Advertisement
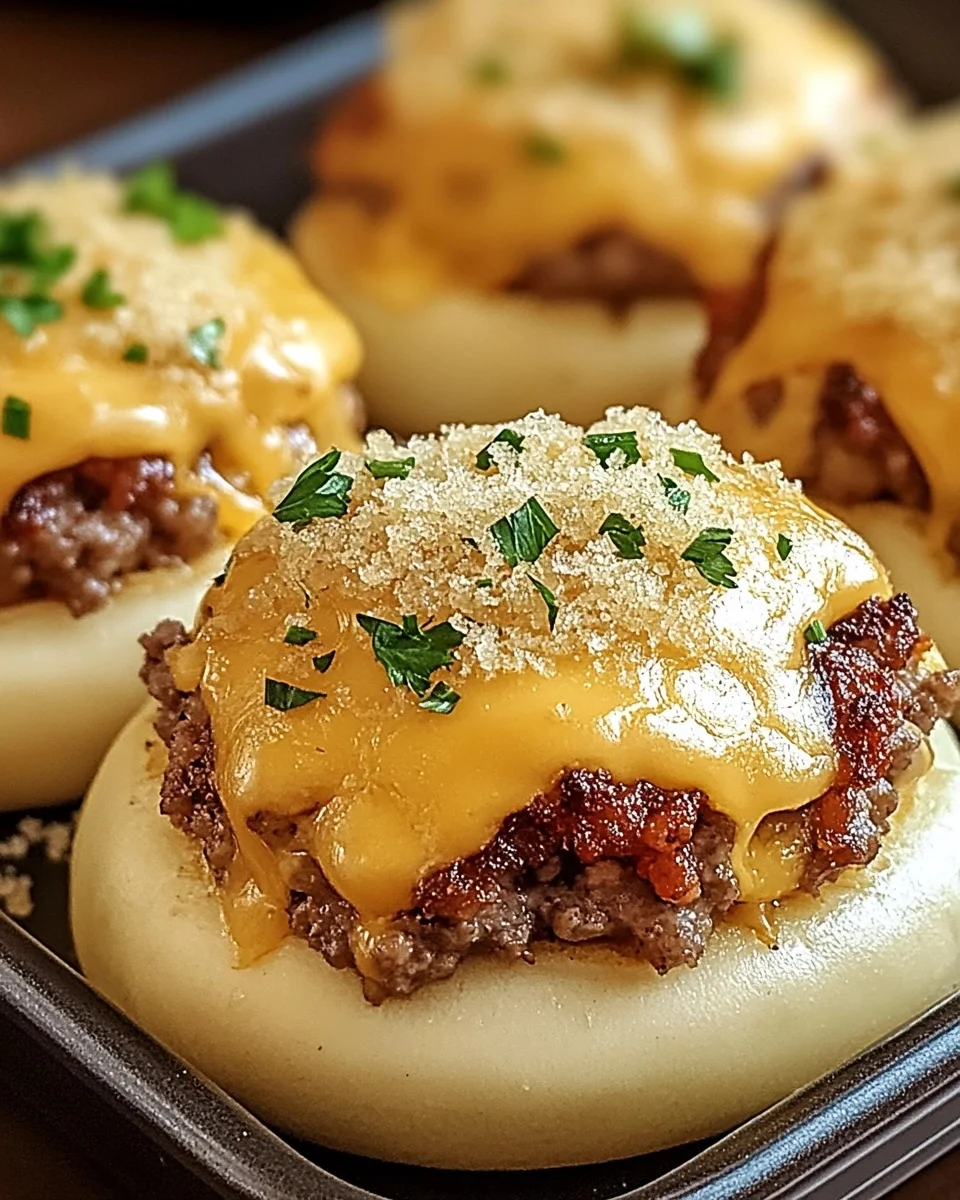
Imagine biting into a warm, golden crust only to discover a savory explosion of garlic-infused beef and oozy, melty cheese inside. Garlic Parmesan Cheeseburger Bombs are the ultimate comfort food that combines the juicy richness of a cheeseburger with the convenience of bite-sized indulgence. Perfect for parties, game nights, or a cozy evening snack, these bombs are sure to impress everyone at the table.
What Are Garlic Parmesan Cheeseburger Bombs?
These cheeseburger bombs are a delicious fusion of classic flavors. They feature a tender biscuit dough exterior, stuffed with seasoned ground beef, sharp Parmesan, creamy cheddar, and a touch of garlic for an irresistible taste. The buttery crust is brushed to golden perfection and garnished with fresh parsley, adding a vibrant finish.
Why You’ll Love This Recipe
- Bursting with Flavor: The combination of garlic, Parmesan, and cheddar delivers a savory punch in every bite.
- Easy to Make: Using pre-made biscuit dough saves time without compromising quality.
- Crowd-Pleasing Appetizer: These bombs are perfect for gatherings, snacks, or even as a fun dinner option for the family.
- Customizable: You can tweak the ingredients to suit your preferences, making this a versatile recipe.
Ingredients You’ll Need
Here’s everything you need to make these cheesy, savory treats:
- Garlic: 2 cloves, minced
- Parmesan Cheese: ½ cup, diced
- Cheddar Cheese: 1 cup, cubed
- Biscuit Dough: 1 can (16.3 oz)
- Ground Beef: 1 pound
- Butter: 2 tablespoons, melted
- Parsley: 1 tablespoon, chopped
Step-by-Step Instructions for Garlic Parmesan Cheeseburger Bombs
1. Prepare the Oven
Preheat your oven to 375°F (190°C). Line a baking sheet with parchment paper for easy cleanup.
Advertisement
2. Cook the Beef and Garlic
In a skillet over medium heat, brown the ground beef. Add the minced garlic and cook until fragrant, about 5-7 minutes. Drain any excess fat and remove the skillet from heat.
3. Mix in the Cheese
Add the diced Parmesan and cubed cheddar cheese to the cooked beef. Stir until the cheese is evenly distributed and begins to melt slightly. Allow the mixture to cool.
4. Flatten the Biscuit Dough
Open the can of biscuit dough and separate the pieces. Flatten each biscuit with your hands or a rolling pin to make space for the filling.
5. Fill and Seal the Bombs
Place a generous spoonful of the beef and cheese mixture in the center of each flattened biscuit. Fold the dough over the filling and pinch the edges to seal completely, forming a bomb shape.
6. Brush with Butter
Arrange the sealed bombs on the prepared baking sheet, seam-side down. Brush the tops with melted butter for a golden crust.
7. Bake to Perfection
Bake in the preheated oven for 12-15 minutes, or until the dough is puffed and golden brown.
8. Garnish and Serve
Once out of the oven, let the bombs cool slightly. Sprinkle with chopped parsley for a fresh garnish and serve warm.
Serving and Storage Tips
- Serve Fresh: These cheeseburger bombs are best enjoyed warm, straight from the oven. Pair them with your favorite dips like ketchup, mustard, or a creamy garlic sauce.
- Leftovers: Store leftovers in an airtight container in the refrigerator for up to 2 days.
- Reheating: Warm them in the oven at 350°F (175°C) for about 10 minutes to maintain their crispy texture.
- Freezing: You can freeze unbaked bombs. Simply thaw and bake them fresh when needed.
Nutritional Information (Per Serving)
| Nutrient | Amount Per Bomb |
|---|---|
| Calories | 240 |
| Protein | 10g |
| Carbohydrates | 15g |
| Fat | 15g |
| Saturated Fat | 8g |
| Sodium | 480mg |
Tips for Perfect Cheeseburger Bombs
1. Use High-Quality Cheese
Good cheese makes a difference. Opt for freshly diced Parmesan and sharp cheddar for the best flavor.
2. Don’t Overfill
Be careful not to overfill the bombs, as this can make them difficult to seal and cause leakage during baking.
3. Add a Flavor Twist
Consider adding diced onions, pickles, or jalapeños to the beef mixture for an extra burst of flavor.
Creative Variations
1. Spicy Cheeseburger Bombs
Add a pinch of chili powder or diced jalapeños to the beef mixture for a spicy kick.
2. BBQ Cheeseburger Bombs
Mix a tablespoon of barbecue sauce into the beef filling for a smoky, tangy twist.
3. Vegetarian Option
Replace the ground beef with cooked lentils or plant-based crumbles for a meatless version.
Frequently Asked Questions
1. Can I make these ahead of time?
Yes, you can prepare the bombs ahead of time and store them in the refrigerator until ready to bake.
2. Can I use homemade biscuit dough?
Absolutely! Homemade dough works perfectly if you prefer a made-from-scratch approach.
3. What dipping sauces pair well with these bombs?
Classic options like ketchup, mustard, ranch dressing, or garlic aioli complement these bombs beautifully.
4. How do I prevent the filling from leaking?
Ensure the edges of the dough are sealed tightly. Pinch them firmly and double-check for any gaps.
5. Can I use other types of cheese?
Yes, feel free to experiment with mozzarella, Gouda, or Swiss cheese for unique flavor combinations.
6. How do I reheat them without drying out?
Reheat them in the oven at a low temperature (350°F) to maintain their moisture and crisp exterior.
Conclusion
Garlic Parmesan Cheeseburger Bombs are more than just a snack—they’re a flavorful adventure in every bite. Whether you’re entertaining guests, feeding your family, or indulging yourself, this recipe is sure to please. With its crispy exterior, cheesy interior, and savory beef filling, these bombs are a guaranteed hit.
Gather your ingredients, follow these simple steps, and enjoy the cheesy goodness of Garlic Parmesan Cheeseburger Bombs today!
Irresistible Garlic Parmesan Cheeseburger Bombs Recipe!
Ingredients
Method
- Preheat your oven to 375°F (190°C) and line a baking sheet with parchment paper.
- In a skillet over medium heat, cook the ground beef until browned. Add the minced garlic and sauté until fragrant, about 5-7 minutes. Drain any excess fat and remove from heat.
- Stir in the diced Parmesan cheese and cubed cheddar cheese until well combined. Allow the mixture to cool slightly.
- Separate the biscuit dough and flatten each piece slightly with your hands or a rolling pin.
- Place a generous spoonful of the beef and cheese mixture in the center of each biscuit. Fold the dough over the filling and pinch the edges tightly to seal.
- Arrange the sealed bombs on the prepared baking sheet, seam-side down. Brush the tops with melted butter for a golden finish.
- Bake for 12-15 minutes, or until the dough is puffed and golden brown.
- Once baked, sprinkle the bombs with chopped parsley for a fresh garnish. Serve warm and enjoy!
Notes
- Customizable: Add a pinch of chili flakes to the filling for a spicy kick, or include diced onions for extra flavor.
- Reheating Tips: Reheat leftovers in the oven at 350°F (175°C) for about 10 minutes to keep the crust crisp.
- Make-Ahead Option: Assemble the bombs and refrigerate them for up to 12 hours before baking.

