Advertisement
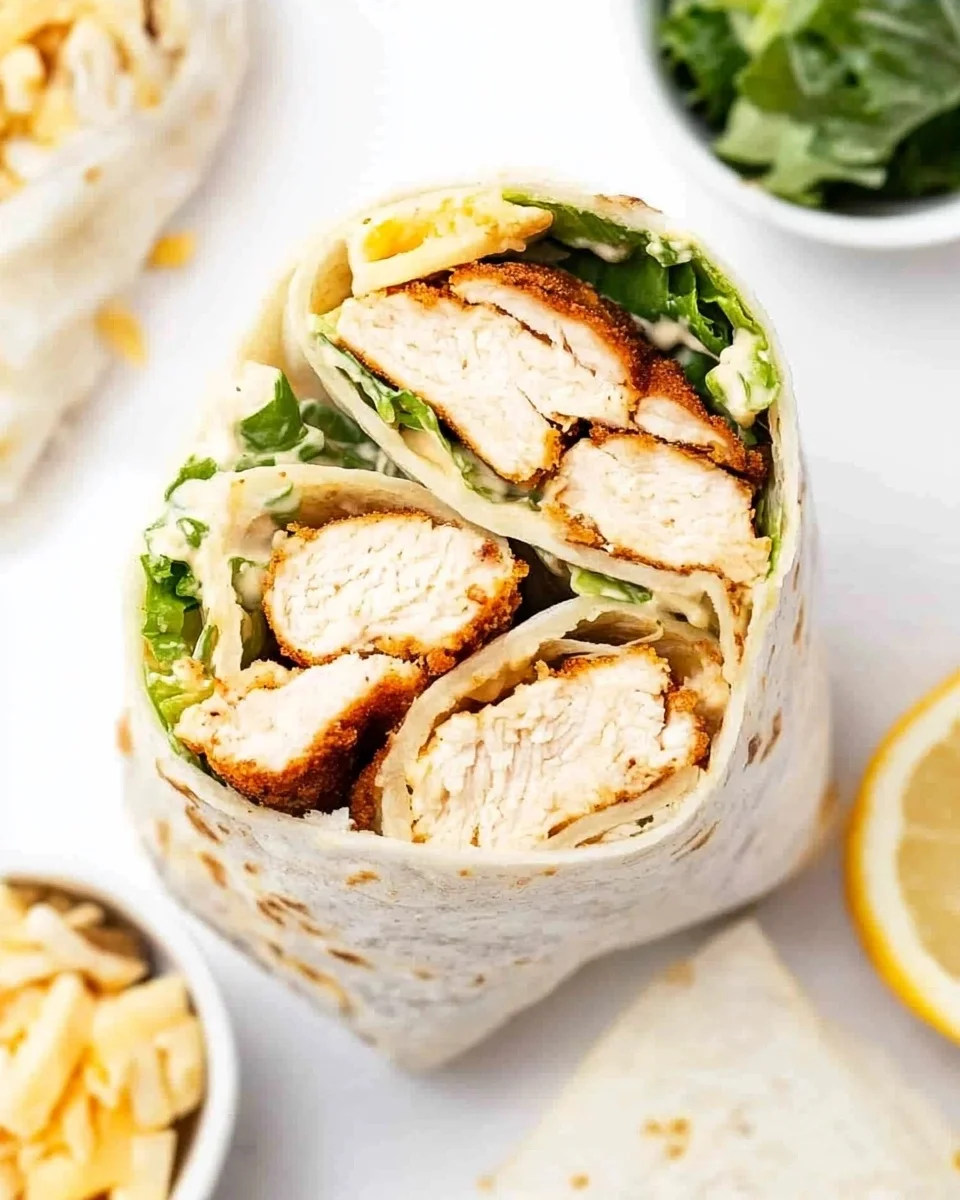
When it comes to quick, hearty, and delicious meals, the Chicken Caesar Wrap stands out as a crowd favorite. Whether you’re packing lunch for work, preparing a family dinner, or whipping up something tasty for a picnic, this wrap combines the tangy flavors of Caesar salad with crispy, golden chicken for a meal that satisfies every craving.
Let’s explore how to make the perfect Chicken Caesar Wrap, step by step.
Why You’ll Love Chicken Caesar Wraps
- Portable and Convenient: Easy to take on the go, making it perfect for lunches or road trips.
- Crunchy and Creamy: The combination of crispy chicken, crisp romaine, and creamy Caesar dressing creates an unbeatable texture.
- Customizable: Add your favorite extras, like bacon or tomatoes, to make it your own.
- Balanced Meal: Packed with protein, greens, and satisfying carbs in every bite.
Ingredients for Chicken Caesar Wraps
For the Chicken:
- 2 large chicken breasts (~1.5 lbs)
- 1 cup flour
- ½ teaspoon salt
- ½ teaspoon pepper
- 2 eggs
- 2 cups panko breadcrumbs
- 1 cup grated Parmesan cheese
- ¼ cup neutral oil (vegetable, smooth olive oil, or avocado oil)
For the Caesar Salad:
- 1 large head of romaine lettuce, chopped
- 1 cup croutons
- 1 cup shredded Parmesan cheese (or grated, depending on preference)
- ½ cup Caesar dressing
For the Wraps:
- 4 extra-large burrito wraps
Step-by-Step Instructions
Step 1: Prepare the Chicken
- Slice each chicken breast in half through the width, creating four thinner pieces.
- Use a meat pounder or rolling pin to pound each piece to ¼-inch thickness for even cooking.
Step 2: Set Up a Coating Station
- Prepare three wide bowls:
- Bowl 1: Mix the flour with salt and pepper.
- Bowl 2: Whisk the eggs until smooth.
- Bowl 3: Combine panko breadcrumbs with grated Parmesan cheese.
- Dredge each chicken piece in the flour, ensuring both sides are coated evenly.
- Dip the chicken into the egg mixture, letting any excess drip off.
- Coat the chicken thoroughly in the breadcrumb mixture, pressing to adhere well.
Step 3: Cook the Chicken
- Heat a large saucepan over medium-high heat and add the oil.
- Once the oil is hot, cook two chicken pieces at a time for 4–5 minutes on each side, until golden brown and fully cooked (internal temperature of 165°F).
- Place the cooked chicken on a paper towel-lined plate to drain excess oil. Repeat with the remaining chicken.
Step 4: Prepare the Caesar Salad
- In a large bowl, combine the chopped romaine lettuce, croutons, shredded Parmesan, and Caesar dressing.
- Toss the salad until everything is evenly coated.
Step 5: Assemble the Wraps
- Slice the chicken cutlets into bite-sized pieces.
- Add the chicken to the salad mixture and toss to combine.
- Place a generous portion of the salad and chicken mixture onto the center of each burrito wrap.
- Fold the sides of the wrap inward, then roll tightly from the bottom to secure the filling.
- Slice each wrap in half for easy serving.
Nutritional Information (Per Wrap)
| Nutrient | Amount |
|---|---|
| Calories | 480 |
| Protein | 34g |
| Fat | 20g |
| Carbohydrates | 38g |
| Fiber | 3g |
Note: Nutritional values may vary based on specific ingredients and serving sizes.
Pro Tips for Perfect Chicken Caesar Wraps
- Use Fresh Ingredients: Fresh lettuce and high-quality Caesar dressing make a noticeable difference in flavor.
- Customize the Protein: Substitute chicken with crispy tofu or grilled shrimp for a different twist.
- Keep It Crunchy: Only assemble the wraps just before serving to keep the lettuce and croutons from getting soggy.
- Warm the Wraps: Lightly heat the burrito wraps in a skillet or microwave for easier rolling and a softer texture.
- Double-Bread the Chicken: For extra crunch, repeat the flour and breadcrumb steps for a thicker coating.
Serving Suggestions
- Pair with Sides: Serve with sweet potato fries, potato chips, or a cup of tomato soup for a complete meal.
- Dipping Sauces: Offer extra Caesar dressing, ranch, or honey mustard for dipping.
- On-the-Go: Wrap the Chicken Caesar Wraps tightly in foil or parchment paper for a portable lunch option.
FAQ: Chicken Caesar Wrap
1. Can I make these wraps ahead of time?
Yes, but it’s best to store the salad, chicken, and wraps separately to avoid sogginess. Assemble just before eating.
Advertisement
2. Can I bake the chicken instead of frying?
Absolutely! Bake the coated chicken at 400°F for 20–25 minutes, flipping halfway through, until golden brown and fully cooked.
3. What type of wrap should I use?
Extra-large burrito wraps work best to hold all the fillings securely. You can also use whole wheat, spinach, or gluten-free wraps.
4. How do I store leftovers?
Store the chicken and salad in separate airtight containers in the refrigerator for up to 2 days. Reheat the chicken before assembling the wraps.
5. Can I use store-bought Caesar dressing?
Yes! Use your favorite store-bought Caesar dressing, or make your own for a fresher flavor.
6. Can I freeze the chicken?
Fried chicken cutlets can be frozen for up to 3 months. Thaw in the refrigerator and reheat in the oven before use.
Why You Should Try Chicken Caesar Wraps
This Chicken Caesar Wrap recipe brings together the best of two worlds: the crunch and flavor of Caesar salad with the heartiness of crispy chicken and a wrap. It’s easy to prepare, versatile, and perfect for any occasion. Whether you’re hosting friends, feeding your family, or meal-prepping for the week, this dish delivers every time.
Get Wrapping!
Now that you have all the steps and tips, it’s time to make your own delicious Chicken Caesar Wraps. Grab your ingredients, follow the instructions, and enjoy a meal that’s sure to become a household favorite.
Grilled Chicken Caesar Salad Wrap
Ingredients
Method
- Slice each chicken breast in half horizontally to create four thinner pieces.
- Pound the chicken pieces to ¼-inch thickness using a meat mallet or rolling pin.
- In one bowl, combine the flour, salt, and pepper.
- In another bowl, whisk the eggs.
- In a third bowl, mix the panko breadcrumbs with grated Parmesan cheese.
- Dredge each chicken piece in the flour mixture, ensuring it’s fully coated.
- Dip into the whisked eggs, letting excess drip off.
- Press into the breadcrumb mixture, covering the chicken entirely.
- Heat the oil in a large skillet over medium-high heat.
- Fry the chicken in batches, cooking 4–5 minutes on each side until golden brown and cooked through (internal temperature of 165°F).
- Transfer to a paper towel-lined plate to drain excess oil.
- In a large bowl, combine chopped romaine, croutons, shredded Parmesan, and Caesar dressing. Toss until well coated.
- Once slightly cooled, slice the chicken into bite-sized strips. Add to the salad and toss to combine.
- Lay a burrito wrap flat and place a generous amount of the chicken Caesar mixture in the center.
- Fold the sides inward, then roll tightly from the bottom to create a wrap.
- Slice in half and serve.
Notes
- Make Ahead: Store the chicken, salad, and wraps separately in the refrigerator. Assemble the wraps just before serving to keep them fresh.
- Customizations: Add crispy bacon, sliced tomatoes, or avocado for extra flavor.
- Healthier Option: Use grilled chicken instead of fried chicken to cut down on calories.
- Storage: Leftovers can be refrigerated for up to 2 days. Reheat the chicken in the oven or air fryer to maintain its crispiness.


