Advertisement
Sweet Heat Pickles are a delicious twist on classic dill pickles, combining the tangy crunch you love with a kick of heat and a touch of sweetness. Infused with sugar, garlic, jalapeños, and red pepper flakes, these pickles pack a punch of flavor in every bite. Whether you’re snacking, serving them as a side, or adding them to your favorite sandwiches, Sweet Heat Pickles are sure to become a household favorite.
Why You’ll Love Sweet Heat Pickles
Pickles are a snack-time staple, but Sweet Heat Pickles take things to a whole new level. Imagine the perfect combination of tangy dill pickles, sweet sugar syrup, and a spicy heat that builds with every bite. These pickles are as versatile as they are addictive—perfect for parties, BBQs, or simply keeping a jar in the fridge for whenever you need a flavorful crunch.
This recipe is easy to make, doesn’t require any complicated canning techniques, and can be customized to your heat preference. Whether you love just a little zing or want a fiery kick, Sweet Heat Pickles are designed to please your taste buds.
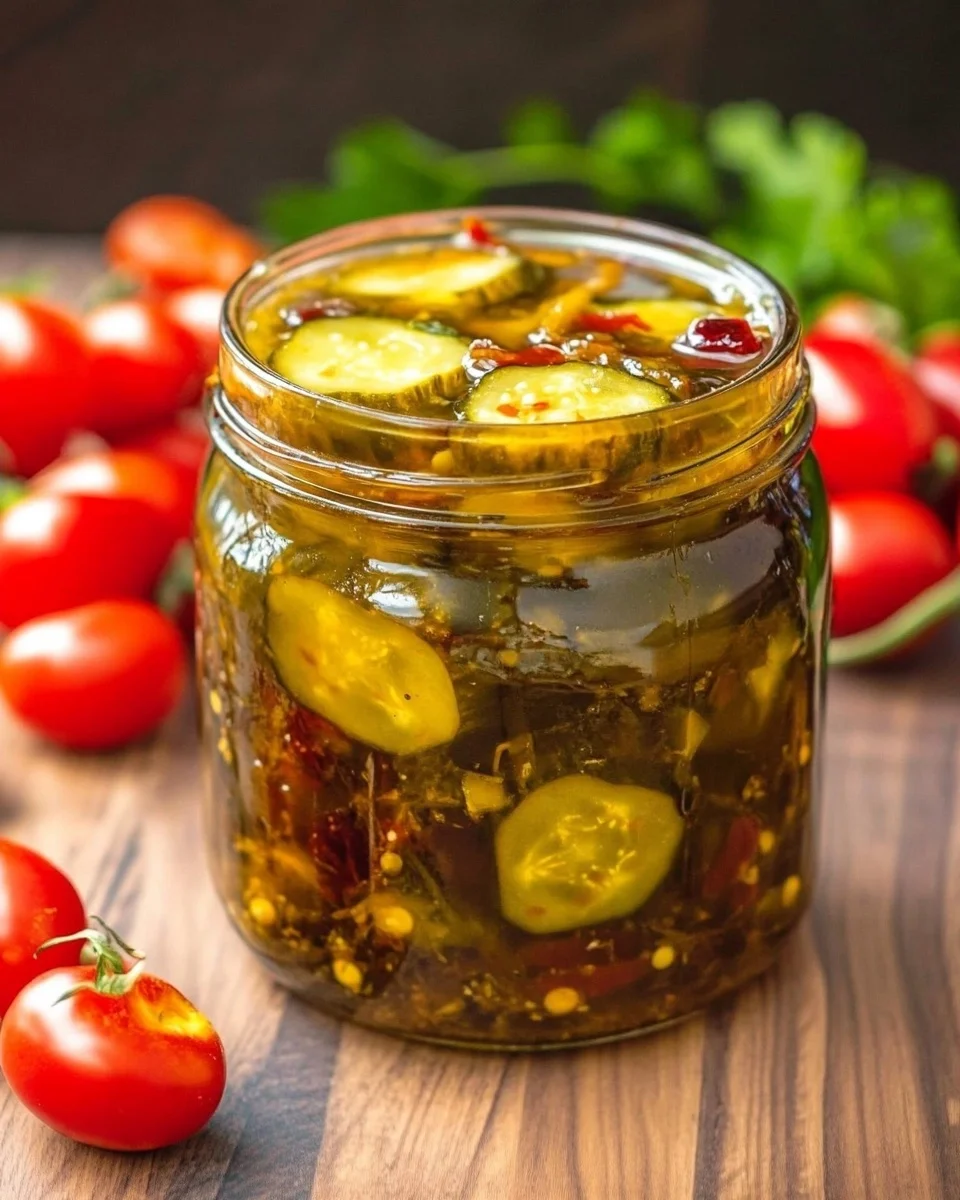
What Are Sweet Heat Pickles?
Sweet Heat Pickles are dill pickles transformed into a flavorful masterpiece by layering them with sugar, minced garlic, fresh jalapeños, red pepper flakes, and parsley. The sugar melts into a sweet syrup, balancing out the heat from the peppers, creating a pickle that’s sweet, spicy, and irresistible.
Advertisement
These pickles don’t require brine or extensive preparation, making them one of the easiest homemade pickle recipes you can try. They’re perfect for anyone who loves bold flavors and enjoys a unique twist on traditional pickles.
Ingredients for Sweet Heat Pickles
Here’s everything you’ll need to make this irresistible treat:
- 1 large jar (about 46 oz) plain dill pickles
- 2 cups sugar
- 6 cloves garlic, minced
- 2 teaspoons fresh jalapeño, chopped (adjust depending on how much heat you like)
- 2 teaspoons red pepper flakes
- 2 teaspoons parsley, chopped
Nutritional Information (Per Serving)
| Nutrient | Amount |
|---|---|
| Calories | 50 per serving |
| Carbohydrates | 12g |
| Sugar | 10g |
| Protein | 0.5g |
| Fat | 0g |
| Sodium | 200mg |
Step-by-Step Instructions for Sweet Heat Pickles
1. Drain and Slice the Pickles
- Open the jar of dill pickles and drain the juice completely. Discard the pickle juice.
- Slice the pickles into ¼ to ½-inch thick pieces, depending on your preference.
2. Prepare a Larger Jar
- Save the original pickle jar to store your finished pickles later, or use a larger jar if needed to allow room for layering.
3. Layer the Pickles with Sugar and Spices
- Start layering the pickles in the jar:
- Add about 1 ½ cups of pickles to the jar.
- Top the layer with ½ cup of sugar, 2 cloves of minced garlic, ½ teaspoon of red pepper flakes, and ½ teaspoon of chopped jalapeños.
- Repeat the layers until all the pickles are used up.
- Pour any remaining sugar on top to ensure it fully dissolves during the resting process.
4. Let the Sugar Liquefy
- Cover the jar with a lid and leave it on the counter for about an hour, or until the sugar begins to dissolve and liquefy into syrup.
5. Mix the Pickles
- Stir the mixture or shake the jar gently to mix the pickles and distribute the syrup evenly. Make sure to pull any undissolved sugar up from the bottom.
6. Rest the Pickles
- Leave the jar on the counter for several more hours or overnight. This allows the pickles to fully absorb the flavors of the sugar, garlic, and spices.
7. Refrigerate the Pickles
- After resting at room temperature, refrigerate the pickles for 1-2 additional days. This helps them firm up and intensifies the flavor.
Why This Recipe Works
1. A Flavor Explosion
The combination of sweet sugar, spicy peppers, and savory garlic creates a unique pickle that hits every flavor note.
2. No Special Equipment Needed
You don’t need any fancy canning tools or equipment to make Sweet Heat Pickles. Just a jar and a little patience!
3. Fully Customizable
You can adjust the level of heat by adding more or less jalapeños and red pepper flakes. Prefer them less sweet? Simply reduce the sugar.
4. Long Shelf Life
Once refrigerated, these pickles stay fresh for weeks, so you can enjoy them anytime.
Tips for Making the Best Sweet Heat Pickles
- Choose High-Quality Pickles: Start with a jar of good-quality dill pickles for the best flavor and texture.
- Adjust the Heat: For milder pickles, use less red pepper flakes and jalapeños. For a fiery kick, add more.
- Don’t Skip the Resting Time: Letting the pickles sit on the counter and in the fridge allows the flavors to fully develop.
- Experiment with Add-Ins: Add a few slices of onions or bell peppers for an extra layer of flavor.
- Shake the Jar Often: During the resting period, shake the jar occasionally to keep the sugar and spices evenly distributed.
Serving Suggestions for Sweet Heat Pickles
- As a Snack: Enjoy them straight out of the jar for a sweet and spicy snack.
- On Sandwiches: Add these pickles to burgers, sandwiches, or sliders for a burst of flavor.
- With BBQ: Serve them as a side at your next BBQ—they pair perfectly with grilled meats.
- In Salads: Chop them up and add them to potato salads or coleslaws for a tangy twist.
- On a Charcuterie Board: Use them as a standout element on your cheese and meat board.
FAQs About Sweet Heat Pickles
1. How long do Sweet Heat Pickles last?
Once refrigerated, these pickles will stay fresh for up to 4 weeks. Keep them in an airtight jar to maintain their flavor and crunch.
2. Can I use pickles other than dill pickles?
Yes! You can use bread-and-butter pickles or kosher pickles, but the flavor profile may change slightly.
3. Are these pickles spicy?
The heat level depends on the amount of jalapeños and red pepper flakes you use. You can adjust the spice to your preference.
4. Can I use pre-sliced pickles?
Absolutely! Pre-sliced pickles save time and work just as well in this recipe.
5. Do I need to sterilize the jar?
Since these pickles are not canned for long-term storage, sterilizing the jar isn’t necessary. Just make sure it’s clean and dry before use.
6. Can I add other vegetables to the mix?
Yes, you can add sliced onions, bell peppers, or even carrots for a more colorful and flavorful mix.
Conclusion: Try Sweet Heat Pickles Today!
Sweet Heat Pickles are a game-changer for anyone who loves bold, exciting flavors. With the perfect balance of sweetness, tanginess, and heat, these pickles are versatile, easy to make, and absolutely delicious. Whether you’re serving them at a backyard BBQ, using them to spice up your sandwiches, or simply enjoying them as a snack, these pickles are guaranteed to impress.
Sweet Heat Pickles – Quick & Easy Snack with a Kick
Ingredients
Method
- Open the jar of dill pickles and pour out the pickle juice (discard it).
- Slice the pickles into ¼ to ½-inch thick rounds, depending on your preference.
- Save the original pickle jar or use a larger jar if needed to make layering easier.
- Add 1 ½ cups of pickles to the bottom of the jar.
- Top the pickles with ½ cup sugar, 2 cloves of minced garlic, ½ teaspoon red pepper flakes, and ½ teaspoon chopped jalapeños.
- Repeat the layering process until all the pickles are used. Pour any remaining sugar on top to ensure it dissolves completely during the resting process.
- Cover the jar with a lid and let it sit on the counter for about 1 hour, or until the sugar begins to liquefy into a syrup.
- Gently shake the jar or stir the contents to evenly coat the pickles in the syrup. Make sure to pull any undissolved sugar from the bottom.
- Allow the pickles to sit on the counter for several more hours, or overnight, to fully absorb the flavors.
- Transfer the jar to the refrigerator and chill for 1-2 additional days before serving. This resting time enhances the flavor and texture of the pickles.
- Serve the pickles as a snack, side dish, or topping for burgers, sandwiches, or salads.
Notes
- Adjust the Spice Level: If you prefer less heat, reduce the amount of jalapeños and red pepper flakes. For more heat, add extra jalapeños or even a pinch of cayenne pepper.
- Customize the Flavor: Feel free to add additional ingredients like sliced onions, carrots, or bell peppers for a more colorful and flavorful pickle mix.
- Shake the Jar Often: During the resting process, gently shake the jar to keep the sugar and spices evenly distributed.
- Storage: Once refrigerated, Sweet Heat Pickles can last for up to 4 weeks. Make sure to keep them in an airtight jar.
- Serving Tip: Pair these pickles with BBQ dishes, grilled meats, or even a charcuterie board for a burst of flavor.