Advertisement
Chocolate-Covered Strawberry Cake Pops: A Sweet Treat for Any Occasion
Chocolate-covered strawberry cake pops are the perfect combination of rich chocolate, fluffy strawberry cake, and a creamy, smooth texture. These bite-sized delights are not only visually appealing but also incredibly delicious, making them an excellent choice for parties, celebrations, or just a fun weekend baking project.
With their convenient size, these cake pops are easy to eat, mess-free, and ideal for gifting or serving at events. Whether you’re making them for a Valentine’s Day treat, a birthday dessert table, or simply to satisfy your sweet tooth, chocolate-covered strawberry cake pops are guaranteed to impress.
In this article, we’ll explore the origins of cake pops, the best techniques for making them, creative variations, health benefits (yes, even cake pops have some!), and frequently asked questions about this delightful dessert.
The Rise of Cake Pops: A Modern Dessert Sensation
Cake pops became a viral baking trend in the early 2010s, thanks to their fun presentation and easy-to-eat nature. While cake has been a dessert staple for centuries, the idea of rolling crumbled cake with frosting into bite-sized spheres and dipping them in chocolate took the baking world by storm.
Advertisement
The popularity of cake pops skyrocketed when they became a staple at coffee shops, bakeries, and dessert buffets. They allowed for endless creativity, from different flavors to artistic decorations, making them a go-to treat for celebrations of all kinds.
Chocolate-covered strawberry cake pops take this trend a step further by combining the classic flavor pairing of strawberries and chocolate. The result? A dessert that is both elegant and playful.
Why You’ll Love Chocolate-Covered Strawberry Cake Pops
1. A Perfect Balance of Flavors
The combination of sweet, fruity strawberry cake and rich, velvety chocolate creates a satisfying contrast that keeps you coming back for more.
2. Ideal for Special Occasions
These cake pops are a stunning addition to dessert tables for birthdays, weddings, baby showers, and holiday celebrations. Their bite-sized form makes them easy for guests to grab and enjoy.
3. Fun and Easy to Make
Making cake pops is an enjoyable baking activity that allows you to get creative with decorations, flavors, and presentation. They’re also a great project to do with kids!
4. Customizable for Any Preference
You can change the flavor of the cake, switch up the type of chocolate coating, or add toppings like sprinkles, crushed nuts, or drizzle designs.
5. Mess-Free and Portable
Unlike traditional cake slices, cake pops are served on a stick, making them easy to handle and reducing mess. This makes them perfect for parties, lunchbox treats, or gifts.
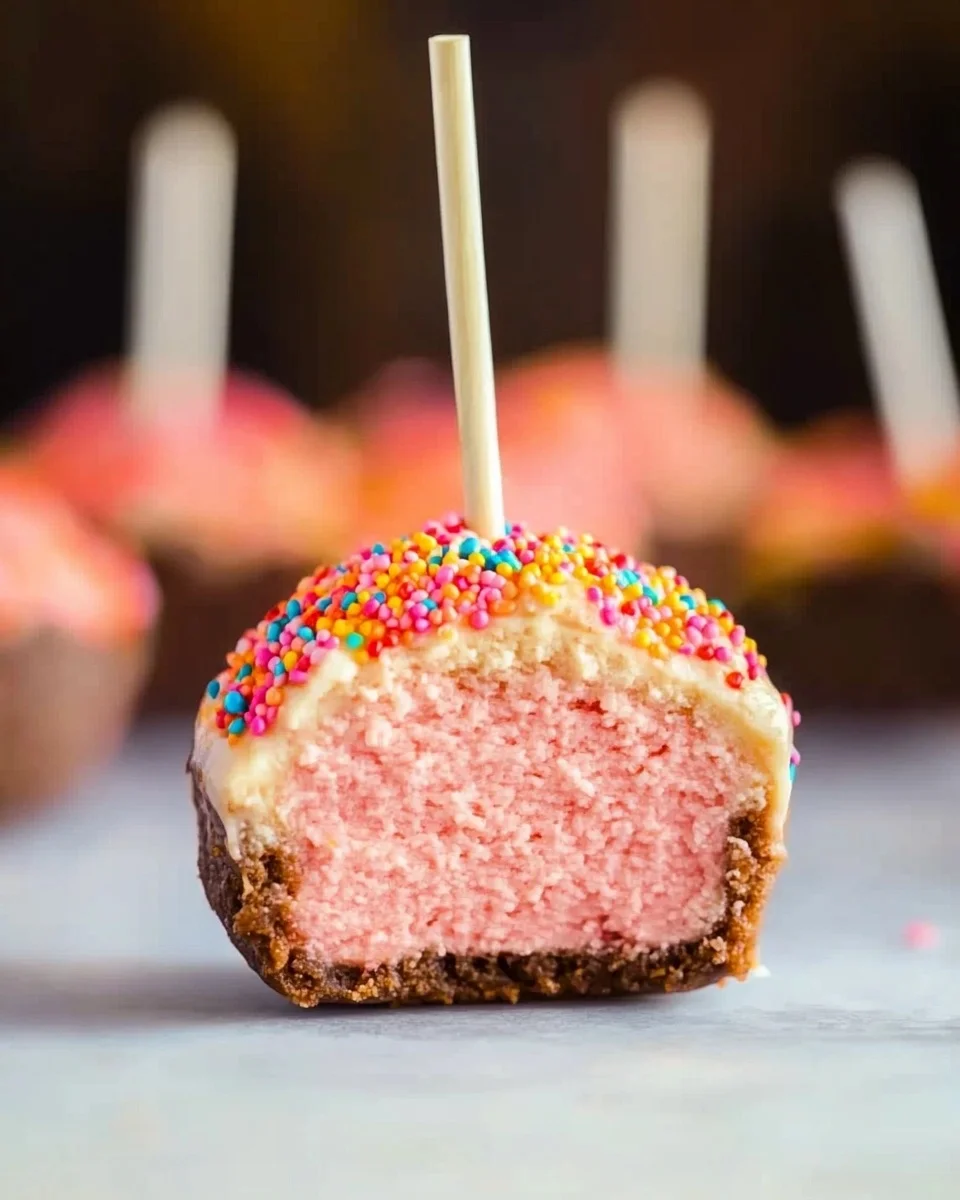
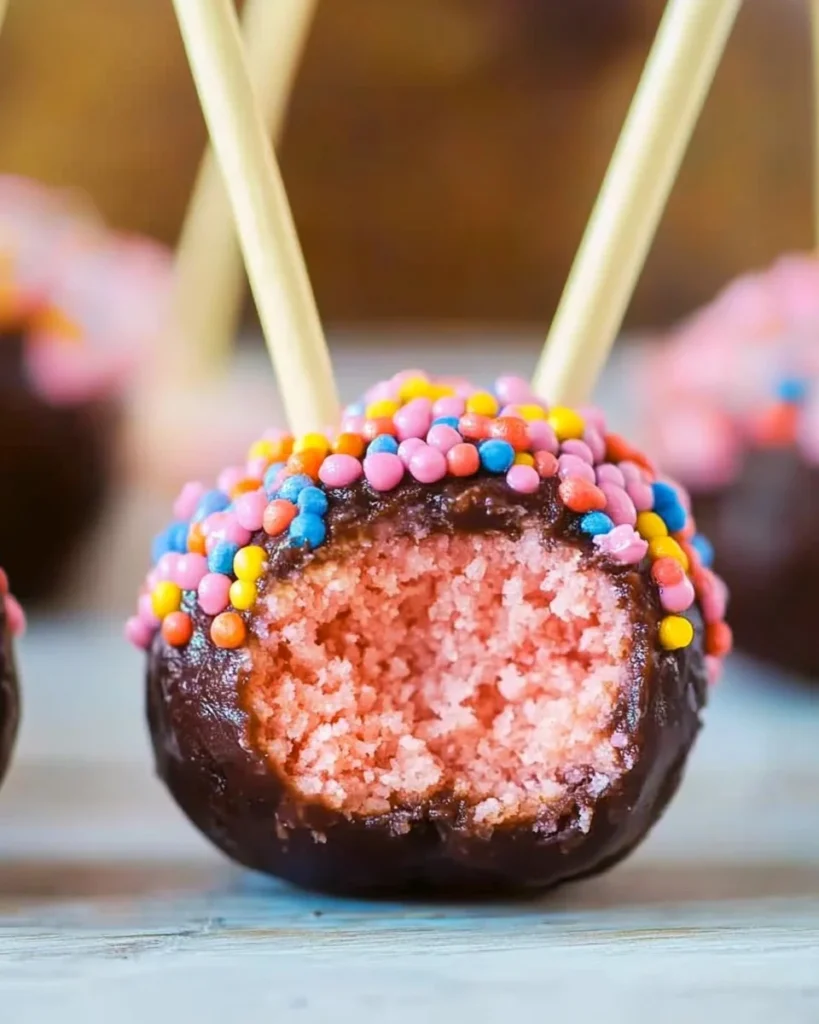
Chocolate-Dipped Strawberry Delight Pops
Ingredients:
- 1 box (15.25 ounces) strawberry cake mix
- 1 cup water
- ½ cup vegetable oil
- 3 large eggs
- 2 tablespoons white frosting
- 12 ounces milk chocolate chips
- Sprinkles (optional, for garnish)
Directions:
- Prepare the Cake: Preheat your oven according to the cake mix package instructions. In a large bowl, combine the strawberry cake mix, water, vegetable oil, and eggs. Mix until well blended. Pour the batter into a 9×13-inch baking pan and bake as directed on the package. Once baked, allow the cake to cool completely.
- Crumble the Cake: Once the cake has cooled, crumble it into fine pieces using a fork or your hands, placing the crumbs into a large mixing bowl.
- Combine with Frosting: Add the white frosting to the cake crumbs. Using your hands, mix until the mixture holds together and can form a ball. If the mixture is too dry, add more frosting, one tablespoon at a time, until the desired consistency is achieved.
- Form Cake Balls: Roll the mixture into 1-inch balls and place them on a baking sheet lined with parchment paper.
- Insert Sticks: Melt a small amount of the milk chocolate chips. Dip the tip of each cake pop stick into the melted chocolate, then insert it halfway into each cake ball. This helps secure the stick in place.
- Chill: Place the cake pops in the refrigerator for about 1 hour to firm up.
- Coat with Chocolate: Melt the remaining milk chocolate chips in a microwave-safe bowl, heating in 30-second intervals and stirring between each until smooth. Dip each cake pop into the melted chocolate, allowing any excess to drip off. If desired, add sprinkles before the chocolate sets.
- Set and Serve: Place the coated cake pops upright in a styrofoam block or a prepared stand to allow the chocolate to set completely. Once set, they are ready to be enjoyed.
Nutritional Information (per serving):
- Calories: Approximately 201
- Total Fat: 11g
- Saturated Fat: 3g
- Cholesterol: 27mg
- Sodium: 161mg
- Total Carbohydrates: 25g
- Protein: 2g
Note: Nutritional values are approximate and may vary based on specific ingredients used.
How to Make Cake Pops Like a Pro
Making cake pops might seem intimidating at first, but with a few key tips, you can achieve a professional-looking and delicious result:
1. Use the Right Cake-to-Frosting Ratio
Adding too much frosting can make the cake pops too soft and difficult to shape. A small amount (about two tablespoons per cake batch) is usually enough to create a smooth texture without making them mushy.
2. Chill Before Dipping
Refrigerating the cake balls for at least an hour before dipping helps them hold their shape when coated in chocolate. If they’re too soft, they may fall apart.
3. Melt Chocolate Properly
For a smooth and glossy finish, melt the chocolate slowly using a microwave or double boiler. Stir between intervals to prevent overheating, which can cause the chocolate to seize.
4. Dip the Sticks in Chocolate First
Dipping the cake pop sticks into a small amount of melted chocolate before inserting them into the cake balls helps secure them in place and prevents them from sliding off.
5. Let the Chocolate Set Completely
Allow the coated cake pops to stand upright until the chocolate fully hardens. You can use a styrofoam block or a cake pop stand to keep them upright.
Creative Variations of Chocolate-Covered Strawberry Cake Pops
If you love experimenting in the kitchen, here are some fun variations to try:
1. White Chocolate Strawberry Cake Pops
Instead of milk or dark chocolate, coat the cake pops in melted white chocolate for a sweeter and creamier flavor. You can also add pink food coloring for a pastel finish.
2. Dark Chocolate Drizzle
For a more sophisticated look, dip the cake pops in milk chocolate and drizzle with melted dark chocolate for contrast.
3. Chocolate Strawberry Cheesecake Pops
Mix a little cream cheese frosting into the cake for a rich, cheesecake-like texture.
4. Sprinkle and Decorate
Roll the cake pops in sprinkles, crushed freeze-dried strawberries, or shredded coconut while the chocolate coating is still wet for added texture and color.
5. Valentine’s Day Special
Add heart-shaped sprinkles or edible glitter to make these cake pops perfect for a romantic occasion.
Health Benefits of Chocolate and Strawberries
While cake pops are an indulgent treat, some of their ingredients have surprising health benefits:
1. Strawberries Are Packed with Antioxidants
Strawberries contain vitamin C and antioxidants that support immune health and skin vitality.
2. Dark Chocolate Has Heart-Healthy Benefits
If you opt for dark chocolate, you’ll get a dose of flavonoids, which can improve heart health and reduce inflammation.
3. A Small Treat Can Curb Sugar Cravings
Cake pops provide built-in portion control—one or two can satisfy a sweet tooth without overindulging.
Frequently Asked Questions (FAQs)
1. Can I Make Cake Pops in Advance?
Yes! Cake pops can be made ahead of time and stored in the refrigerator for up to 5 days. You can also freeze them for longer storage.
2. How Do I Prevent Cake Pops from Cracking?
If the cake balls are too cold when dipped into warm chocolate, the temperature difference can cause cracking. Let them sit at room temperature for a few minutes before dipping.
3. What’s the Best Way to Store Cake Pops?
Store them in an airtight container in the fridge or at room temperature if serving the same day. If freezing, wrap them individually in plastic wrap to prevent freezer burn.
4. Can I Use a Different Cake Flavor?
Absolutely! While strawberry cake pairs beautifully with chocolate, you can use vanilla, red velvet, or even lemon cake for a different flavor experience.
5. How Do I Make Cake Pops Without a Stick?
You can serve them as cake truffles by placing them in mini cupcake liners instead of using sticks.
6. What’s the Best Chocolate to Use for Dipping?
High-quality chocolate or candy melts work best. Avoid chocolate chips alone, as they can be too thick for dipping.
Conclusion: A Treat That’s as Fun to Make as It Is to Eat
Chocolate-covered strawberry cake pops are a delightful, bite-sized dessert that brings together the best of both worlds—fruity strawberry cake and luscious chocolate coating. Whether you’re making them for a celebration, as a gift, or just for fun, they are guaranteed to impress with their delicious taste and beautiful presentation.
Their versatility, portability, and ability to be customized make them a staple in the world of desserts. With the right techniques and a little creativity, you can make professional-quality cake pops that will rival any bakery.
So, the next time you’re craving something sweet, give these chocolate-covered strawberry cake pops a try—you won’t be disappointed!
Looking for more dessert ideas? Stay tuned for more recipes that bring fun and flavor to your kitchen!