Advertisement
The first time I tasted homemade cream cheese mints, I was a child rummaging through my grandmother’s china cabinet, looking for a treat. She always had a crystal dish filled with delicate, pastel-colored mints. Their smooth, creamy texture and refreshing burst of peppermint were unlike any candy I had ever tried.
“These aren’t just candies,” Grandma would say with a knowing smile, “They’re made with love.”
She made them for weddings, baby showers, Christmas gatherings, and sometimes just because she knew we loved them. I can still picture her, carefully pressing each one with a fork, turning a simple recipe into a tradition that brought our family together. Now, whenever I make these mints, I feel a connection to those sweet childhood memories, and I hope this recipe becomes just as special for you.
A Nostalgic Treat with a Timeless Appeal
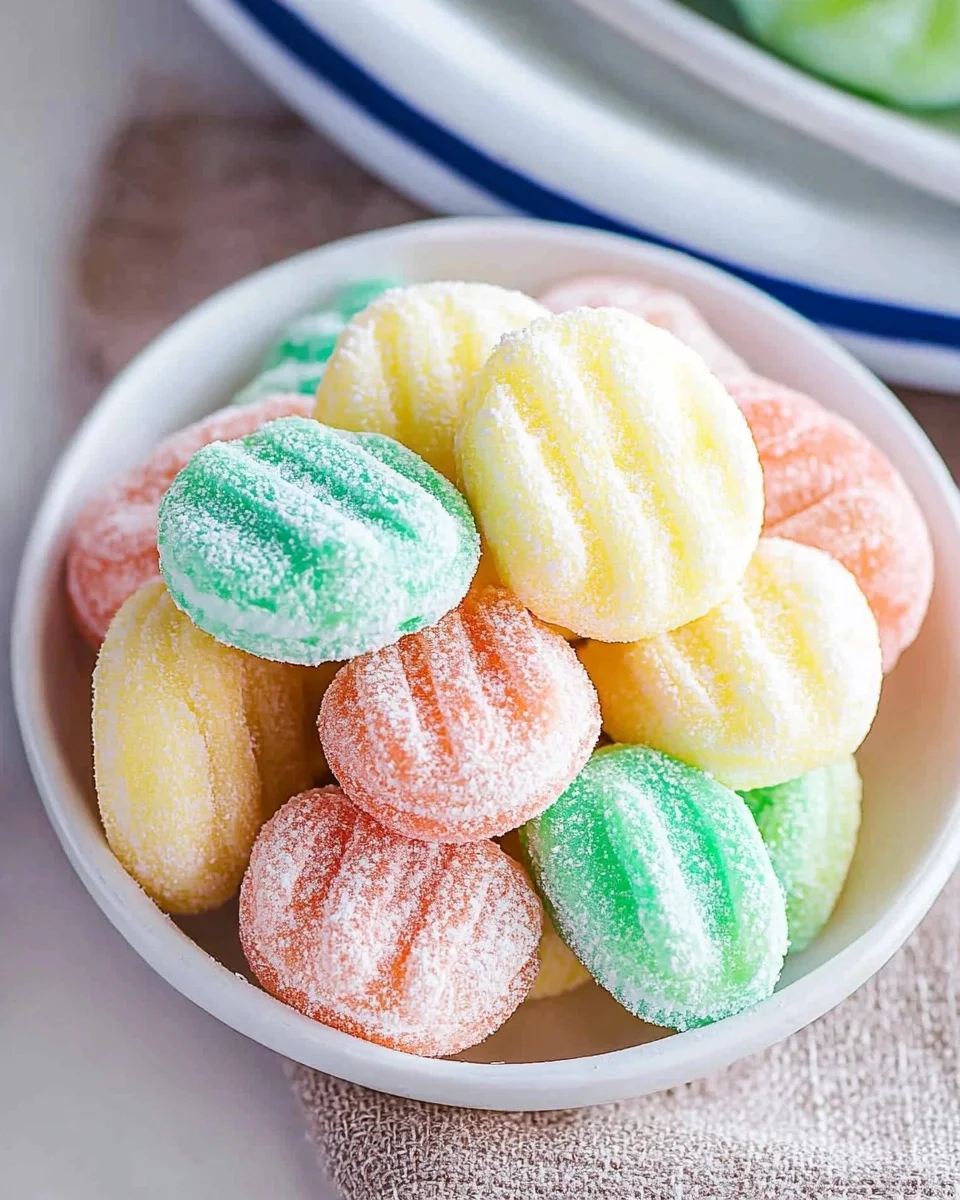
Cream cheese mints have been a staple at celebrations for generations. Their origins can be traced back to Midwestern and Southern kitchens, where they were made for weddings, graduations, and holiday gatherings. Unlike store-bought mints, these homemade versions offer a rich, creamy texture and a refreshing burst of flavor that lingers.
Advertisement
What makes them so beloved is their versatility—you can shape them into elegant rounds, press them with a fork for a rustic look, or use decorative molds to create hearts, flowers, or holiday designs. Their soft, melt-in-your-mouth texture makes them a delightful treat that complements any occasion.
Why You’ll Fall in Love with This Recipe
- No-Bake Simplicity – No need to turn on the oven! These mints come together quickly and require only drying time.
- Customizable Flavors & Colors – While peppermint is the classic choice, you can easily swap in almond, vanilla, or lemon extract. A few drops of food coloring allow you to match them to any celebration.
- Perfect for Any Occasion – Weddings, baby showers, birthdays, and holidays—these mints always make an elegant and delicious addition.
- Long-Lasting & Freezer-Friendly – Make them ahead of time and store them for weeks. They taste just as fresh days later!
Ingredients:
- 8 oz (225g) cream cheese, softened
- ¼ cup (57g) unsalted butter, softened
- 2 pounds (approximately 7 ½ cups or 900g) powdered sugar, divided
- 1 ½ teaspoons pure mint extract
- Gel food coloring (optional)
Directions:
- Creamy Base Creation: In a large mixing bowl, use an electric mixer to beat the softened cream cheese and butter until the mixture is smooth and creamy.
- Sweetening the Mix: Gradually add 4 cups of powdered sugar to the cream cheese mixture, one cup at a time, mixing thoroughly after each addition until fully incorporated.
- Infusing Mint Flavor: Stir in the pure mint extract, ensuring it’s evenly distributed throughout the mixture.
- Achieving the Right Consistency: Gradually add the remaining powdered sugar, mixing thoroughly until a stiff, non-sticky dough forms. If the dough remains sticky, add more powdered sugar as needed.
- Adding a Splash of Color (Optional): Divide the dough into portions based on the number of desired colors. Add a small amount of gel food coloring to each portion and knead until the color is evenly distributed.
- Shaping the Mints: Roll the dough into small balls, about 1 teaspoon each. Place them on a parchment-lined baking sheet. Using a fork dipped in powdered sugar, gently press each ball to create a decorative pattern.
- Setting the Mints: Allow the mints to air dry at room temperature for at least 2 hours. Once set, they can be refrigerated or frozen for longer storage.
Nutritional Information (Per Mint):
- Calories: 50 kcal
- Carbohydrates: 10g
- Fat: 1g
- Protein: 0.1g
- Sodium: 14mg
- Sugar: 10g
Tips for the Perfect Cream Cheese Mints
1. Use Softened Cream Cheese and Butter
For the smoothest consistency, ensure your cream cheese and butter are fully softened before mixing. This prevents lumps and creates a silky dough.
2. Gradually Add Powdered Sugar
Too much sugar at once can make the mixture hard to mix. Add it slowly, incorporating it fully for a creamy, lump-free dough.
3. Get Creative with Shapes
Use a fork for the classic ridged look, roll into simple balls, or press into silicone molds for unique shapes. You can even pipe them out for a decorative touch.
4. Allow Proper Drying Time
These mints need to dry at room temperature for at least two hours before storing. This ensures they hold their shape while remaining soft.
5. Store Properly
Refrigerate in an airtight container for up to two weeks or freeze them for up to two months. Separate layers with parchment paper to prevent sticking.

Creative Variations to Try
1. Chocolate-Dipped Mints
Once set, dip half of each mint in melted chocolate and let them harden for an elegant touch.
2. Citrus Zest Mints
Swap out the peppermint extract for lemon or orange extract and add a bit of citrus zest for a refreshing, summery twist.
3. Holiday Spice Mints
For a festive flavor, try adding a dash of cinnamon or nutmeg to the mix and use warm-colored food dyes like red and gold.
4. Sprinkle-Coated Mints
Roll the mints in colorful sanding sugar or sprinkles before drying to add a pop of texture and color.
Frequently Asked Questions (FAQs)
1. Can I make these without mint extract?
Yes! You can substitute vanilla, almond, coconut, or citrus extracts for different flavors.
2. How long do cream cheese mints last?
They stay fresh for up to two weeks in the refrigerator and up to two months in the freezer.
3. Can I make these ahead of time for an event?
Absolutely! Since they store well, they’re a great make-ahead treat for weddings, holidays, and parties.
4. My dough is too sticky—what should I do?
Gradually add more powdered sugar, one tablespoon at a time, until the dough becomes firm but still pliable.
5. Do I need to refrigerate them after drying?
Yes, due to the dairy content, it’s best to keep them in the fridge or freezer for freshness.
6. Can I use liquid food coloring instead of gel?
Yes, but gel food coloring is preferred because it won’t alter the dough’s consistency like liquid coloring might.
Conclusion: A Classic Treat for Every Occasion
Homemade cream cheese mints are more than just a delicious candy—they’re a tradition, a memory, and a symbol of love and celebration. Their rich, creamy texture combined with a refreshing minty kick makes them an irresistible treat that brings joy to every occasion.
Whether you’re making them for a wedding, a holiday gathering, or just to have a sweet treat on hand, these melt-in-your-mouth mints will always impress. So gather your powdered sugar, mix up a batch, and start creating memories, one delicious bite at a time.
Melt-in-Your-Mouth Cream Cheese Mints
Ingredients
Method
- In a large mixing bowl, beat the softened cream cheese and butter together until smooth and creamy.
- Gradually add 4 cups of powdered sugar, mixing well after each addition until fully incorporated.
- Stir in the mint extract and mix until combined.
- Gradually add the remaining powdered sugar, continuing to mix until a stiff dough forms. If the dough is sticky, add more powdered sugar, one tablespoon at a time.
- If using food coloring, divide the dough into portions and knead in a few drops of color until evenly mixed.
- Roll the dough into small balls (about 1 teaspoon each) and place them on a parchment-lined baking sheet.
- Use a fork dipped in powdered sugar to gently press each ball, creating a decorative pattern.
- Allow the mints to air dry at room temperature for at least 2 hours, or until firm.
- Once set, store the mints in an airtight container in the refrigerator or freezer until ready to serve.
Notes
- Ensure the cream cheese and butter are at room temperature for a smooth consistency.
- If the dough is too sticky, gradually add more powdered sugar until manageable.
- For a festive touch, roll the mints in sanding sugar or dip them in melted chocolate.
- Store in an airtight container in the fridge for up to two weeks or freeze for up to two months.