Advertisement
Red, White, and Blue Cheesecake Salad
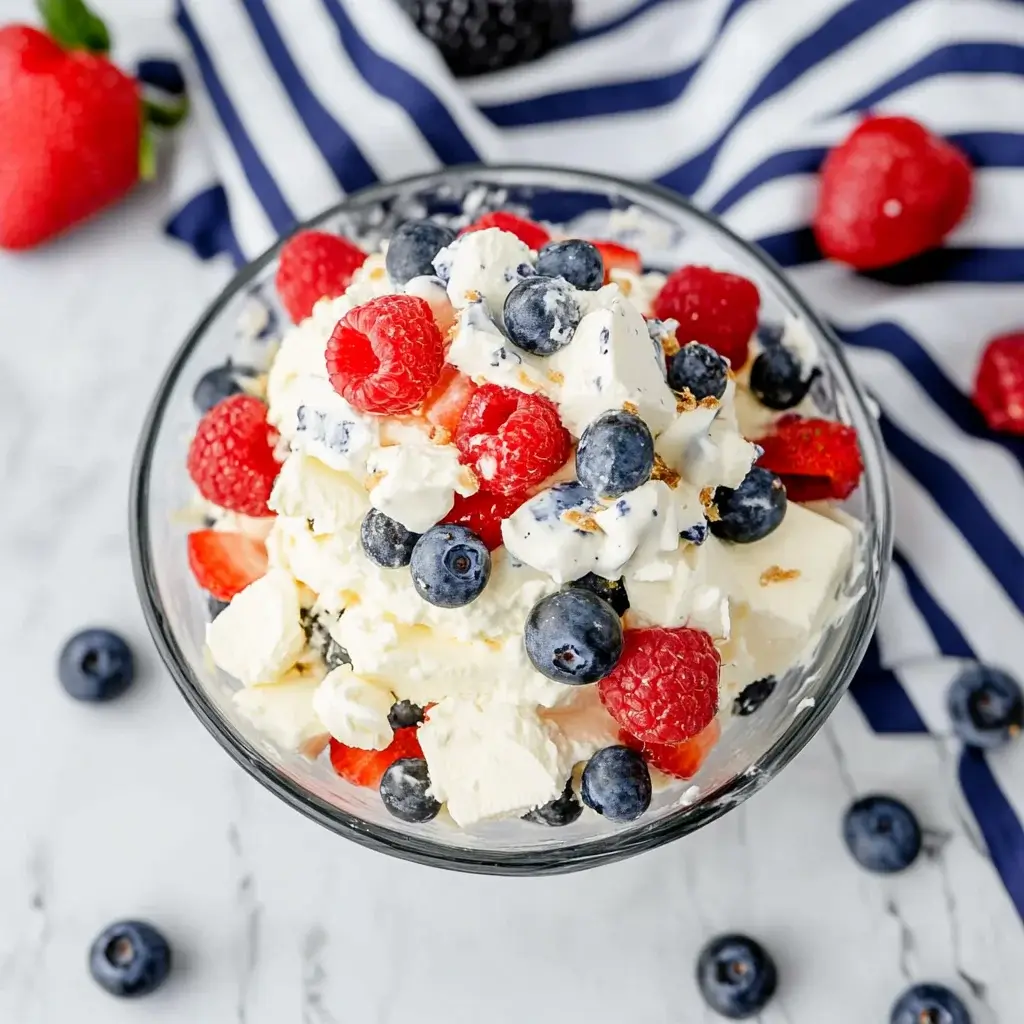
Summer gatherings are all about vibrant flavors and refreshing treats, and that’s where the Red, White, and Blue Cheesecake Salad shines. I remember the first time I made this delightful dessert; it was a hit at a backyard barbecue. The combination of creamy cheesecake, fresh berries, and crunchy graham crackers creates a symphony of textures and tastes. Plus, it’s a no-bake recipe, making it a quick solution for busy days. Whether you’re hosting friends or just treating yourself, this salad is sure to impress and satisfy everyone’s sweet tooth!
Why You’ll Love This Red, White, and Blue Cheesecake Salad
This Red, White, and Blue Cheesecake Salad is a game-changer for summer desserts. It’s incredibly easy to whip up, taking just 15 minutes of prep time. The vibrant colors make it visually stunning, perfect for impressing guests. Plus, the creamy texture paired with fresh berries is a taste sensation that will have everyone coming back for seconds. It’s a delightful way to celebrate summer flavors without the fuss!
Ingredients for Red, White, and Blue Cheesecake Salad
Gathering the right ingredients is the first step to creating this delightful Red, White, and Blue Cheesecake Salad. Here’s what you’ll need:
- Cream cheese: The base of our salad, providing that rich, creamy texture.
- Powdered sugar: This sweetens the cream cheese, making it irresistibly delicious.
- Vanilla extract: A splash of vanilla adds warmth and depth to the flavor.
- Whipped topping: Light and airy, it gives the salad a fluffy consistency.
- Strawberries: Fresh and juicy, they bring a burst of sweetness and vibrant color.
- Blueberries: These little gems add a tangy flavor and a pop of blue.
- Mini marshmallows: For a fun, chewy texture that complements the creaminess.
- Graham cracker crumbs: They provide a crunchy layer, reminiscent of traditional cheesecake crust.
Feel free to get creative! You can substitute cream cheese with Greek yogurt for a lighter version or add a splash of lemon juice for a refreshing twist. If you want extra crunch, consider mixing in chopped nuts or using crushed cookies instead of graham cracker crumbs. For exact quantities, check the bottom of the article where you can find them available for printing.
Advertisement
How to Make Red, White, and Blue Cheesecake Salad
Creating this Red, White, and Blue Cheesecake Salad is a breeze! Follow these simple steps, and you’ll have a stunning dessert that’s sure to impress. Let’s dive in!
Step 1: Prepare the Cream Cheese Mixture
Start by grabbing a large mixing bowl. Beat the softened cream cheese with an electric mixer until it’s smooth and creamy. This step is crucial; you want a velvety base for your salad. Gradually add in the powdered sugar and vanilla extract, mixing until everything is well combined. The sweetness of the sugar and the warmth of the vanilla will make your taste buds dance!
Step 2: Fold in the Whipped Topping
Now, it’s time to add the whipped topping. Gently fold it into the cream cheese mixture. This is where the magic happens! Folding helps maintain that light and fluffy texture we all love. Be careful not to overmix; we want to keep that airy feel. Trust me, this step makes all the difference!
Step 3: Combine the Fruits
In a separate bowl, toss together the strawberries, blueberries, and mini marshmallows. The colors are already a feast for the eyes! Make sure the strawberries are hulled and sliced for easy mixing. This fruity combination adds freshness and a burst of flavor to your salad.
Step 4: Mix the Fruit with the Cream Cheese Mixture
Carefully fold the fruit mixture into the cream cheese mixture. Use a spatula to combine them gently, ensuring the fruits are evenly distributed. You want every bite to be a delightful mix of creamy and fruity goodness. It’s like a summer party in a bowl!
Step 5: Layer the Ingredients
Grab your serving dish or individual cups. Start layering the cheesecake mixture and graham cracker crumbs. Begin with a layer of the cheesecake mixture, followed by a sprinkle of graham cracker crumbs. Repeat the layers until all ingredients are used, finishing with a layer of cheesecake on top. This creates a beautiful presentation that’s as tasty as it is pretty!
Step 6: Chill Before Serving
Finally, it’s time to chill! Place your salad in the refrigerator for at least one hour. This step is essential; it allows the flavors to meld together and the salad to set. When you’re ready to serve, you’ll have a refreshing dessert that’s perfect for any summer gathering!
Tips for Success
- Make sure your cream cheese is softened for easy mixing.
- Use fresh, ripe berries for the best flavor and texture.
- Don’t skip the chilling step; it enhances the taste and texture.
- For a fun twist, try adding a splash of lemon juice to the cream cheese mixture.
- Layering in clear cups makes for a stunning presentation!
Equipment Needed
- Mixing bowl: A large bowl for combining ingredients. A glass or ceramic bowl works well.
- Electric mixer: For beating the cream cheese. A whisk can be used, but it requires more effort.
- Spatula: Essential for folding ingredients together.
- Serving dish or cups: Use a large dish or individual cups for a fun presentation.
Variations
- Greek Yogurt Swap: Replace cream cheese with Greek yogurt for a tangy, lighter version.
- Fruit Mix-Up: Experiment with other berries like raspberries or blackberries for a different flavor profile.
- Nutty Crunch: Add chopped nuts like pecans or walnuts for an extra crunch.
- Chocolate Drizzle: Drizzle melted chocolate over the top for a decadent twist.
- Vegan Option: Use dairy-free cream cheese and coconut whipped cream for a vegan-friendly dessert.
Serving Suggestions
- Pair with grilled chicken or burgers for a balanced meal.
- Serve alongside a refreshing lemonade or iced tea to complement the flavors.
- For a festive touch, garnish with mint leaves or additional berries.
- Use clear cups for individual servings to showcase the beautiful layers.
FAQs about Red, White, and Blue Cheesecake Salad
Can I make this Red, White, and Blue Cheesecake Salad ahead of time?
Absolutely! This salad can be made a day in advance. Just keep it covered in the refrigerator. The flavors will meld beautifully overnight, making it even more delicious!
What can I substitute for whipped topping?
If you prefer a homemade touch, you can whip heavy cream until soft peaks form. This will give you a fresh, creamy texture without the preservatives found in store-bought whipped topping.
Is this dessert salad suitable for kids?
<pDefinitely! The Red, White, and Blue Cheesecake Salad is a fun and colorful treat that kids will love. The sweetness of the berries and marshmallows makes it appealing to younger palates.
Can I use frozen berries instead of fresh?
While fresh berries are ideal for this recipe, you can use frozen berries in a pinch. Just make sure to thaw and drain them well to avoid excess moisture in your salad.
How long will leftovers last in the fridge?
Your salad will stay fresh for about 3 days in the refrigerator. Just be sure to keep it covered to maintain its flavor and texture!
Final Thoughts
Creating the Red, White, and Blue Cheesecake Salad is more than just whipping up a dessert; it’s about bringing people together. The vibrant colors and delightful flavors evoke the spirit of summer, making every bite a celebration. Whether it’s a family gathering or a casual get-together with friends, this salad is sure to spark joy and laughter. Plus, the ease of preparation means you can focus on what truly matters—enjoying the moment. So, grab your ingredients, and let this refreshing treat be the highlight of your next summer occasion!
Red, White, and Blue Cheesecake Salad: A Refreshing Treat!
Ingredients
Method
- In a large mixing bowl, beat the softened cream cheese with an electric mixer until smooth.
- Gradually add the powdered sugar and vanilla extract, mixing until well combined.
- Gently fold in the whipped topping until the mixture is light and fluffy.
- In a separate bowl, combine the strawberries, blueberries, and mini marshmallows.
- Carefully fold the fruit mixture into the cream cheese mixture until evenly distributed.
- In a serving dish or individual cups, layer the cheesecake mixture and graham cracker crumbs, starting with a layer of cheesecake.
- Repeat the layers until all ingredients are used, finishing with a layer of cheesecake on top.
- Chill the salad in the refrigerator for at least 1 hour before serving.
Nutrition
Notes
- For a lighter version, substitute cream cheese with Greek yogurt and reduce powdered sugar to ½ cup.
- Add a splash of lemon juice for a refreshing twist.
- For added crunch, mix in chopped nuts or use crushed cookies instead of graham cracker crumbs.