Advertisement
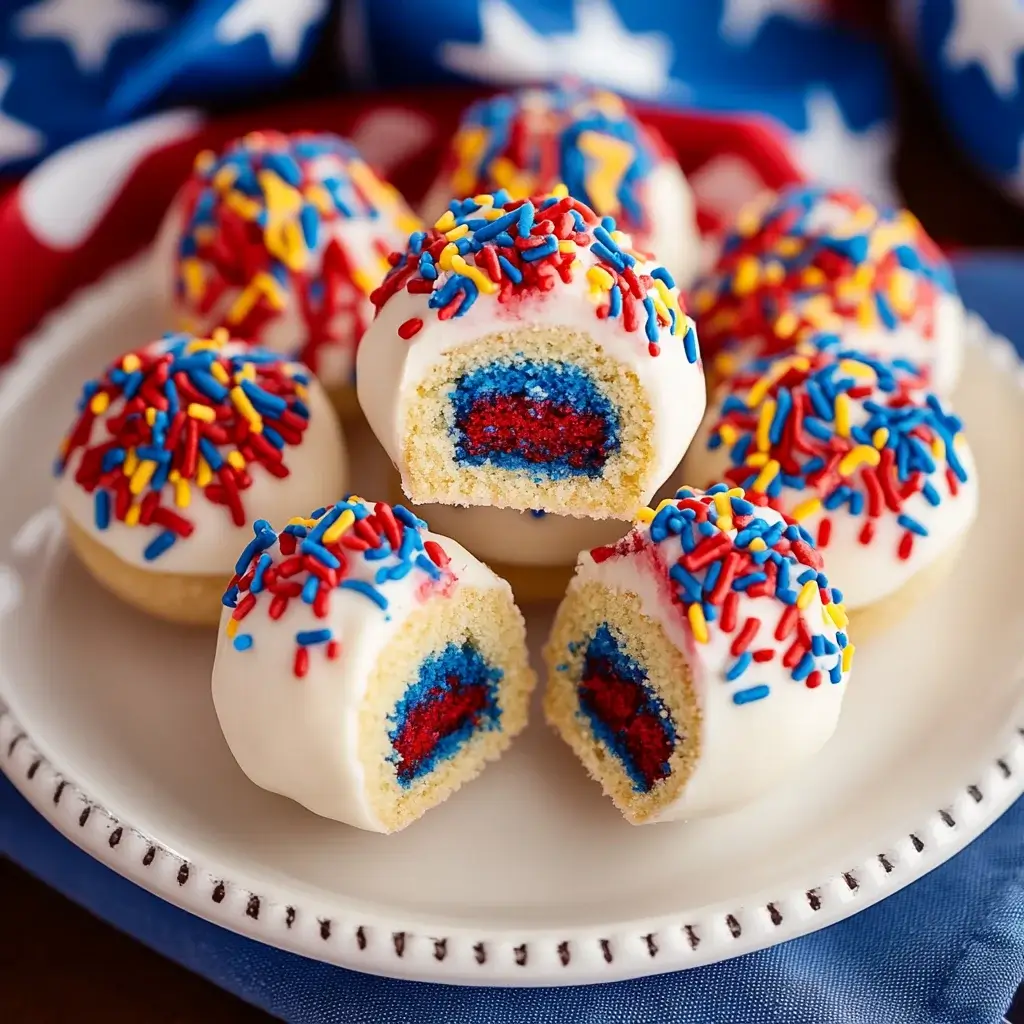
Fourth of July Cake Balls
As the Fourth of July approaches, I can’t help but reminisce about the backyard barbecues of my childhood. The smell of grilled burgers, laughter echoing, and, of course, the sweet treats that followed. This year, I’m excited to share a delightful recipe that captures that festive spirit: Fourth of July Cake Balls. These little bites of joy are not only easy to make but also a surefire way to impress your friends and family. With their vibrant colors and rich flavors, they’re perfect for celebrating Independence Day, making them a must-try festive treat!
Why You’ll Love This Fourth of July Cake Balls
These Fourth of July Cake Balls are a game-changer for your holiday celebrations. They’re incredibly easy to whip up, making them perfect for busy schedules. The rich red velvet cake paired with creamy frosting creates a flavor explosion that will have everyone coming back for more. Plus, their festive appearance adds a pop of color to your dessert table, ensuring they’re not just delicious but also a visual treat!
Ingredients for Fourth of July Cake Balls
Gathering the right ingredients is the first step to creating these festive Fourth of July Cake Balls. Here’s what you’ll need:
- Red velvet cake mix: This is the star of the show, providing that rich flavor and vibrant color.
- Water: Essential for mixing the cake batter to the right consistency.
- Vegetable oil: Adds moisture and richness to the cake, ensuring it stays soft and delicious.
- Eggs: These bind the ingredients together and help the cake rise, giving it a fluffy texture.
- Cream cheese frosting: This sweet and tangy frosting is mixed into the crumbled cake, creating a luscious filling.
- White chocolate melting wafers: Used for coating the cake balls, adding a sweet, creamy layer that complements the cake.
- Red and blue sprinkles: These festive toppings not only enhance the visual appeal but also add a fun crunch.
For those looking to mix things up, consider using different cake flavors like chocolate or vanilla for a unique twist. You can also drizzle melted dark chocolate over the set cake balls for an extra layer of flavor. If you’re interested in exact measurements, you can find them at the bottom of the article, ready for printing!
Advertisement
How to Make Fourth of July Cake Balls
Step 1: Preheat and Prepare
Start by preheating your oven to 350°F. While it warms up, grab a 9×13-inch baking pan and grease it with butter or cooking spray. Then, dust it lightly with flour to prevent sticking. This simple preparation ensures your cake comes out perfectly without any hassle. Trust me, a well-prepared pan makes all the difference in the world!
Step 2: Mix the Cake Batter
In a large mixing bowl, combine the red velvet cake mix, water, vegetable oil, and eggs. Use a whisk or electric mixer to blend everything until the batter is smooth and free of lumps. The vibrant red color will start to shine through, and the aroma will be irresistible. This step is where the magic begins, so mix it well!
Step 3: Bake the Cake
Pour the luscious batter into your prepared baking pan, spreading it evenly. Slide it into the preheated oven and bake for 30-35 minutes. Keep an eye on it! You’ll know it’s done when a toothpick inserted in the center comes out clean. The anticipation builds as the cake rises, filling your kitchen with a delightful scent.
Step 4: Cool and Crumble
Once baked, remove the cake from the oven and let it cool completely in the pan. This is crucial! After about 30 minutes, transfer it to a wire rack. Once cooled, crumble the cake into a large bowl using your hands. The texture should be fluffy and soft, perfect for mixing with frosting. Embrace the mess; it’s all part of the fun!
Step 5: Combine with Frosting
Now, it’s time to add the cream cheese frosting to your crumbled cake. Use a spatula or your hands to mix it all together until fully combined. The mixture should be moist and easy to shape. This step is where the flavors meld, creating a rich filling that will make your cake balls irresistible. Don’t be shy; get in there!
Step 6: Form Cake Balls
With your mixture ready, it’s time to shape it into balls. Take about a tablespoon of the mixture and roll it between your palms to form 1-inch balls. Place them on a baking sheet lined with parchment paper. Once you’ve shaped all the mixture, pop the baking sheet in the refrigerator for at least 30 minutes. Chilling helps them firm up, making them easier to dip later.
Step 7: Dip in Chocolate
While the cake balls chill, melt the white chocolate melting wafers according to the package instructions. Once melted, remove the cake balls from the fridge. Dip each chilled ball into the melted chocolate, allowing any excess to drip off. This step adds a sweet, creamy layer that perfectly complements the rich cake inside. It’s a messy but delightful process!
Step 8: Decorate and Set
After dipping, return the cake balls to the parchment-lined baking sheet. While the chocolate is still wet, sprinkle them with red and blue sprinkles for that festive touch. Let the chocolate set completely at room temperature or in the fridge. Once set, these Fourth of July Cake Balls are ready to dazzle your guests and bring smiles all around!
Tips for Success
- Make sure your cake is completely cool before crumbling; this prevents a gooey mess.
- Use a cookie scoop for uniform cake balls; it makes shaping easier and quicker.
- Chill the cake balls long enough to firm up; this helps with dipping.
- Don’t rush the chocolate melting process; slow and steady ensures a smooth coating.
- Experiment with different sprinkles for a unique look each time!
Equipment Needed
- 9×13-inch baking pan: A standard size for baking the cake; a round pan works too.
- Mixing bowls: Use a large bowl for mixing the batter; any size will do.
- Whisk or electric mixer: For blending the cake batter smoothly; a fork can work in a pinch.
- Parchment paper: Essential for easy cleanup; aluminum foil is a good alternative.
- Cookie scoop: Helps shape uniform cake balls; your hands can do the job too!
Variations
- Chocolate Cake Balls: Swap the red velvet cake mix for chocolate cake mix for a rich, decadent twist.
- Gluten-Free Option: Use a gluten-free cake mix to make these treats suitable for gluten-sensitive friends.
- Vegan Version: Substitute eggs with flaxseed meal and use a dairy-free frosting and chocolate for a vegan-friendly treat.
- Flavor Infusions: Add a splash of vanilla or almond extract to the cake batter for an extra layer of flavor.
- Nutty Surprise: Mix in crushed nuts or toffee bits for added texture and crunch in your cake balls.
Serving Suggestions
- Pair these cake balls with a refreshing summer lemonade or iced tea for a delightful contrast.
- Serve them on a festive platter adorned with red, white, and blue decorations to enhance the holiday spirit.
- For a fun twist, offer a dipping station with chocolate sauce or fruit preserves.
FAQs about Fourth of July Cake Balls
Can I make Fourth of July Cake Balls ahead of time?
Absolutely! You can prepare the cake balls a day in advance. Just store them in an airtight container in the fridge after they’ve set. This way, they’ll be ready to impress your guests when the holiday arrives!
What can I use instead of cream cheese frosting?
If cream cheese frosting isn’t your thing, you can substitute it with vanilla buttercream or even chocolate frosting. Each option will give your cake balls a unique flavor twist while keeping them delicious!
How do I store leftover cake balls?
Store any leftover Fourth of July Cake Balls in an airtight container in the refrigerator. They’ll stay fresh for about a week, but I doubt they’ll last that long with how tasty they are!
Can I freeze these cake balls?
Yes, you can freeze them! Just make sure they’re fully set and then place them in a freezer-safe container. They can last up to three months in the freezer. When you’re ready to enjoy, let them thaw in the fridge.
What’s the best way to decorate these cake balls?
While red and blue sprinkles are festive, you can get creative! Try drizzling melted dark chocolate on top or using edible glitter for a fun sparkle. The possibilities are endless, so let your imagination run wild!
Final Thoughts
Creating Fourth of July Cake Balls is more than just baking; it’s about bringing people together. The joy of sharing these vibrant treats with family and friends is unmatched. Each bite is a celebration of flavors and colors, evoking memories of summer festivities and laughter. Whether you’re hosting a barbecue or attending a potluck, these cake balls are sure to be a hit. So, roll up your sleeves, embrace the mess, and enjoy the process. After all, the best part of cooking is the love and joy you share with others. Happy Independence Day!