Advertisement
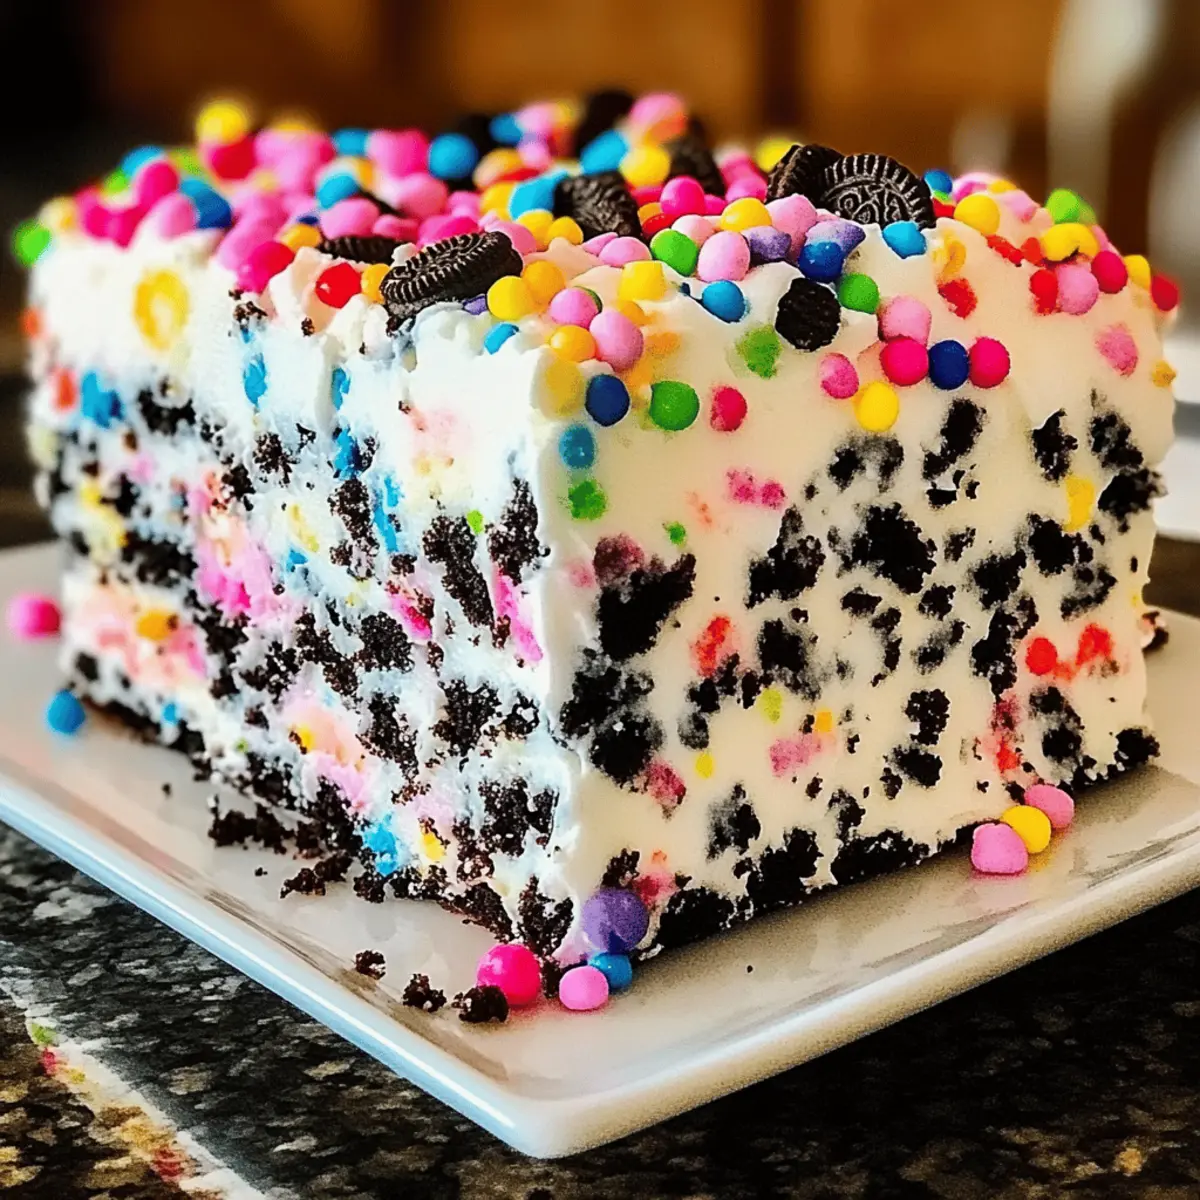
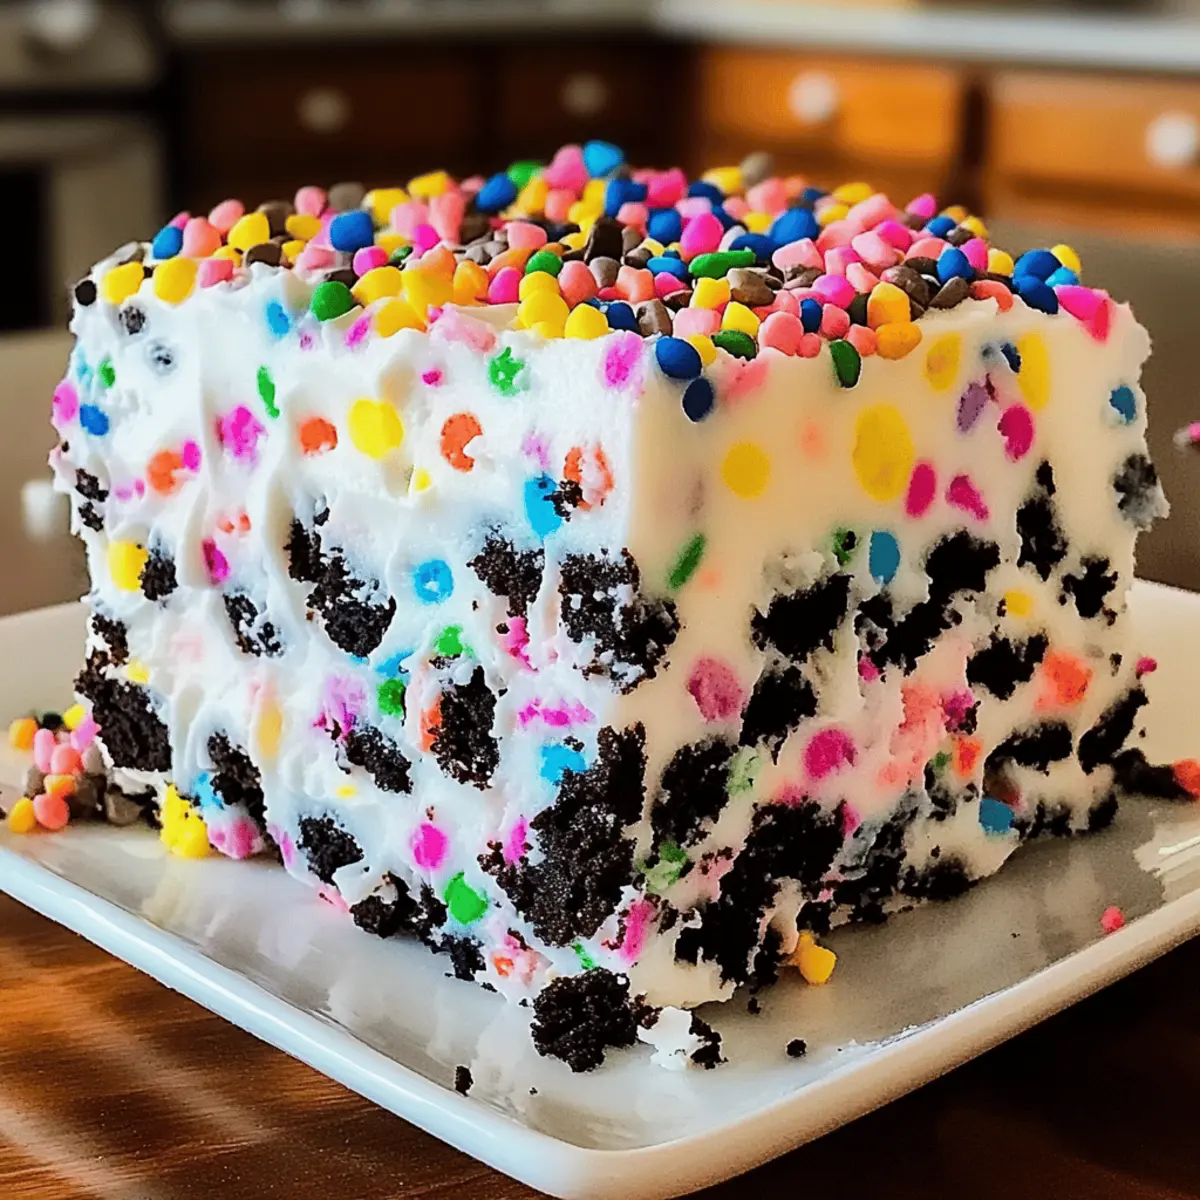
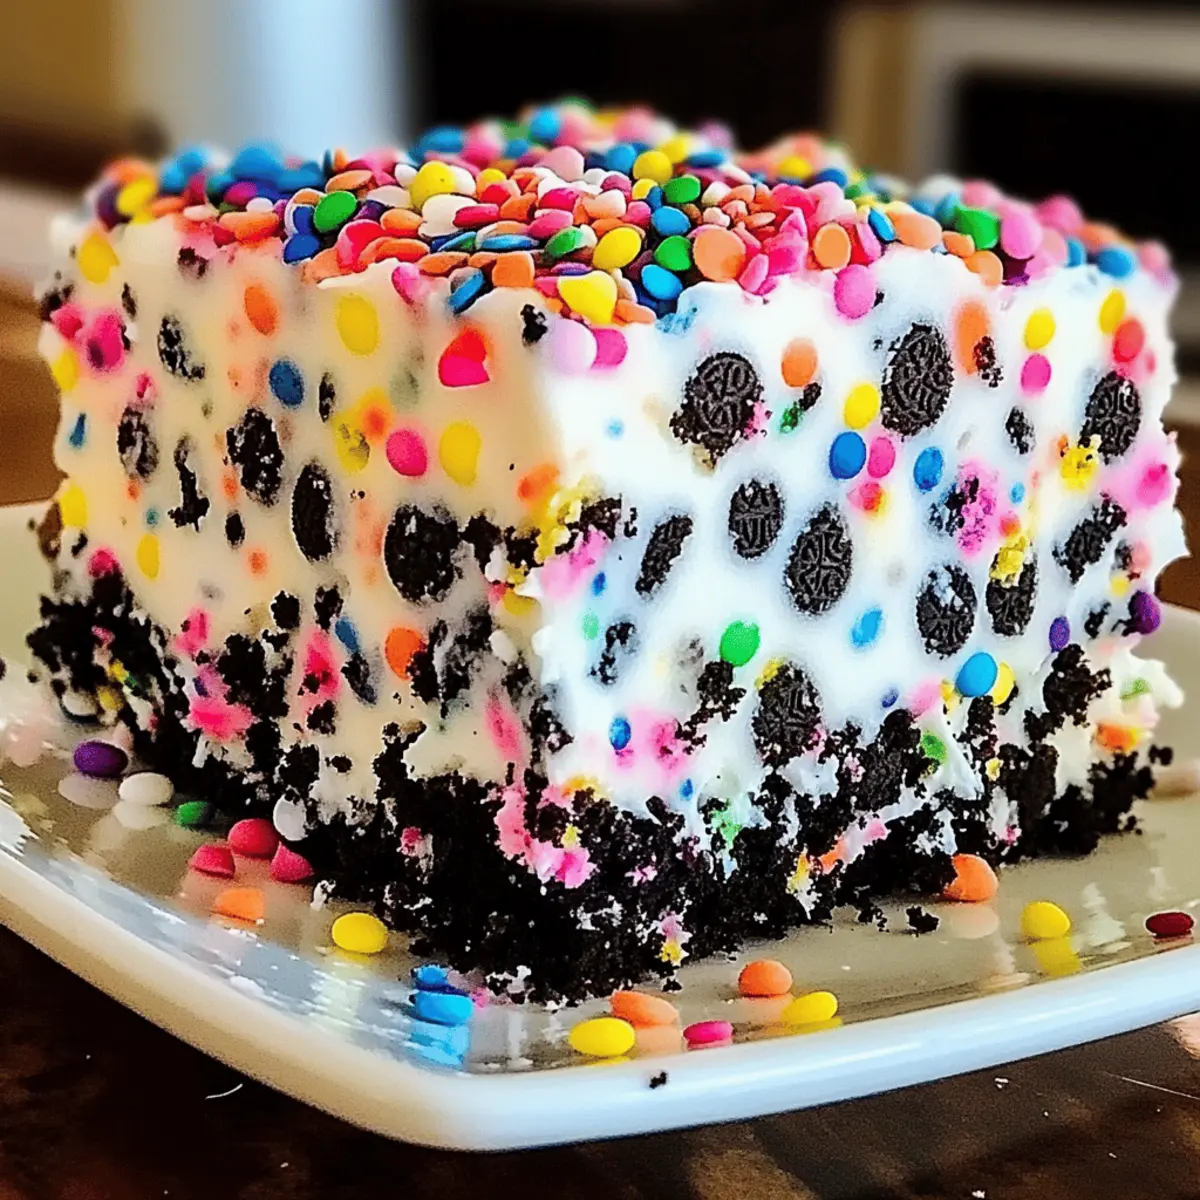
As I was flipping through old family photo albums, I stumbled upon a snapshot of my sister’s birthday party, where laughter intertwined with the fragrant aroma of sweet pastries. It was a charming reminder of those carefree days, fueling my desire to recreate that joyful essence. Enter the Easy No-Bake Funfetti Oreo Icebox Cake—my go-to dessert for any celebration. This colorful masterpiece pairs layers of crunchy Birthday Cake Oreos with a creamy whipped mixture, making it a delightful treat for both kids and adults alike. And the best part? With its minimal prep time and zero baking required, it allows me to focus on creating memories without the stress. Have you ever whipped up a dessert that brings your loved ones together while keeping your kitchen cool? Let’s dive into this simple yet impressive recipe that will undoubtedly become a favorite in your home!
Why is this Funfetti Cake a Must-Try?
Effortless Creation: With no baking required, this cake is a breeze to make—perfect for busy schedules!
Festive Appeal: Colorful sprinkles and layers of Birthday Cake Oreos make this dessert not only delicious but visually striking for any occasion.
Advertisement
Versatile Options: Customize easily by swapping Oreo flavors or adding fruit layers, ensuring there’s something for everyone.
Crowd Favorite: It’s a guaranteed hit with both kids and adults, making it your go-to for birthdays, picnics, and family gatherings.
Memorable Moments: Every slice brings back joy, reminding us of sweet celebrations and laughter shared around the table.
Dive deeper into delightful desserts with our Ding Dong Cake and Pumpkin Spice Cake, perfect for any celebration!
Funfetti Oreo Icebox Cake Ingredients
• Create your masterpiece with these delightful ingredients.
For the Cake Layers
- Birthday Cake Oreos – These provide a sweet, crunchy base; feel free to swap them for regular or chocolate Oreos for different flavors.
- Heavy Cream – Whipping this ingredient gives the cake its airy texture; substitute with whipped topping if desired.
For the Cream Mixture
- Cream Cheese – This adds richness and structure; ensure it’s softened for easy blending, or use mascarpone for a unique twist.
- Powdered Sugar – Sweetens the mixture while achieving a smooth texture; granulated sugar can work too, just blend thoroughly.
- Vanilla Extract – Enhances the overall flavor; try substituting with almond extract or cake batter extract for fun variations.
For the Decoration
- Colorful Sprinkles – These add a festive touch and visual appeal; swap them for your favorite candies or omit for a simpler finish.
Now that you have the essential ingredients for a fabulous Funfetti Oreo Icebox Cake, let your creativity flourish, and get ready to create a dessert that will enchant your guests and family alike!
Step‑by‑Step Instructions for Funfetti Oreo Icebox Cake
Step 1: Whip the Cream
Start by pouring 2 cups of heavy cream into a large mixing bowl. Using an electric mixer, whip the cream on medium-high speed until stiff peaks form, typically around 3-5 minutes. The cream should be thick and hold its shape beautifully when you lift the beaters. This will be the light and fluffy base of your Funfetti Oreo Icebox Cake.
Step 2: Mix the Cream Cheese Mixture
In a separate bowl, combine 8 oz of softened cream cheese, 1 cup of powdered sugar, and 1 teaspoon of vanilla extract. Use a hand mixer on medium speed to blend the mixture until it becomes silky smooth and well incorporated, about 2-3 minutes. This creamy mixture will bring richness to your Funfetti Oreo Icebox Cake, so make sure it’s lump-free.
Step 3: Combine the Mixtures
Gently fold the whipped cream into the cream cheese mixture using a spatula. Start by adding a third of the whipped cream and mix until combined, then gradually add the rest. Be gentle to avoid deflating the whipped cream; you want to keep that airy, light texture. This delightful combination will be the heart of your cake.
Step 4: Layer the Ingredients
Grab a 9×13 inch dish and place a layer of Birthday Cake Oreos on the bottom. Begin layering the Oreos side by side, ensuring an even base. Once the bottom is covered, spread half of the cream mixture over the Oreos, smoothing it out with a spatula. This will be the first layer of your delicious Funfetti Oreo Icebox Cake.
Step 5: Add More Oreos
Repeat the layering process by adding another layer of Birthday Cake Oreos on top of the cream mixture. Again, ensure they’re arranged neatly. Once this layer is done, spread the remaining cream mixture evenly over the top, filling in all the gaps and smoothing the surface. Your cake is starting to take shape beautifully!
Step 6: Top with Sprinkles
For a festive finish, generously sprinkle colorful sprinkles over the top of your cake. Use a variety of colors to create a vibrant and eye-catching design that adds to the excitement of the Funfetti Oreo Icebox Cake. This will not only make it visually appealing but also enhance the fun element of your dessert.
Step 7: Chill the Cake
Cover the dish with plastic wrap or a lid and place it in the refrigerator. Allow the cake to chill for at least 4 hours, but for the best flavor and texture, leave it overnight. This waiting time allows the flavors to meld and the cake layers to soften—transforming your Funfetti Oreo Icebox Cake into a creamy delight that’s ready to impress!
Expert Tips for Funfetti Oreo Icebox Cake
-
Chill Overnight: For maximum flavor and a creamier texture, let the cake chill overnight. This helps the layers meld beautifully.
-
Gentle Folding: When combining whipped cream with the cream cheese mixture, fold gently to preserve that airy texture. Avoid vigorous mixing to prevent deflation.
-
Layer Creatively: Don’t hesitate to get creative with layers! Add strawberry slices or banana pieces between Oreo layers for extra flavor and freshness.
-
Sprinkle Last: Decorate with sprinkles just before serving for a vibrant look. This keeps them crisp and colorful, enhancing the cake’s festive appeal.
-
Flavor Swaps: Experiment with different Oreo flavors like mint or peanut butter to switch up the taste of your Funfetti Oreo Icebox Cake—each variation offers a new twist!
Funfetti Oreo Icebox Cake Variations
Feel free to unleash your creativity and customize this delightful dessert in tempting ways!
- Oreo Flavor Swap: Substitute Birthday Cake Oreos with chocolate or mint-flavored Oreos for a fun twist that adds depth.
- Dairy-Free Delight: Use coconut cream and dairy-free cream cheese for a lactose-free version that retains its rich flavor.
- Chocolate Heaven: Incorporate a chocolate cake mix instead of light cream for an irresistible chocolate version that will please any chocoholic.
- Fruit Layers: Add fresh strawberries or bananas between layers for a fruity burst that complements the creamy filling beautifully.
- Sweet & Salty: Sprinkle crushed pretzels over the cream layers for a delightful crunch that introduces a contrasting salty note.
- Nutty Texture: Blend in finely chopped nuts or crushed up candies like Butterfingers for an added crunch and rich flavor.
- Spicy Kick: For those who love heat, add a pinch of cayenne or some spicy chocolate Oreos for a surprising yet delightful flavor contrast.
- Cake Batter Bliss: Enhance the vanilla flavor by adding a bit of cake batter extract or sprinkle cake mix into the cream mixture.
If you’re keen on another sweet adventure, don’t miss out on trying the scrumptious Ding Dong Cake or the delightful Pumpkin Spice Cake—both are perfect for any celebration!
What to Serve with Easy No-Bake Funfetti Oreo Icebox Cake
Imagine a joyful gathering filled with laughter and sweet treats, where every bite of this creamy delight evokes memories of celebrations gone by.
-
Fresh Berries: Juicy strawberries or blueberries bring a refreshing tang that cuts through the creaminess, balancing the sweetness perfectly.
-
Whipped Cream Topping: A dollop of freshly whipped cream adds an extra layer of lightness and enchantment, enhancing each decadent slice.
-
Chocolate Ice Cream: The rich, creamy texture of chocolate ice cream pairs beautifully with the crunchy Oreos, creating a delightful contrast that’s simply irresistible.
Fruity notes really shine when you add a homemade berry sauce. It brings a pop of color and flavor that will make both kids and adults smile.
-
Sparkling Lemonade: The effervescent zing of sparkling lemonade refreshes the palate, making it a fabulous drink choice for warm gatherings.
-
Mint Chocolate Chip Cookies: These cookies add a cool minty crunch, enhancing the festive vibe while echoing the chocolatey goodness in the cake.
-
Caramel Sauce Drizzle: A light drizzle of caramel sauce takes your cake to another level of indulgence, amplifying all the flavors in a delightful way.
Explore further with a scoop of vanilla bean ice cream and let the flavors mingle in your mouth for a truly divine dessert experience!
Make Ahead Options
This No-Bake Funfetti Oreo Icebox Cake is a fantastic choice for those looking to save time during busy days! You can prepare the cream mixture (whipped cream and cream cheese) up to 24 hours in advance and store it in an airtight container in the refrigerator to maintain its fluffy texture. You can also layer the Birthday Cake Oreos in your dish without the cream, refrigerating it for up to 3 days. Just remember to add the cream mixture and colorful sprinkles before serving to keep everything fresh and vibrant. By prepping these components ahead, you’ll have a delightful dessert ready to impress your family and friends with minimal last-minute effort!
Storage Tips for Funfetti Oreo Icebox Cake
Fridge: Store any leftover cake in an airtight container in the refrigerator for up to 5 days, ensuring it stays fresh and delicious.
Freezer: If you’d like to keep it longer, you can freeze the cake for up to 1 month. Wrap tightly in plastic wrap and aluminum foil to prevent freezer burn.
Thawing: To serve frozen slices, thaw in the fridge overnight or at room temperature for about 1-2 hours before enjoying your Funfetti Oreo Icebox Cake again.
Reheating: This cake is best served chilled, so there’s no need to reheat. Just slice and enjoy the creamy layers!

Funfetti Oreo Icebox Cake Recipe FAQs
How do I choose the best Birthday Cake Oreos?
Absolutely! When selecting Birthday Cake Oreos, look for packages that are intact, with no visible damage. The cookies should be fresh and not have dark spots all over the package. This ensures a crunchy, flavorful base for your Funfetti Oreo Icebox Cake, enhancing your dessert’s overall taste. If you’re looking for alternatives, regular or chocolate Oreos also work wonderfully!
How should I store leftover Funfetti Oreo Icebox Cake?
Store any leftover cake in an airtight container in the refrigerator for up to 5 days. This helps maintain its freshness and creamy texture. If you’re passing leftovers to a friend or storing for later, keep it well sealed to prevent it from absorbing other odors in the fridge.
Can I freeze Funfetti Oreo Icebox Cake, and if so, how?
Yes, you can freeze the Funfetti Oreo Icebox Cake! First, slice the cake into individual portions. Wrap each slice tightly in plastic wrap, then in aluminum foil to prevent freezer burn. This way, you can enjoy a slice at a time. The cake can be frozen for up to 1 month. To thaw, place it in the fridge overnight or leave it at room temperature for about 1-2 hours before serving.
What should I do if my whipped cream doesn’t form stiff peaks?
Very! If your whipped cream isn’t forming stiff peaks, ensure that the heavy cream is very cold, which helps with the whipping process. Additionally, try using a clean mixing bowl and beaters, as any grease can hinder the whipped cream’s ability to firm up. Whip on medium-high speed for 3-5 minutes, and don’t be afraid to give it a little extra time if necessary—stiff peaks are key for achieving that fluffy texture!
Are there any dietary considerations I should keep in mind?
Absolutely! If you have guests with allergies, it’s crucial to consider that this recipe contains dairy (heavy cream and cream cheese) and gluten (Oreo cookies). For a dairy-free version, look for gluten-free Oreo options and non-dairy whipped toppings. Always check labels for specific allergens to ensure the safety of all your guests.
What can I do if my cake layers are too thick or falling apart?
If your cake layers seem too thick or are falling apart, you may have overfilled your dish. For next time, ensure an even distribution of Oreo layers, and avoid tightly packing them. When layering the cream mixture, a gentle touch will help maintain their form. You can also omit a layer of cookies when constructing it if you prefer a lighter texture. Remember, it’s all about what works best for your taste!
Delicious Funfetti Oreo Icebox Cake for Effortless Celebrations
Ingredients
Equipment
Method
- Whip the cream by pouring 2 cups of heavy cream into a large mixing bowl and whip on medium-high speed until stiff peaks form (3-5 minutes).
- Mix the cream cheese mixture by combining 8 oz of softened cream cheese, 1 cup of powdered sugar, and 1 tsp of vanilla extract in a separate bowl. Blend until smooth (2-3 minutes).
- Combine the whipped cream with the cream cheese mixture by gently folding a third of the whipped cream into the mixture, then gradually add the rest.
- Layer the ingredients by placing a layer of Birthday Cake Oreos in a 9x13 inch dish, then spread half of the cream mixture over the Oreos.
- Add more Oreos by repeating the layering process with another layer of Birthday Cake Oreos on top of the cream mixture, then spread the remaining cream mixture evenly over the top.
- Top with sprinkles by generously sprinkling colorful sprinkles over the cake before chilling.
- Chill the cake by covering the dish and placing it in the refrigerator for at least 4 hours, ideally overnight.