Advertisement
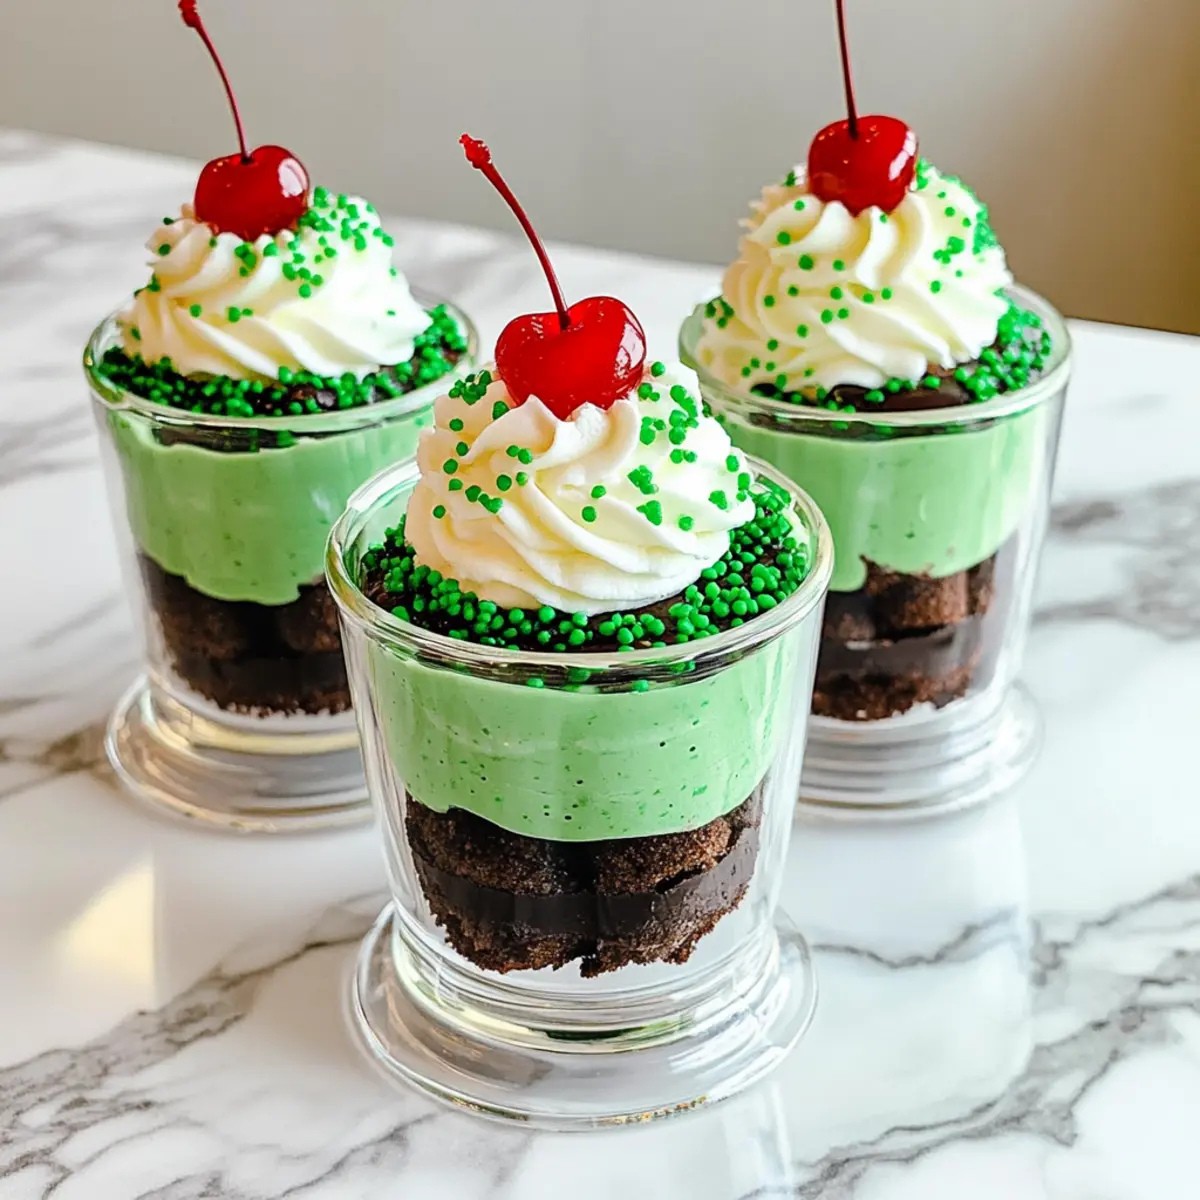
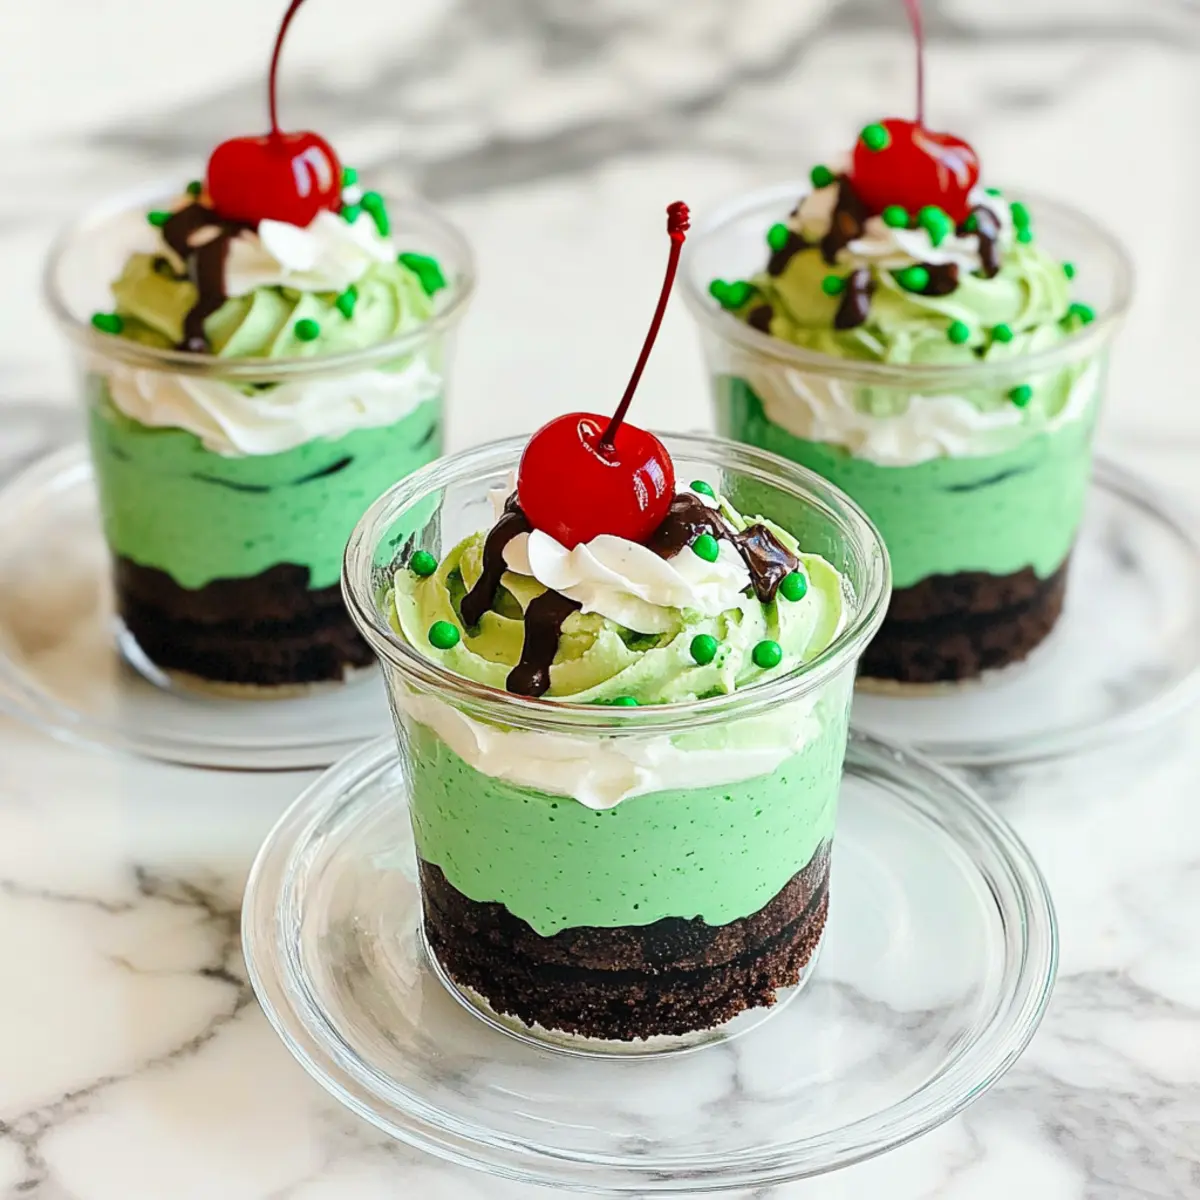
As the scent of fresh mint wafts through the air, I can’t help but feel a sense of excitement for St. Patrick’s Day. This celebration wouldn’t be complete without a treat that’s both fun and festive, which is why I’m thrilled to share my Minty No-Bake Shamrock Shake Pudding Cups! Perfectly creamy and effortlessly vibrant, this kid-friendly dessert is a crowd-pleaser that requires just a little mixing and chilling—no oven needed. These delightful cups channel the joyful spirit of the season, making them an ideal addition to any party or family gathering. Whether you’re hosting a festive bash or just treating your loved ones, you’ll love how quickly these come together. Curious about how to whip up this no-bake delight? Let’s dive into this easy-to-follow recipe!
Why Are Shamrock Shake Pudding Cups Amazing?
Kid-Friendly Fun: These pudding cups are perfect for kids and adults alike, making any St. Patrick’s Day celebration exciting!
No-Bake Delight: With just a few simple steps, you can whip these up without ever turning on the oven. That means less mess and more time for festive fun!
Advertisement
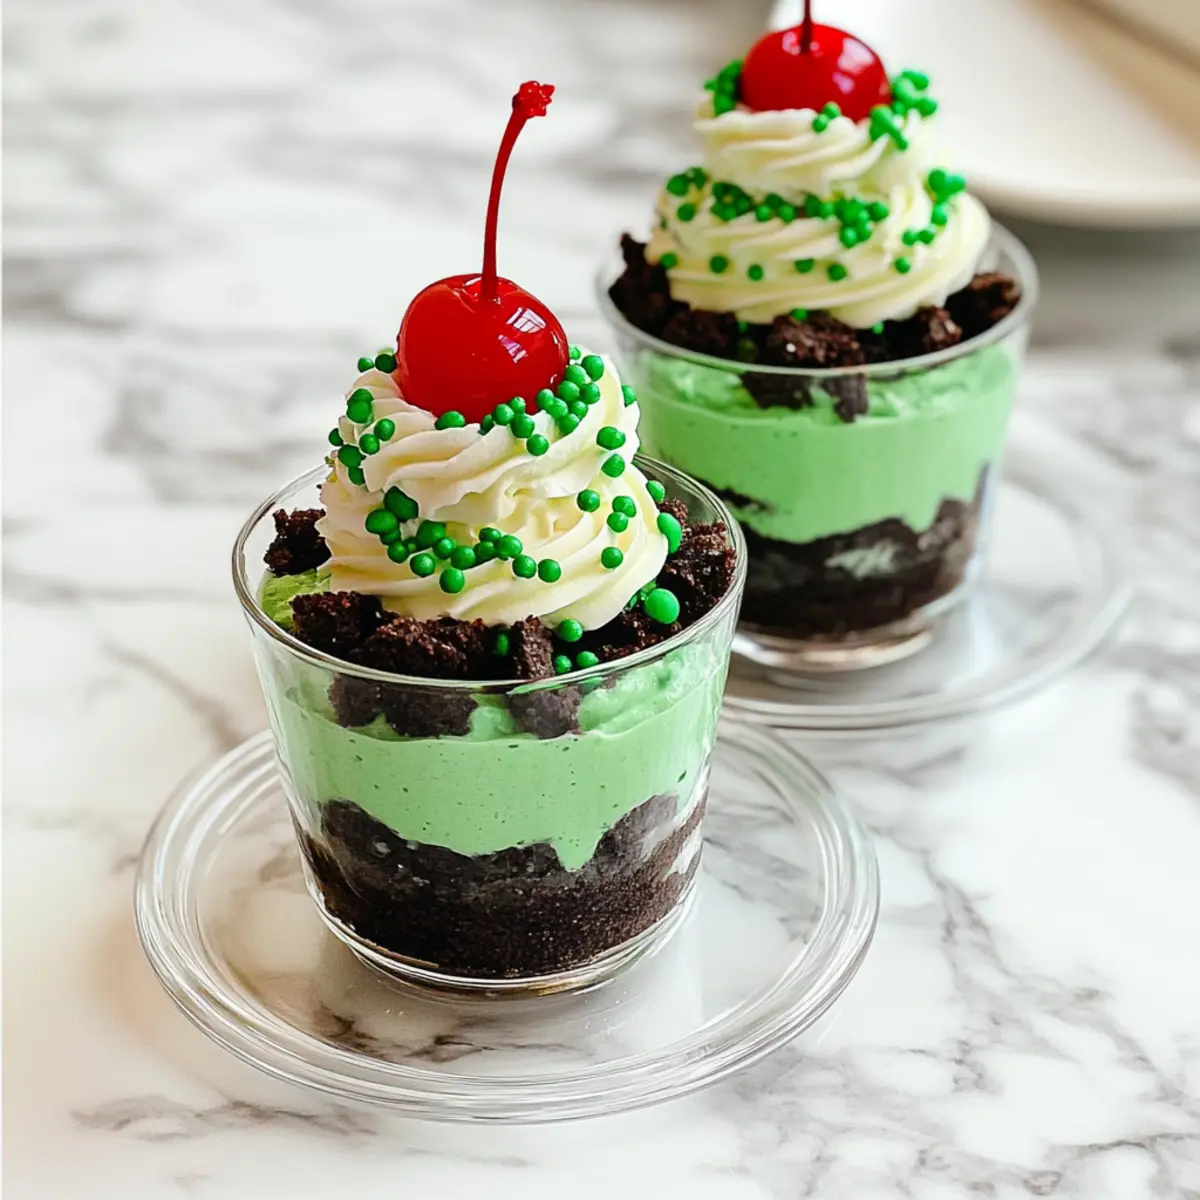
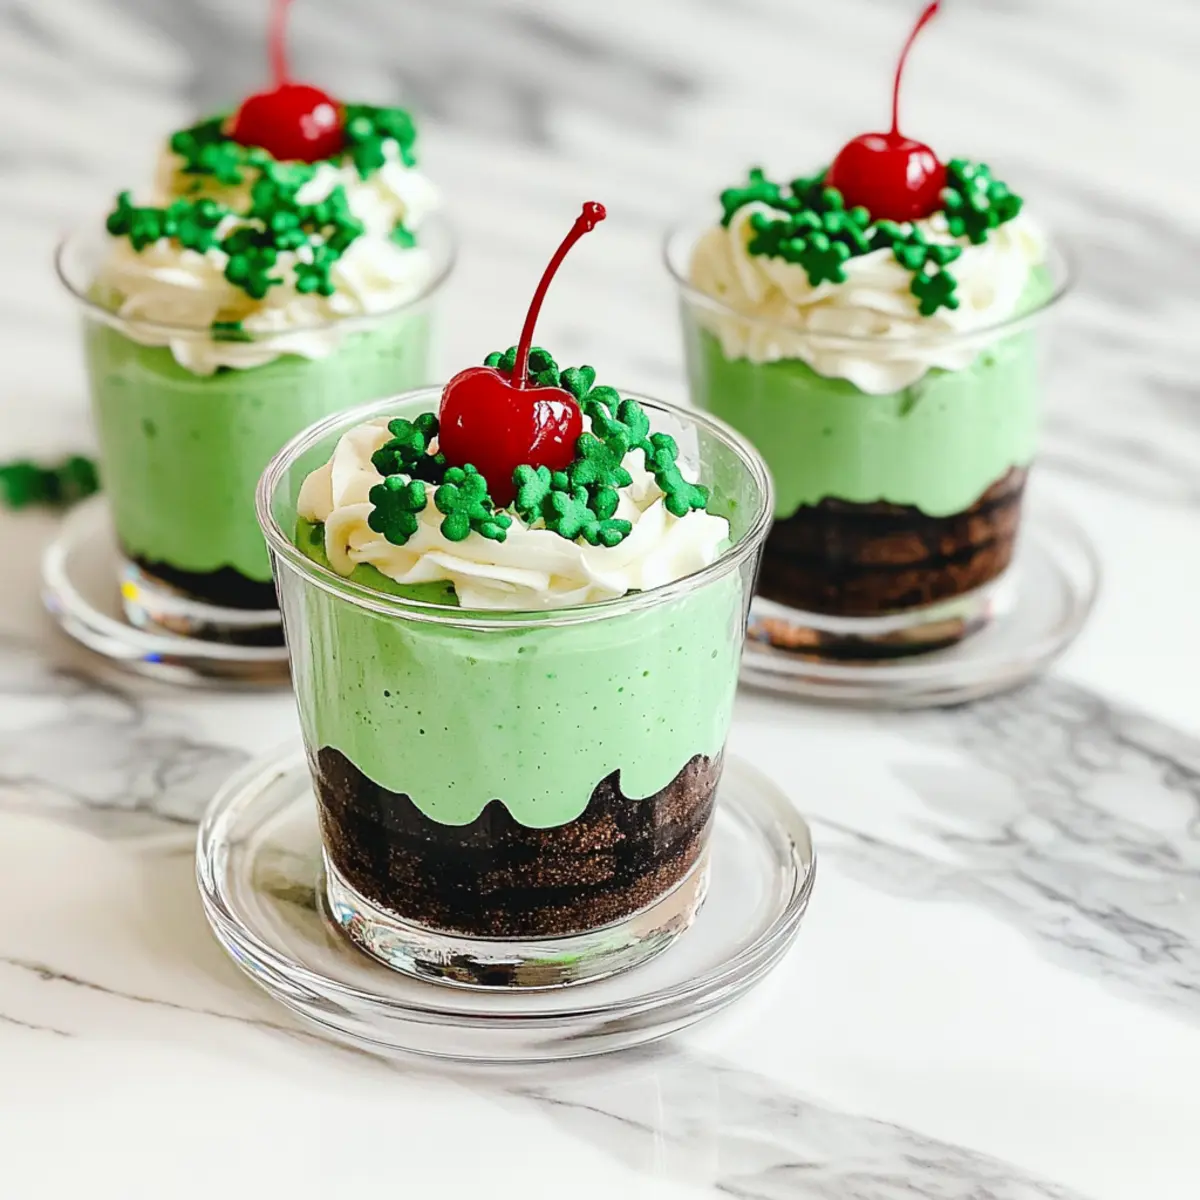
Vibrant Presentation: The bright green hue and decorative toppings make these cups a visual treat that will impress guests and brighten any table.
Versatile Base: Feel free to switch up the cookie layer or even the pudding flavor—go for chocolate or even a fruit blend for something unique!
Quick Chill Time: Just 15 minutes in the fridge, and they’re ready to serve—ideal for last-minute dessert prep. For another fun no-bake idea, check out Warm Blueberry Pudding for a delicious variety!
Add a touch of whimsy to your seasonal festivities with these delightful treats!
Shamrock Shake Pudding Cups Ingredients
For the Pudding
• Instant Vanilla Pudding Mix – Provides the base flavor and creamy texture. Substitution: Use chocolate pudding mix for a different flavor profile.
• Cold Milk – Activates the pudding mix to create the creamy consistency. Note: Use whole milk for richer flavor; non-dairy milk works too.
• Mint Extract – Adds minty flavor, akin to a classic Shamrock Shake. Substitution: Peppermint extract can be used but will taste more like candy.
• Green Food Coloring – Enhances visual appeal, giving the pudding a vibrant green hue. Note: Adjust drops based on desired color intensity.
For the Crunch Layer
• Chocolate Sandwich Cookies – Provides a crunchy texture at the bottom of the cups. Substitution: Any similar cookie can be used, like Oreos.
For Topping
• Whipped Topping (like Cool Whip) – Adds fluffiness and creaminess to the pudding. Note: Use dairy-free whipped topping for a vegan option.
• Green Sprinkles (optional) – Decorative element to enhance presentation. Note: Use any color sprinkles for variety.
• Maraschino Cherries (optional) – Adds a finishing touch and sweetness. Note: Ensure to drain before adding to avoid excess juice.
Prepare these Shamrock Shake Pudding Cups to impress your friends and family with this festive no-bake delight!
Step‑by‑Step Instructions for Shamrock Shake Pudding Cups
Step 1: Mix the Base
In a medium mixing bowl, whisk together 1 package of instant vanilla pudding mix and 2 cups of cold milk. Beat the mixture for about 2 minutes until it begins to thicken, achieving a smooth and creamy consistency. You’ll know it’s ready when it starts becoming a bit firmer and holds a soft peak.
Step 2: Add Minty Flavor
Once your pudding base is thickened, add ½ teaspoon of mint extract and 3–4 drops of green food coloring to enhance its festive hue. Gently whisk the mixture until the mint and color are fully integrated, creating a vibrant green pudding. This step infuses your Shamrock Shake Pudding Cups with delightful mint flavor, reminiscent of the classic shake.
Step 3: Fold in Whipped Topping
Carefully fold in half of a container (about 8 ounces) of whipped topping into the pudding mixture. Use a spatula for this step, gently incorporating the fluffiness while taking care not to deflate the mixture. The goal here is to maintain a light and airy texture, which will enhance the creaminess of your Shamrock Shake Pudding Cups.
Step 4: Prepare the Cookie Layer
Take your chocolate sandwich cookies and crush them into small pieces. Layer about 1 tablespoon of the crushed cookies at the bottom of clear serving cups, creating a crunchy base for your pudding. This layer adds a delightful texture contrast, setting the stage for the creamy pudding mixture on top.
Step 5: Fill the Cups
Now, fill each cup with the green pudding mixture until they are about three-quarters full, making sure to divide the pudding evenly among the cups. The vibrant green color should be visible on top of the cookie layer, offering a festive appearance to your Shamrock Shake Pudding Cups.
Step 6: Chill to Set
Once the cups are filled, place them in the refrigerator to chill for at least 15 minutes. This allows the pudding to set nicely, ensuring it holds its shape when served. This brief chilling period gives you time to tidy up or prepare any additional toppings for your festive treat.
Step 7: Add the Finishing Touches
Just before serving, remove your cups from the refrigerator and add a dollop of remaining whipped topping on each. Top with colorful green sprinkles and a maraschino cherry for an extra festive flair. These finishing touches make your Shamrock Shake Pudding Cups irresistibly appealing and ready to delight your guests!
What to Serve with Shamrock Shake Pudding Cups?
These delightful pudding cups are perfect for adding a festive touch to your St. Patrick’s Day celebrations!
-
Creamy Mint Milkshake: A classic pairing that mirrors the minty flavor in the pudding cups while providing a refreshing, cool sip alongside each bite.
-
Green Fruit Salad: This vibrant mix of kiwi, green grapes, and honeydew adds a refreshing crunch and a burst of natural sweetness that perfectly complements the creamy cups.
-
Chocolate-Covered Pretzels: The salty crunch of chocolate-covered pretzels provides a delightful contrast to the sweet and minty pudding cups, enhancing every mouthful.
-
Festive Sugar Cookies: Keep the celebration sweet with soft, colorful sugar cookies that are fun for kids to decorate and enjoy alongside a scrumptious dessert.
-
Lemonade Spritzers: A bubbly, citrusy drink brings brightness to your dessert table while balancing the rich flavors of the pudding—perfect for festive gatherings!
-
Green Tea: A warm cup of green tea serves as a calming contrast to the sweetness of the pudding cups, making for a sophisticated pairing.
Bring your St. Patrick’s Day feast to life with these delicious accompaniments that celebrate the spirit of the occasion!
How to Store and Freeze Shamrock Shake Pudding Cups
Fridge: Store any leftover Shamrock Shake Pudding Cups covered in the refrigerator for up to 2 days. This keeps them fresh and delicious for your next sweet craving!
Freezer: It’s best to avoid freezing these pudding cups, as freezing can alter the creamy texture of the pudding, resulting in an undesirable consistency.
Preparation Ahead: You can prepare these cups up to 24 hours in advance; just be sure to add toppings like whipped cream and sprinkles right before serving to maintain freshness and appearance.
Serving Tip: If you’re reheating any components for a revamped dessert, gently warm only the base ingredients, keeping the pudding chilled for the best overall experience.
Expert Tips for Shamrock Shake Pudding Cups
Use a Whisk: For best results, use a whisk instead of an electric mixer for incorporating the whipped topping, ensuring a light, airy texture.
Chill Before Serving: Chill the pudding cups for at least 15 minutes to help them set properly. This brief chill enhances the texture and flavor.
Avoid Peppermint Extract: Stick to mint extract for a milder flavor more like a classic Shamrock Shake. Peppermint can make it taste overly sweet.
Decorate Last Minute: Add sprinkles and cherries just before serving to keep them fresh and visually appealing.
Experiment with Colors: Feel free to explore different colors for other occasions by using various food colorings while making your Shamrock Shake Pudding Cups!
Substitutions Available: Remember, you can swap chocolate cookies for graham crackers or use different pudding flavors for a unique twist!
Shamrock Shake Pudding Cups Variations
Feel free to make this festive treat your own with these fun and delicious variations!
-
Dairy-Free: Use almond or coconut milk and a dairy-free whipped topping to create a vegan version that everyone can enjoy. The rich creaminess will still shine through!
-
Mint-Free: Omit the mint extract entirely and simply color the pudding green for a delightful surprise that’s just as fun, allowing the creaminess to be the star of the show.
-
Chocolatey Delight: Swap the vanilla pudding mix for chocolate pudding mix for a rich twist that pairs beautifully with the minty theme. This is perfect for chocolate lovers!
-
Additional Crunch: Try using crushed graham crackers instead of chocolate sandwich cookies for a different texture, adding a hint of sweetness that complements the pudding well.
-
Festive Sprinkles: Look beyond green sprinkles! Use gold or rainbow sprinkles for a pop of color, ensuring your pudding cups stand out at any gathering.
-
Flavored Whipped Topping: Whip up your own flavored topping by mixing in a bit of cocoa powder or cinnamon into the whipped topping for an extra layer of flavor that surprises the taste buds.
-
Heat it Up: For a warm version, use a mini microwave-safe cup and gently heat the pudding before adding toppings, giving it a cozy twist. Enjoy this twist in place of traditional pudding flavors, or feature it alongside a classic dessert like Crunch Banana Pudding, which is equally delightful!
Embrace your creativity and have fun with these Shamrock Shake Pudding Cups to celebrate the season!
Make Ahead Options
These Shamrock Shake Pudding Cups are perfect for meal prep aficionados! You can prepare the pudding base up to 24 hours in advance by following steps 1 to 5, then refrigerate the cups until you’re ready to serve. This keeps the pudding fresh and creamy, while also allowing the flavors to meld beautifully. For maximum presentation, wait to add the whipped topping, sprinkles, and cherries until just before serving. This ensures the toppings stay fluffy and vibrant. With these make-ahead tips, you’ll be well-equipped to impress your guests while saving precious time on the day of your St. Patrick’s Day celebration!
Shamrock Shake Pudding Cups Recipe FAQs
What’s the best way to choose ripe ingredients for Shamrock Shake Pudding Cups?
Absolutely! For the best outcome, use fresh ingredients. When selecting your mint extract, opt for a high-quality brand for authentic flavor. If using whipped topping, check for freshness at the store; it should be well within its expiration date. The food coloring should be vibrant—avoid any that appear faded or old.
How should I store leftover Shamrock Shake Pudding Cups?
Very good question! Store any leftover Shamrock Shake Pudding Cups covered in the refrigerator for up to 2 days. It’s important to keep them well-covered to avoid any drying out or absorbing other odors in the fridge. Just remember that these cups don’t freeze well, as freezing can affect their creamy texture.
Can I freeze Shamrock Shake Pudding Cups?
It’s best to avoid freezing these pudding cups. Freezing can change the creamy texture of the pudding, making it grainy or watery upon thawing. Instead, prepare them fresh up to 24 hours in advance but add decorations just before serving to keep everything looking and tasting great!
What if my pudding mixture doesn’t thicken properly?
No worries! If your pudding mixture doesn’t thicken after whisking for 2 minutes, it could be due to not using cold milk or insufficient mixing. Make sure your milk is very cold, and use a whisk to beat vigorously until smooth. If it’s still not thickening, try letting it sit for a few more minutes; it often firms up a little as it chills.
Are there any dietary considerations for Shamrock Shake Pudding Cups?
Absolutely! If you have dietary restrictions, you can easily adapt this recipe. For a dairy-free version, simply use non-dairy milk and a dairy-free whipped topping. Be mindful of any allergies, particularly if using cookies; you can substitute sandwich cookies with gluten-free options or homemade alternatives tailored to fit specific dietary needs.
Minty Shamrock Shake Pudding Cups for a Festive Treat
Ingredients
Equipment
Method
- In a medium mixing bowl, whisk together the instant vanilla pudding mix and cold milk for about 2 minutes until it thickens.
- Add the mint extract and green food coloring to the thickened pudding and whisk until fully combined.
- Gently fold in half of the whipped topping into the pudding mixture, maintaining a light texture.
- Crush the chocolate sandwich cookies and layer about 1 tablespoon at the bottom of clear serving cups.
- Fill each cup with the green pudding mixture until they are three-quarters full.
- Chill the cups in the refrigerator for at least 15 minutes to set.
- Before serving, top each cup with a dollop of remaining whipped topping, green sprinkles, and a maraschino cherry.