Advertisement
As the spring sunshine starts to warm the days, creativity blossoms in my kitchen! This year, I’m diving into the sweet, colorful world of treats with my easy White Chocolate Easter Bark. It’s not just a delightful holiday treat; it’s a canvas for you and your loved ones to unleash your imagination! With just a few simple ingredients, you can whip up a batch that’s not only a crowd-pleaser but also an engaging activity for the whole family. Picture yourself swirled in the creamy goodness of white chocolate, paired with the crunch of vibrant candies and sprinkles that make this bark not just snack-worthy but also gift-ready for your Easter gatherings. Ready to make something that looks as good as it tastes? Let’s get started on this fun and festive journey!
Why is White Chocolate Easter Bark So Special?
Versatility: This recipe is a canvas for creativity, allowing you to customize with your favorite candies and sprinkles. Family Fun: It’s an engaging activity for all ages, making memories while crafting your unique treat. Gift-Worthy: Perfect for packaging as gifts or sharing at gatherings, it’s guaranteed to impress! Quick and Easy: With minimal ingredients and a straightforward process, you can create this delightful treat in no time. For more delightful ideas, check out my Cherry White Chocolate or Raspberry White Chocolate recipes to keep the sweet creativity going!
White Chocolate Easter Bark Ingredients
• Create a delightful treat this Easter with these simple ingredients!
Advertisement
For the Bark
- White Chocolate Chips (24 ounces) – This creamy base is perfect for melting and spreading.
- Green Candy Melts (2 tablespoons) – Adds a vibrant touch; feel free to substitute with any color to match your theme.
- Pink Candy Melts (2 tablespoons) – Offers a fun contrast; can easily be swapped for other colors.
- Blue Candy Melts (2 tablespoons) – Enhances the colorful aesthetic; choose any color based on your preference.
For the Toppings
- Easter M&M’s (1/4 cup) – Adds sweetness and crunch; replace with your favorite small candies for variety.
- Easter Sprinkles – These fun sprinkles bring festive cheer; try using other colored sprinkles or nuts for a unique twist.
With this easy White Chocolate Easter Bark recipe, you’ll be ready to whip up a colorful treat that’s perfect for sharing or gifting!
Step‑by‑Step Instructions for White Chocolate Easter Bark
Step 1: Prepare Your Workspace
Start by lining a large baking sheet with a Silpat Mat or parchment paper, ensuring there are no wrinkles. This step is essential for easy removal later. Set your workspace near your melting stations, keeping nearby bowls ready for the white chocolate and colored candy melts.
Step 2: Melt the White Chocolate
In a heat-proof bowl, add the white chocolate chips and place it over a saucepan of barely simmering water. Stir frequently for about 5-8 minutes until the chocolate is completely melted and smooth. Be careful not to let the bowl touch the water, as this may cause the chocolate to burn. Once melted, remove from heat and set aside.
Step 3: Melt the Candy Melts
Using separate bowls, measure out the green, pink, and blue candy melts. Melt each color over another pot of simmering water, stirring for about 2-4 minutes until smooth and glossy. Pay attention to the melting process and make sure each color is vibrant before moving on.
Step 4: Spread the White Chocolate
Pour the melted white chocolate onto the prepared baking sheet, using a spatula to spread it evenly into a 1/4-inch thick layer. Ensure the layer is smooth, as this will be the base of your White Chocolate Easter Bark. Take a moment to admire the creamy surface before moving on!
Step 5: Add Candy Melts
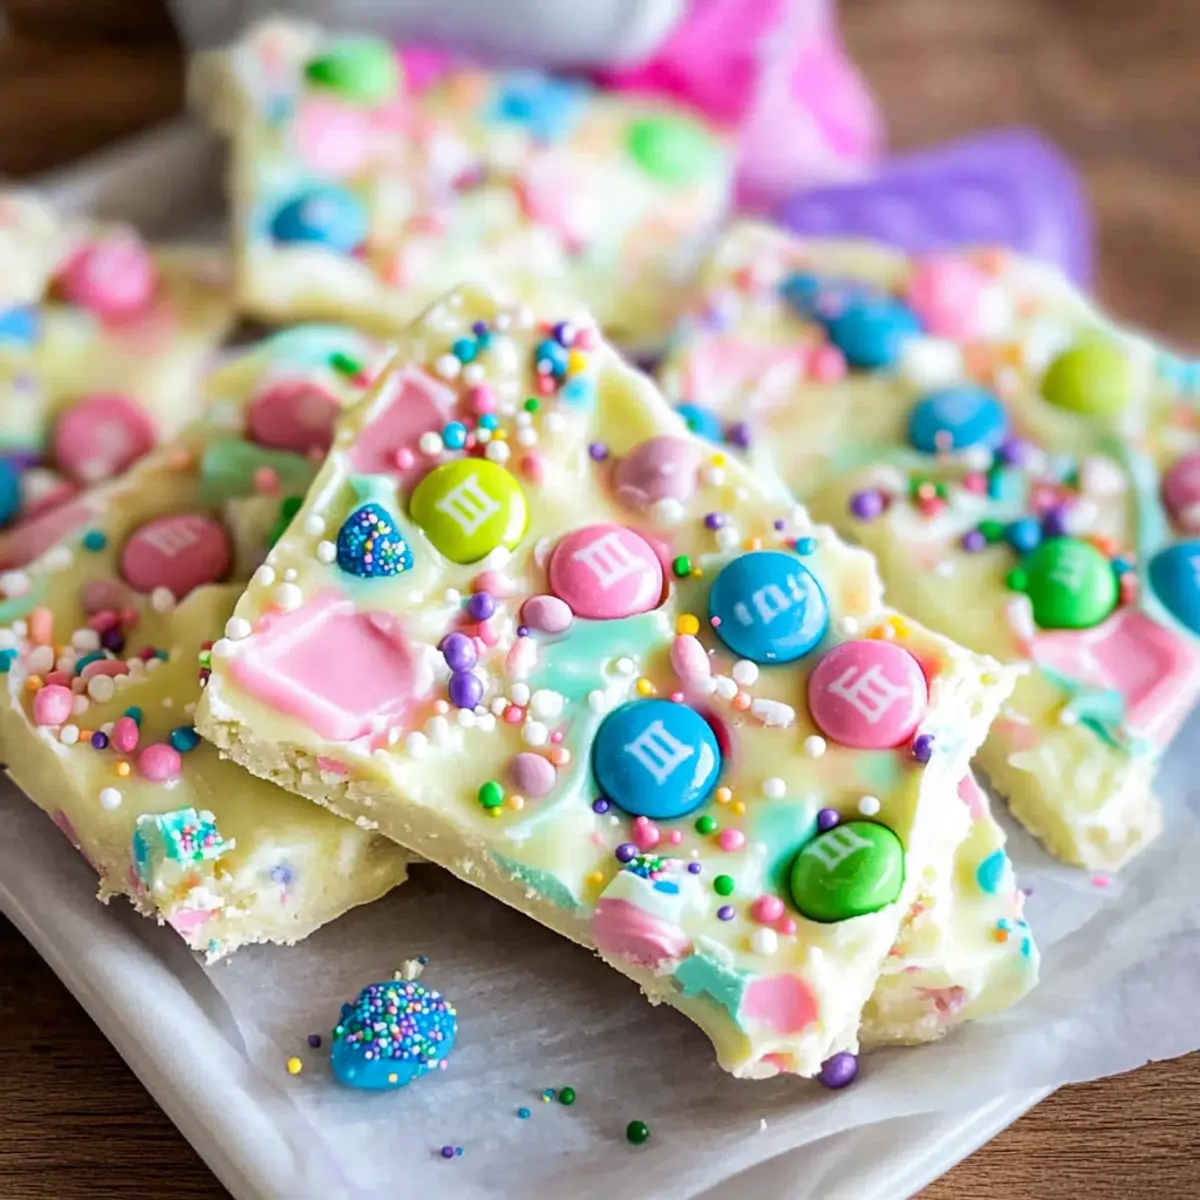
Once the white chocolate is spread evenly, use a spoon to drop dollops of the melted candy melts onto the surface. You can be creative with placement, allowing the bright colors to contrast against the white. Ensure these colors are spaced out, as it will create a beautiful swirled effect later.
Step 6: Swirl the Colors
Using a toothpick or a skewer, gently swirl through the dolloped candy melts and the white chocolate. Take care not to overmix; you want a marbled look that highlights the different colors. This fun swirling is where the creativity of your White Chocolate Easter Bark really shines!
Step 7: Add Toppings
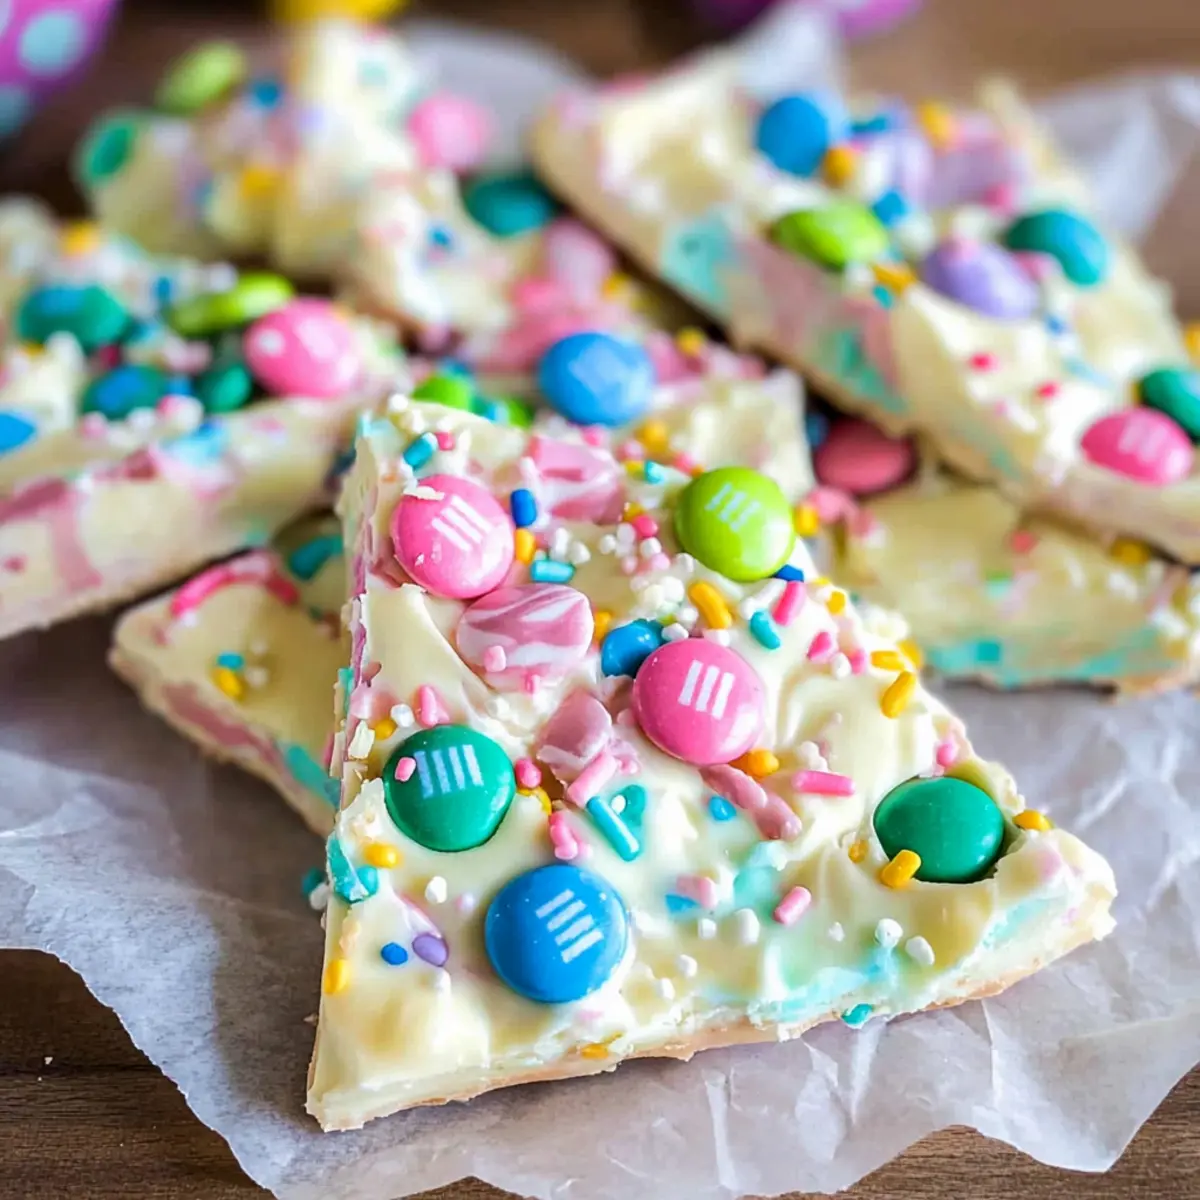
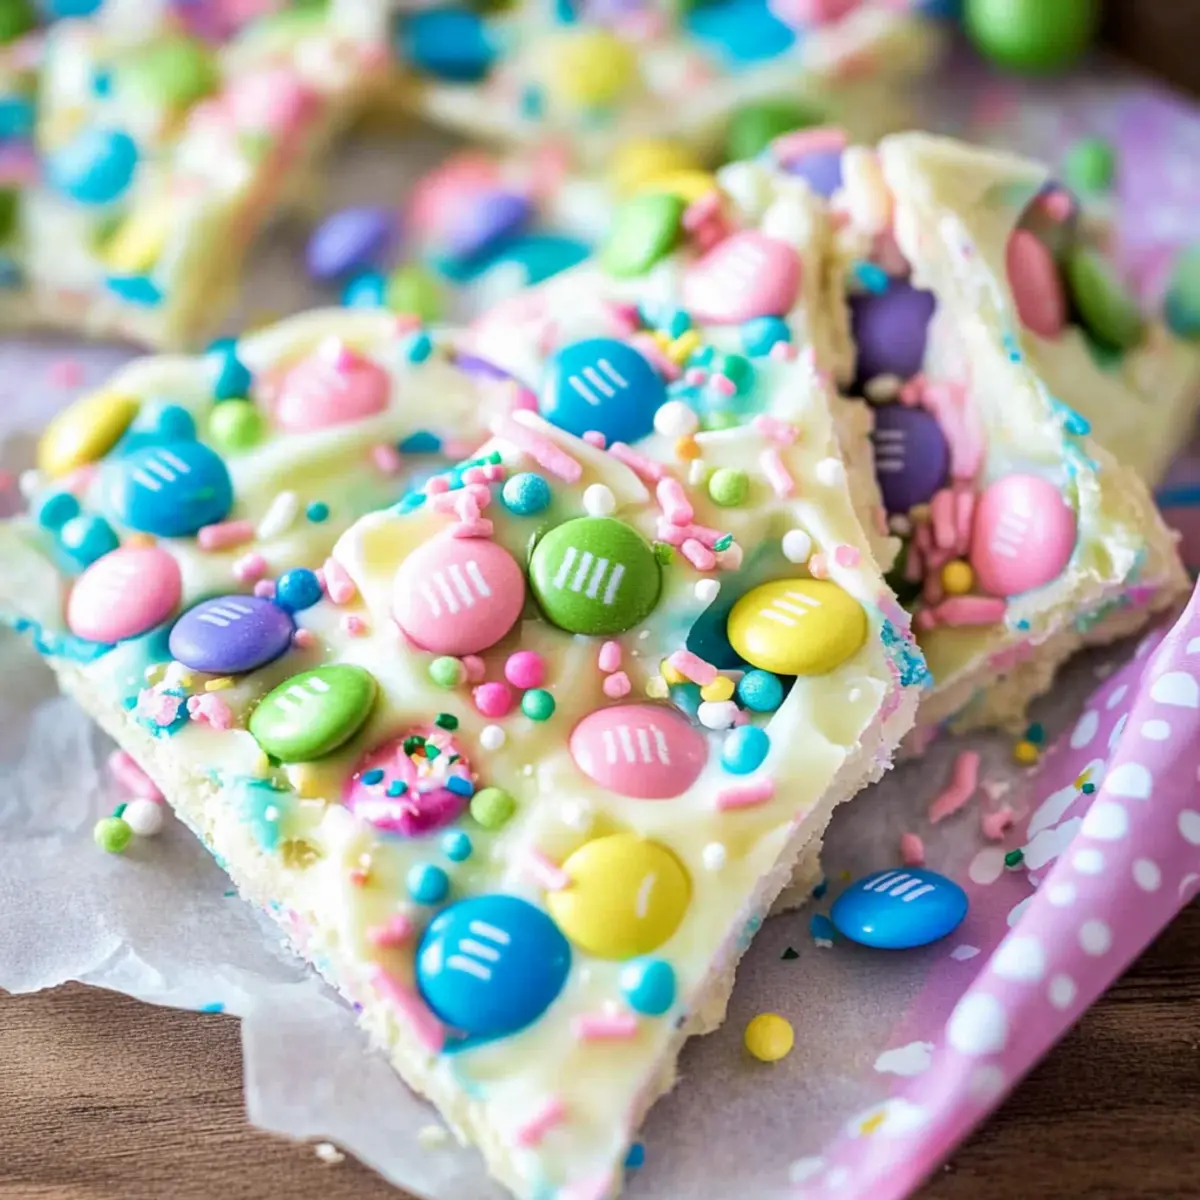
Sprinkle the Easter M&M’s and festive sprinkles across the top while the chocolate is still wet. Press down lightly to ensure they adhere properly. This step adds texture and festive flair to your bark, making it even more appealing as a treat or gift.
Step 8: Chill the Bark
Place the baking sheet in the refrigerator and chill for about 30 minutes, or at room temperature for 2 hours, until the bark is completely set and firm. Check for a matte appearance, indicating it’s ready to be sliced. This chilling time solidifies all those delicious flavors together!
Step 9: Cut and Serve
Once set, remove the baking sheet from the refrigerator. Using a sharp knife, cut the White Chocolate Easter Bark into approximately 16 pieces, or break it into larger chunks for a rustic look. Your delightful treat is ready to be served, enjoyed, or gifted!
Tips for the Best White Chocolate Easter Bark
- Melt Order Matters: Start with the candy melts, as they set more slowly than white chocolate. This ensures a smooth swirl effect without hardening too quickly.
- Avoid Burning: Ensure that the bowls for melting do not touch the boiling water. This prevents the chocolate from burning and keeps the flavors intact.
- Layer Evenly: Spread the melted white chocolate in a uniform 1/4-inch layer to ensure that it sets evenly. An uneven layer can lead to cracking when cut.
- Creative Swirls: Don’t overmix the colors when swirling; you want to maintain some distinctiveness between the white chocolate and candy melts for that visual appeal.
- Storage Tip: Store your completed White Chocolate Easter Bark in an airtight container at room temperature for up to 2-3 weeks to keep it fresh and delicious.
Make Ahead Options
These White Chocolate Easter Bark treats are perfect for busy home cooks looking to streamline their holiday preparations! You can prep the bark up to 24 hours in advance by melting and swirling the white chocolate and colored candy melts, then toppings as specified. Chill it until set, then cover with a layer of plastic wrap to maintain freshness and prevent any stickiness. When you’re ready to serve, simply remove the bark from the refrigerator, cut it into pieces, and voila! You’ll have a stunning, festive dessert that’s just as delicious as when freshly made, allowing you to enjoy more quality time with guests.
White Chocolate Easter Bark Variations
Feel free to customize your White Chocolate Easter Bark into unique creations that suit your taste buds!
-
Dark Chocolate: Swap white chocolate for dark chocolate for a richer, more intense treat. This twist gives a delightful contrast that chocolate lovers will adore!
-
Seasonal Sprinkles: Incorporate seasonal-themed sprinkles or candies for a festive look. Think Halloween or Christmas-themed treats that can brighten up any celebration!
-
Nutty Addition: Add chopped nuts like almonds or walnuts for a crunchy texture that pairs beautifully with the creamy chocolate. This adds depth of flavor and crunch, making each bite memorable.
-
Fruity Burst: Mix in dried fruits such as cranberries or apricots for a sweet and chewy contrast. Not only flavorful, but they also add a delightful chewiness that balances the bark’s smoothness.
-
Coconut Flakes: Sprinkle unsweetened coconut flakes on top for a tropical twist. The coconut’s subtle flavor enhances the treat, making it feel like a beach getaway in every bite.
-
Peppermint Twist: Crushed peppermint candies can make a festive holiday version of your bark. This addition provides a refreshing minty flavor, perfect for winter celebrations.
-
Spicy Kick: Add a dash of cayenne pepper to the melted chocolate before spreading it for a surprising kick. It’s a unique twist that brings warmth and excitement to this sweet treat.
-
Vegan Option: Replace chocolate with dairy-free alternatives to create a vegan-friendly version. It’s delicious and allows everyone to join in the fun, just like my other favorite recipes like Homemade Chocolate Chip cookies!
These variations let you explore and express your flavor creativity, making your White Chocolate Easter Bark even more special and unforgettable!
How to Store and Freeze White Chocolate Easter Bark
Room Temperature: Store your White Chocolate Easter Bark in an airtight container at room temperature for up to 2-3 weeks. This keeps the treats fresh and ready to enjoy!
Fridge: If your home is warmer than 70°F, refrigerate the bark to maintain its texture. It can be kept in the fridge for the same duration of 2-3 weeks.
Freezer: For longer storage, you can freeze the bark in an airtight container. It will hold its quality for up to two months. Just ensure it’s separated by parchment paper to prevent sticking.
Reheating: If the bark becomes too hard, let it sit at room temperature for a few minutes before serving. No need to reheat, as it’s best enjoyed slightly cool and crisp!
What to Serve with White Chocolate Easter Bark?
Indulge your sweet tooth while crafting the perfect festive spread for your Easter celebrations.
- Coffee or Espresso: A rich brew contrasts beautifully with the sweetness of the bark, enhancing its creamy chocolate flavor.
- Chocolate-Dipped Strawberries: These juicy delights add freshness and an additional layer of chocolatey goodness that pairs perfectly with the bark.
- Mini Fruit Tarts: Light and airy, these tarts offer a refreshing fruit balance, counteracting the sweetness of the White Chocolate Easter Bark.
- Sparkling Lemonade: The zesty fizz brings a bright, citrusy note, cutting through the creaminess and adding a celebratory flair.
- Easter-Themed Cupcakes: A festive touch to your dessert table, these add variety and visual appeal that complements the colorful bark.
- Cheese Platter: Add a savory element with a selection of soft cheeses; the richness will create a delightful contrast with the sweet bark.
- Pistachio Ice Cream: Creamy and nutty, its unique flavor profile heightens the taste experience of the bark while providing a cool treat.
- Butter Cookies: These simple cookies offer a buttery crunch that pairs beautifully with the smooth texture of the bark, balancing sweetness.
- Mint Tea: A soothing herbal option, its refreshing notes cleanse the palate, enhancing the dessert experience.
White Chocolate Easter Bark Recipe FAQs
What should I look for when selecting white chocolate?
When choosing white chocolate chips, look for those with high cocoa butter content for a creamier texture. Avoid chips with a lot of additives or waxes; they may not melt smoothly. Quality brands often have a rich vanilla flavor, making your bark even more delightful!
How should I store leftover White Chocolate Easter Bark?
Store your White Chocolate Easter Bark in an airtight container at room temperature for up to 2-3 weeks. Ensure it’s in a cool area, as warmer temperatures can cause the chocolate to melt or become sticky.
Can I freeze White Chocolate Easter Bark, and how?
Absolutely! To freeze your White Chocolate Easter Bark, cut it into pieces and layer them in an airtight container with parchment paper between each layer. This prevents sticking. It can last in the freezer for up to 2 months! When ready to enjoy, simply thaw in the refrigerator for a few hours.
What causes the chocolate to bloom or become dull?
Chocolate can bloom if it’s exposed to moisture or fluctuating temperatures. This creates a white, powdery appearance. To avoid this, store your bark in a cool, dry place and always keep it in airtight containers. Remember, it’s still perfectly safe to eat, even if it looks a bit different!
Is White Chocolate Easter Bark suitable for dogs or pets?
No, white chocolate contains theobromine and caffeine, which are toxic to dogs and other pets. Always keep chocolate treats out of reach of your furry friends. Instead, consider making a pet-friendly treat using carob instead of chocolate!
What should I do if my candy melts don’t melt smoothly?
If your candy melts are clumping or not melting evenly, it’s likely due to overheating or moisture. Make sure you’re melting them over low heat and stirring gently. If they’re too thick after melting, add a small amount of vegetable oil to help smooth them out. This will create that beautiful, glossy finish you desire!

Delicious White Chocolate Easter Bark for Sweet Holiday Fun
Ingredients
Equipment
Method
- Prepare Your Workspace: Start by lining a large baking sheet with a Silpat Mat or parchment paper, ensuring there are no wrinkles. Set your workspace near your melting stations, keeping nearby bowls ready for the white chocolate and colored candy melts.
- Melt the White Chocolate: In a heat-proof bowl, add the white chocolate chips and place it over a saucepan of barely simmering water. Stir frequently for about 5-8 minutes until the chocolate is completely melted and smooth.
- Melt the Candy Melts: Using separate bowls, measure out the green, pink, and blue candy melts. Melt each color over another pot of simmering water, stirring for about 2-4 minutes until smooth and glossy.
- Spread the White Chocolate: Pour the melted white chocolate onto the prepared baking sheet, using a spatula to spread it evenly into a 1/4-inch thick layer.
- Add Candy Melts: Use a spoon to drop dollops of the melted candy melts onto the surface, allowing the bright colors to contrast against the white.
- Swirl the Colors: Using a toothpick or a skewer, gently swirl through the dolloped candy melts and the white chocolate, creating a marbled look.
- Add Toppings: Sprinkle the Easter M&M's and festive sprinkles across the top while the chocolate is still wet. Press down lightly to ensure they adhere properly.
- Chill the Bark: Place the baking sheet in the refrigerator and chill for about 30 minutes, or at room temperature for 2 hours, until the bark is completely set and firm.
- Cut and Serve: Once set, remove the baking sheet from the refrigerator. Using a sharp knife, cut the White Chocolate Easter Bark into approximately 16 pieces or break it into larger chunks for a rustic look.