Advertisement
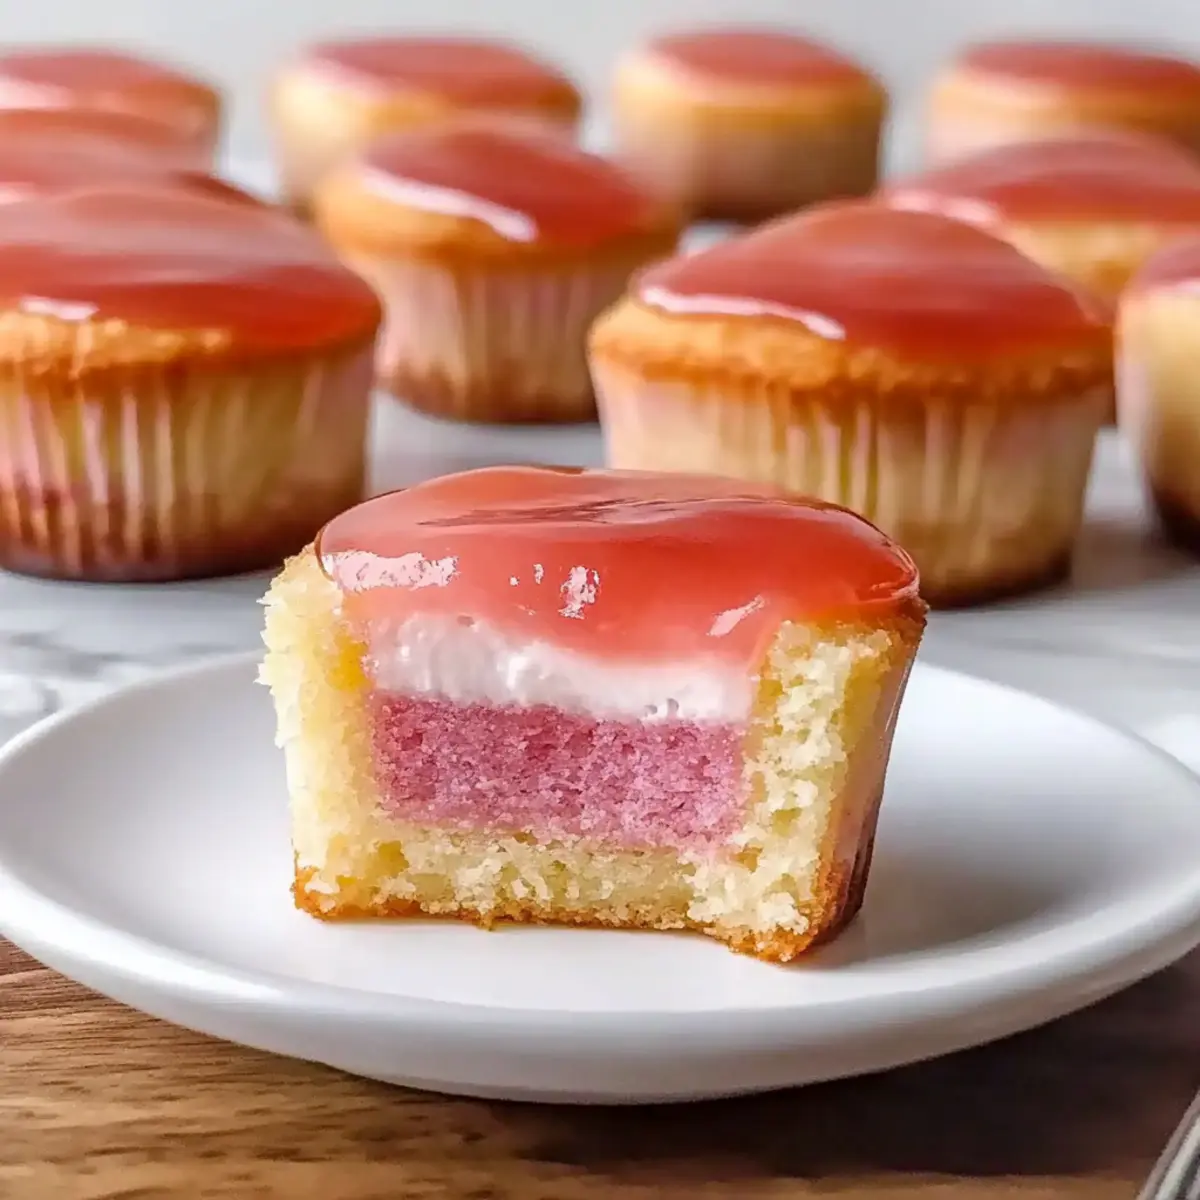
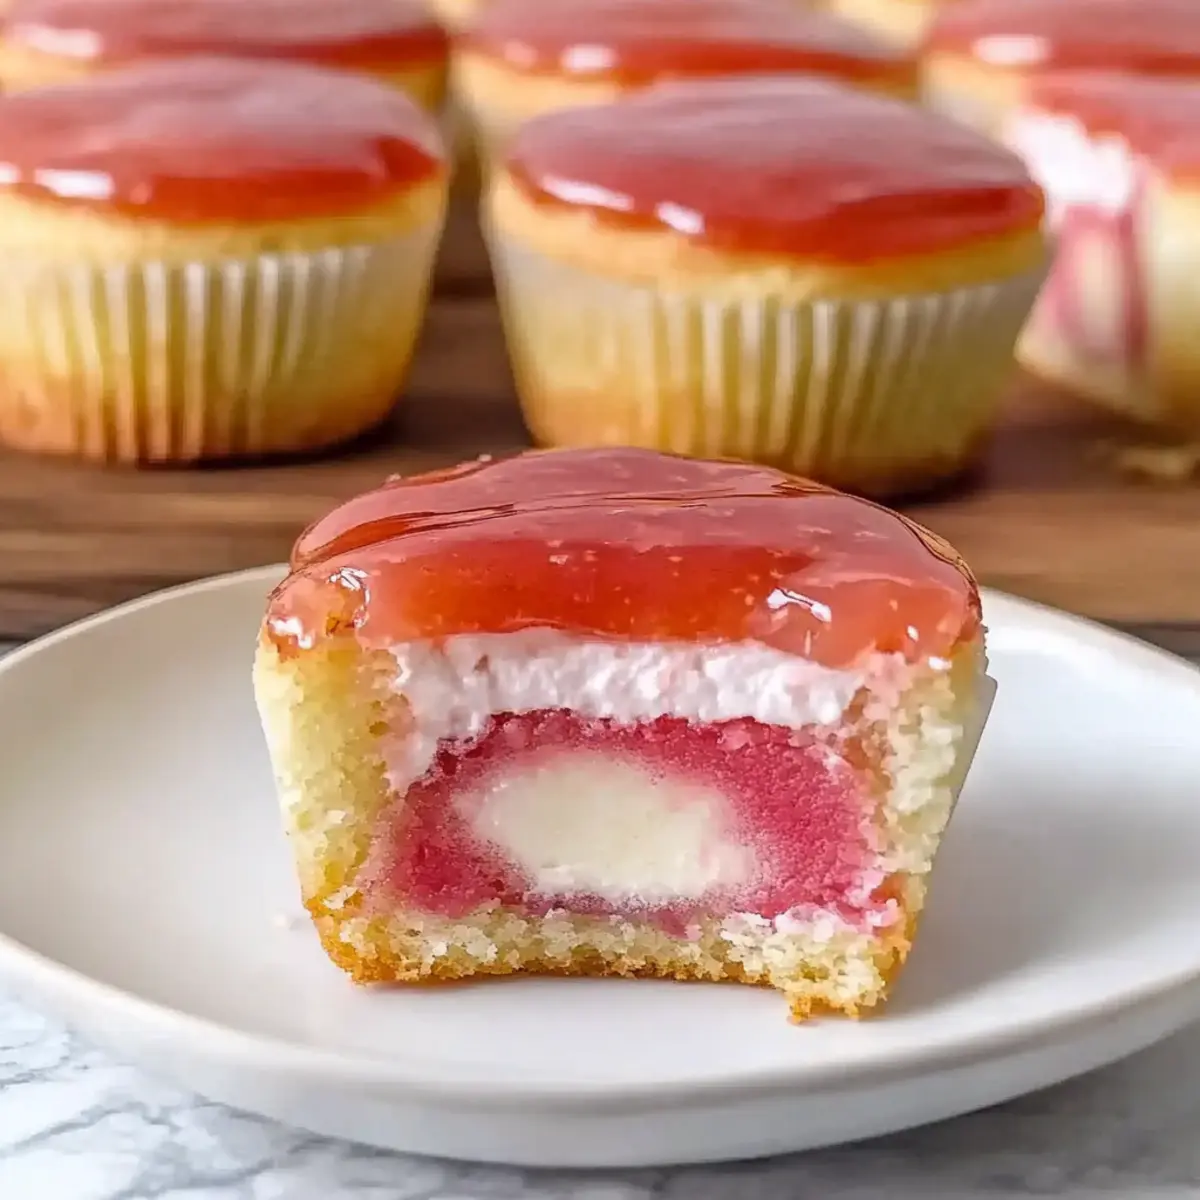
As I strolled through a local market, the sweet aroma of ripe guavas transported me straight to a Hawaiian paradise. That’s when inspiration struck! These Hawaiian Mini Guava Cakes with Cream Cheese Glaze are my culinary homage to the vibrant flavors of the tropics. Every bite offers a delightful fusion of fluffy strawberry cake infused with luscious guava, topped with a creamy glaze that’s downright irresistible. Perfect for gatherings, they’re not only sure to impress but are easy to whip up, bringing a slice of sunshine to your table. Plus, with gluten-free alternatives available, everyone can indulge in this tropical treat. Are you ready to embark on this sweet journey?
Why are Hawaiian Mini Guava Cakes a Must-Try?
Tropical Escape: Every bite of these mini cakes transports you to Hawaii, filling your senses with the essence of summer.
Simple Ingredients: Utilizing easy-to-find components like strawberry cake mix and guava juice keeps this recipe accessible for everyone, from beginners to seasoned bakers.
Advertisement
Versatile Options: Not just for parties, you can adapt this recipe to suit gluten-free or vegan diets, ensuring everyone at your gathering can enjoy a sweet treat.
Effortless Preparation: Fast and easy to whip up, they come together in no time—perfect for busy weekends or last-minute invites.
Gorgeous Presentation: With their vibrant colors and glossy glaze, these mini cakes are as beautiful as they are delicious, making them a showstopper on any dessert table.
Pair them with a refreshing drink, or for more delightful inspiration, check out these easy-to-make Mini Blueberry Muffins or indulge in some delicious Chocolate Chip Cupcakes.
Hawaiian Mini Guava Cakes Ingredients
For the Cake
- Strawberry Cake Mix – A great base for the cake that provides softness and fruity flavor; swap it for vanilla or white cake mix for a different twist.
- Guava Juice/Nectar – Infuses a tropical sweetness and moisture into the cake and glaze; feel free to use fresh guava juice if you’re up for some prep!
- Eggs – Essential for binding the cake together; flax eggs work well as a vegan substitute.
- Coconut Oil – Adds richness and a hint of tropical flavor; you can substitute it with melted butter or vegetable oil for a different taste.
For the Topping
- Cream Cheese – Creates a rich and creamy layer for the topping; for a vegan option, choose dairy-free cream cheese.
- Sugar – Sweetens the cream cheese topping; consider reducing the amount if you prefer a less sweet topping.
- Cool Whip (or equivalent whipped topping) – Lightens the cream cheese mixture, giving it an airy texture; a dairy-free whipped topping can help for vegan adaptations.
For the Glaze
- Cornstarch – Helps thicken the glaze to the perfect consistency; no substitutes are needed here.
- Water – Mixed with cornstarch to create a slurry for the glaze.
- Guava Juice (for glaze) – Adds that final touch of tropical flavor and a glossy finish to your Hawaiian Mini Guava Cakes; remember, using pure guava nectar enhances the tropical vibe!
With these ingredients at your fingertips, you’re ready to create a delightful tropical escape right from your kitchen!
Step‑by‑Step Instructions for Hawaiian Mini Guava Cakes
Step 1: Preheat the Oven
Begin by preheating your oven to 350°F (175°C). While the oven warms up, prepare a cupcake pan by lining it with cupcake liners. This step sets the stage for baking your Hawaiian Mini Guava Cakes to perfection, ensuring they rise beautifully and come out easily once baked.
Step 2: Mix the Batter
In a large mixing bowl, combine the strawberry cake mix, guava juice, eggs, and melted coconut oil. Use an electric mixer to blend the ingredients on medium speed for about 2 minutes, until your batter is smooth and free of lumps. This vibrant mix combines the tropical sweetness of guava with a hint of coconut, creating a delightful base for the mini cakes.
Step 3: Fill and Bake
Carefully fill each cupcake liner about one-third full with the prepared batter. This allows room for rising while baking. Place the filled pan in your preheated oven and bake for 19-22 minutes. Keep an eye on them; when they are golden and a toothpick inserted into the center comes out clean, you’ll know your Hawaiian Mini Guava Cakes are ready.
Step 4: Cool the Cakes
Once baked, remove the cupcake pan from the oven and allow the mini cakes to cool in the pan for 5 minutes. Then, gently transfer them to a wire rack to cool completely. This cooling process is essential, as it prevents the cakes from becoming soggy and prepares them for their luscious toppings.
Step 5: Prepare the Guava Glaze
In a small saucepan, combine guava juice and sugar over medium heat. Bring the mixture to a gentle boil, stirring frequently. Once boiling, mix cornstarch with a little water to create a slurry, then add it to the saucepan. Cook for an additional minute until the glaze thickens and becomes glossy, then remove from heat and set it aside to cool.
Step 6: Make the Cream Cheese Topping
In a mixing bowl, beat the cream cheese until fluffy using an electric mixer. Gradually add sugar and a splash of vanilla extract, blending until smooth. Fold in the Cool Whip until everything is well combined. This creamy mixture will serve as a delicious layer on your cooled Hawaiian Mini Guava Cakes, adding richness and a delightful contrast to the fruity glaze.
Step 7: Frost the Cakes
Once the mini cakes are completely cool, spread the cream cheese topping generously on each one. A spatula or knife works great for this step. The fluffy cream cream cheese layer serves as a perfect canvas for the glossy guava glaze to come, making each bite irresistible and beautifully layered.
Step 8: Glaze and Chill
Finally, drizzle the chilled guava glaze over the frosted cakes, allowing it to cascade down the sides. Once glazed, refrigerate the Hawaiian Mini Guava Cakes for at least 30 minutes to let the toppings set and meld beautifully together. This step ensures a delightful presentation and enhances the flavors before serving.
What to Serve with Hawaiian Mini Guava Cakes
Elevate your tropical experience by pairing these delightful cakes with our carefully chosen accompaniments.
-
Coconut Rice: This fluffy, fragrant dish complements the tropical theme while balancing the sweetness of the cakes, creating a harmonious meal experience. Its subtle nuttiness pairs beautifully with the fruity flavors.
-
Fresh Fruit Salad: A vibrant mix of diced tropical fruits like pineapple, mango, and kiwi brings freshness and a burst of color, enhancing the tropical vibe of your dessert spread. A drizzle of lime over the salad adds a zesty contrast.
-
Tropical Fruit Punch: Serve a refreshing drink made from guava, pineapple, and orange juice. This lively punch not only quenches your thirst but also mirrors the flavors of the cakes, crafting an all-around tropical celebration.
-
Whipped Cream or Cool Whip: A dollop of light whipped cream can add an airy texture that balances the richer cream cheese topping, providing a delightful contrast with every bite.
-
Chocolate-Covered Macadamia Nuts: These sweet, crunchy bites add a nutty richness that complements the light texture of the mini cakes. They make for an indulgent treat that enhances the overall tropical experience.
-
Green Tea: A warm, soothing cup of green tea provides a lovely herbal note that cuts through the sweetness of the cakes, making it a perfect palate cleanser. Its gentle flavor enhances the cake experience without overwhelming it.
-
Toasted Coconut Flakes: A sprinkle of toasted coconut adds a delightful crunch and nutty flavor to each slice, enhancing the tropical aesthetic and providing an additional layer of texture. Simply toast the coconut until golden for an irresistible topping.
Let the flavors dance together, creating an unforgettable island-inspired feast!
How to Store and Freeze Hawaiian Mini Guava Cakes
Fridge: Store your Hawaiian Mini Guava Cakes in an airtight container for up to 3-4 days to keep them fresh and moist.
Freezer: For long-term storage, freeze the unglazed cakes for up to 2 months. Wrap them tightly in plastic wrap and foil before placing them in a freezer bag to prevent freezer burn.
Thawing: Thaw the frozen cakes in the refrigerator overnight before glazing. This ensures they maintain their delightful texture.
Reheating: If desired, enjoy your mini cakes slightly warmed. Just pop them in the microwave for about 10-15 seconds for a cozy treat!
Expert Tips for Hawaiian Mini Guava Cakes
-
Baking Time Matters: Keep a close eye on your mini cakes to prevent overbaking; seek that light golden color and a clean toothpick test for perfect results.
-
Chill Before Glazing: Allow the cream cheese topping to chill before spreading it on the cakes. This helps achieve a firmer texture that won’t melt into the cake.
-
Guava Best Practices: If using fresh guava juice, strain it for a smoother glaze. This enhances the silky finish, making your Hawaiian Mini Guava Cakes truly spectacular.
-
Egg Alternatives: For a vegan adaptation, use flax eggs instead of regular eggs. This keeps the cakes light while making them suitable for a broader audience.
-
Don’t Rush Cooling: Be sure to let your cakes cool completely on a wire rack before adding any toppings. This step prevents sogginess and ensures the perfect texture.
-
Experiment with Flavors: Feel free to swap out the strawberry cake mix for vanilla or chocolate to create your signature twist on these tropical Hawaiian Mini Guava Cakes.
Make Ahead Options
These Hawaiian Mini Guava Cakes are perfect for meal prep enthusiasts! You can prepare the cake base up to 24 hours in advance by baking and cooling the mini cakes, then storing them in an airtight container in the refrigerator. This helps maintain their soft texture. Additionally, the guava glaze can be made and refrigerated up to 3 days ahead; just allow it to come to room temperature before glazing. The cream cheese topping can also be prepared and stored in the fridge for up to 3 days. When you’re ready to serve, simply frost the chilled cakes with the cream cheese mixture and drizzle the glaze on top for a quick, tropical treat that’s just as delicious as when freshly made!
Hawaiian Mini Guava Cakes Variations & Substitutions
Feel free to explore these delightful twists and substitutions, transforming your Hawaiian Mini Guava Cakes into a personal masterpiece!
-
Gluten-Free: Use a gluten-free cake mix instead of traditional to cater to gluten sensitivities without sacrificing flavor or texture.
-
Vegan Delight: Substitute flax eggs for regular eggs and dairy-free cream cheese for a plant-based option that everyone can enjoy. You won’t even miss the dairy!
-
Fruit Boost: Incorporate fresh guava puree into the batter for an intense fruit flavor and a tropical texture that will transport you straight to Hawaii.
-
Flavor Swap: Experiment by swapping the strawberry cake mix for chocolate or lemon cake mix to explore unique flavor combinations that everyone will love. Each version tells a different tropical story!
-
Coconut Oil Alternative: If you prefer, use olive oil or unsalted butter instead of coconut oil for a unique twist that still delivers amazing results.
-
Mini Muffins: For a fun bite-sized snack, bake the batter in mini muffin tins for a sweet treat at brunch or as a delightful snack. Perfect for gathering and sharing!
-
Fruity Add-Ins: Try adding shredded coconut or chopped macadamia nuts to the cake batter for an extra layer of texture, echoing the rich flavors of Hawaiian cuisine.
-
Layered Cakes: Create an impressive layered dessert by slicing the baked cakes in half and adding cream cheese frosting between the layers for an elegant presentation.
Pair these mini cakes with some refreshing green tea or a scoop of vanilla ice cream for the ultimate tropical experience. If you love light desserts, also consider making these Mini Blueberry Muffins for another fruity treat, and don’t forget about my delightful Chocolate Chip Cupcakes for more sweet inspiration!
Hawaiian Mini Guava Cakes Recipe FAQs
How do I select ripe guavas for this recipe?
Absolutely! Look for guavas that are slightly soft to the touch with a fragrant aroma. They should have a yellowish or pale green color, indicating ripeness. Avoid those with dark spots all over, as they may be overripe.
What’s the best way to store leftovers?
Very! Store your Hawaiian Mini Guava Cakes in an airtight container in the refrigerator for up to 3-4 days. This keeps them moist and delicious for your next snack!
Can I freeze the Hawaiian Mini Guava Cakes?
Absolutely! To freeze, make sure the mini cakes are unglazed. Wrap each one tightly in plastic wrap, then place them in a freezer bag to avoid freezer burn. They can be frozen for up to 2 months. When you’re ready to enjoy them, thaw the cakes in the refrigerator overnight before adding your glaze.
What should I do if my cakes sink in the middle?
Don’t worry, it happens! To prevent this, make sure your oven is properly preheated before baking. Additionally, avoid overmixing the batter, as this can incorporate too much air. Lastly, check the baking powder for freshness, as expired leavening agents can lead to collapse.
Are there any dietary considerations for pets or allergies?
Definitely! These Hawaiian Mini Guava Cakes contain ingredients like eggs and dairy, which should be avoided for pets. If you’re making them for guests with allergies, be sure to ask about gluten and dairy sensitivities since substitutions can be made! For a gluten-free version, simply use a gluten-free cake mix.
Can I adjust the sweetness of the cream cheese topping?
Very! If you’re looking for a less sweet topping, reduce the sugar in the cream cheese mixture. You can start by cutting the sugar amount in half and taste-testing for preferred sweetness. Adding a little lemon juice can also balance flavors without adding much sweetness.
Hawaiian Mini Guava Cakes for a Tropical Treat at Home
Ingredients
Equipment
Method
- Preheat your oven to 350°F (175°C) and prepare a cupcake pan with liners.
- In a mixing bowl, combine strawberry cake mix, guava juice, eggs, and coconut oil. Mix on medium for 2 minutes.
- Fill cupcake liners one-third full with the batter and bake for 19-22 minutes until golden.
- Cool in the pan for 5 minutes, then transfer to a wire rack.
- In a saucepan, combine guava juice and sugar, bring to boil. Mix cornstarch with water, add to saucepan, and cook until thickened.
- Beat cream cheese, gradually adding sugar, then fold in Cool Whip.
- Spread cream cheese topping on cooled cakes, then drizzle with guava glaze.
- Refrigerate for at least 30 minutes to set toppings.