Advertisement
As the leaves turn and the air fills with anticipation, I can’t help but reminisce about the joy of creating memories in the kitchen during Halloween. This year, I’m excited to share a fun and delicious recipe—DIY Halloween Mini Pizzas! It’s a perfect blend of creativity and taste that brings the whole family together. You can transform simple ingredients into spooky delights, making it an ideal choice for parties, family dinners, or cozy Halloween movie nights. In just 25 minutes, you’ll have mouthwatering, customizable pizzas that will delight both kids and adults alike. Plus, with gluten-free options available, everyone can join in on the fun. Are you ready to get your creative juices flowing and whip up some festive pizza magic? Let’s dive into the delightful world of Halloween Mini Pizzas!
Why Are Mini Pizzas a Halloween Hit?
Fun and Creative: Let your imagination run wild! These DIY Mini Halloween Pizzas invite everyone to design their own spooky creations, from ghostly mummies to jack-o’-lantern faces. Flavorful Combinations: With gooey cheese and your choice of toppings, each bite is bursting with deliciousness, ensuring a treat for every palate. Quick Preparation: Ready in just 25 minutes, these mini pizzas are perfect for those last-minute Halloween gatherings. Versatile Options: Tailor each pizza to dietary preferences with gluten-free crusts or veggie toppings, making them a festive favorite for all. Don’t forget to pair them with a fun drink, like Witch’s Brew, for an unforgettable experience!
Halloween Mini Pizzas Ingredients
For the Pizza Base
• Mini Pizza Crusts – Use store-bought for convenience or make your own for a personal touch.
Advertisement
For the Sauce
• Pizza Sauce – A classic choice for a flavorful base; garlic butter or pesto can add an intriguing twist.
For the Cheese
• Shredded Mozzarella Cheese – Provides that gooey melt and rich flavor; try mixing with other cheeses for added depth.
• Mozzarella Slices – Cut into spooky ghost shapes for a fun visual; feel free to swap with provolone or cheddar.
For the Toppings
• Pepperoni Slices – A traditional favorite; consider using veggies to create healthier alternatives.
• Black Olives – Perfect for crafting “eyes,” but cherry tomatoes or capers can also bring creativity.
• Orange Bell Pepper – Cut into pumpkin shapes to enhance the festive spirit of your Halloween Mini Pizzas.
These ingredients will not only make your pizzas delicious but will also leave your family eagerly awaiting the spooky creations!
Step‑by‑Step Instructions for Halloween Mini Pizzas
Step 1: Preheat and Prepare
Begin by preheating your oven to 400°F (200°C). While the oven heats up, line a baking sheet with parchment paper to prevent sticking. This is a crucial step for ensuring that your mini pizzas have a delightful, crispy base. Set the tray aside as you gather your mini pizza crusts and arrange them on the lined baking sheet.
Step 2: Sauce it Up
Take your pizza sauce and evenly spread it on each mini pizza crust using a spoon or a spatula. Aim for a generous layer that will keep your crust moist and flavor-packed. This foundational layer is key to your Halloween Mini Pizzas, so don’t skim on it! Make sure to cover the entire surface to enhance every bite’s deliciousness.
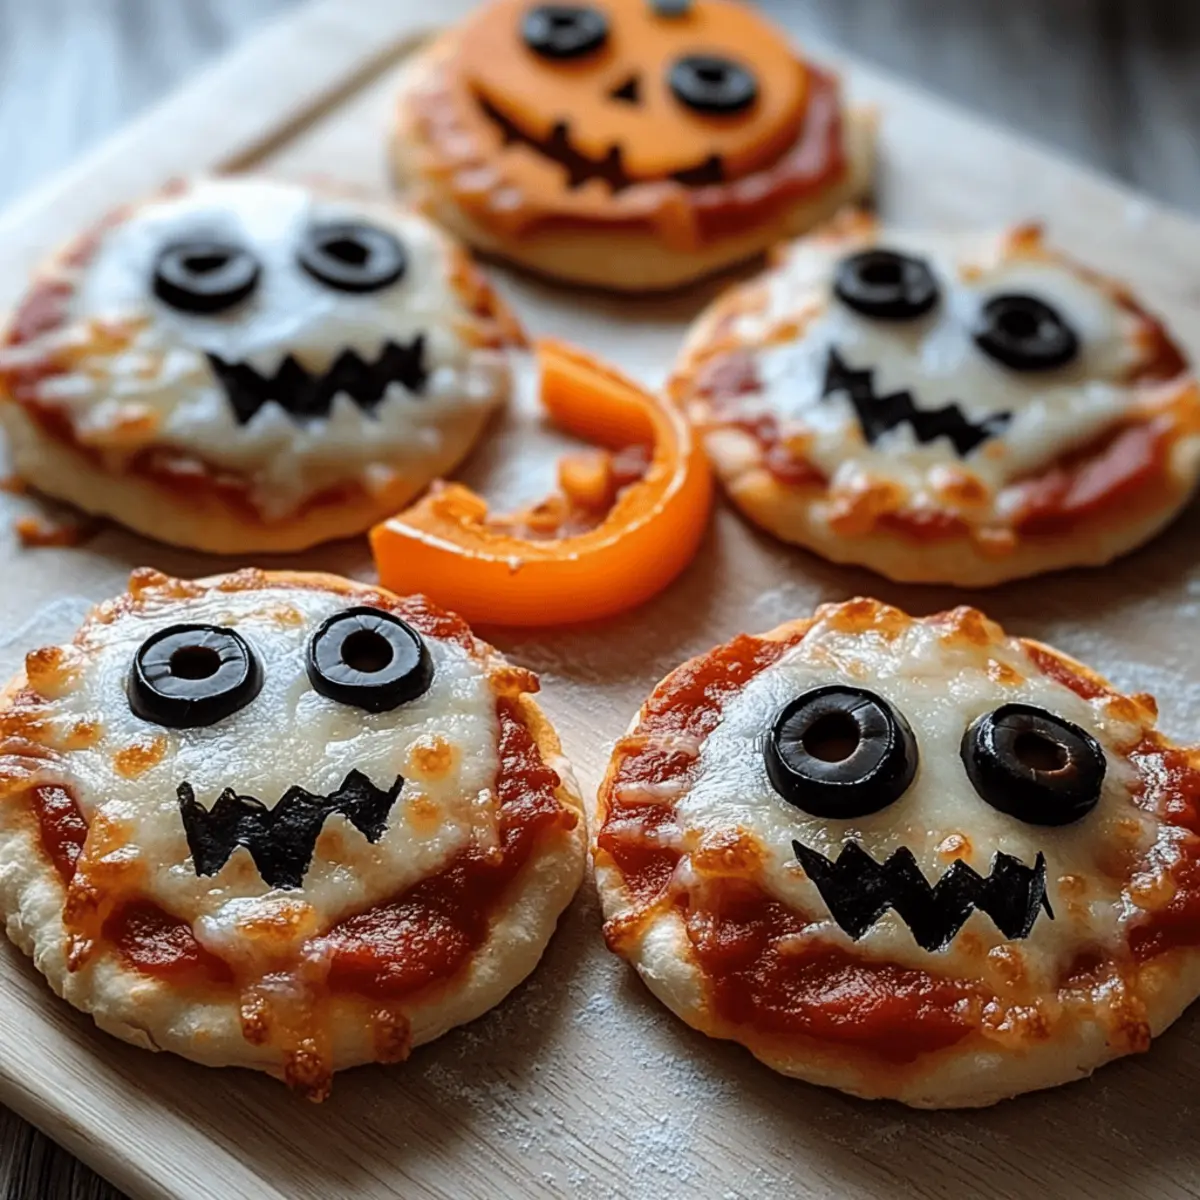
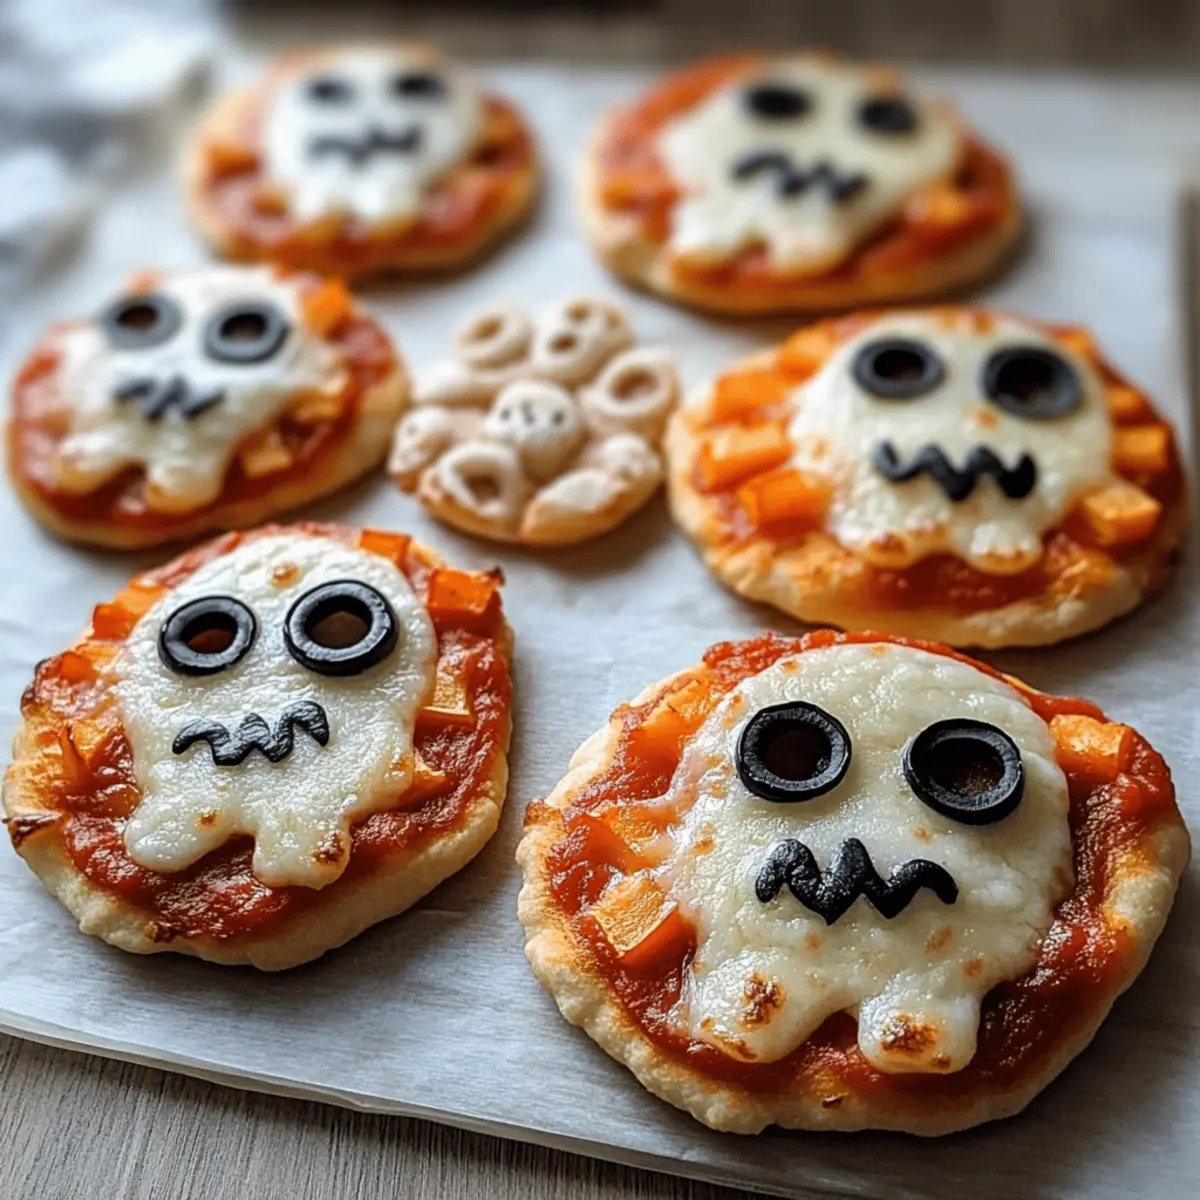
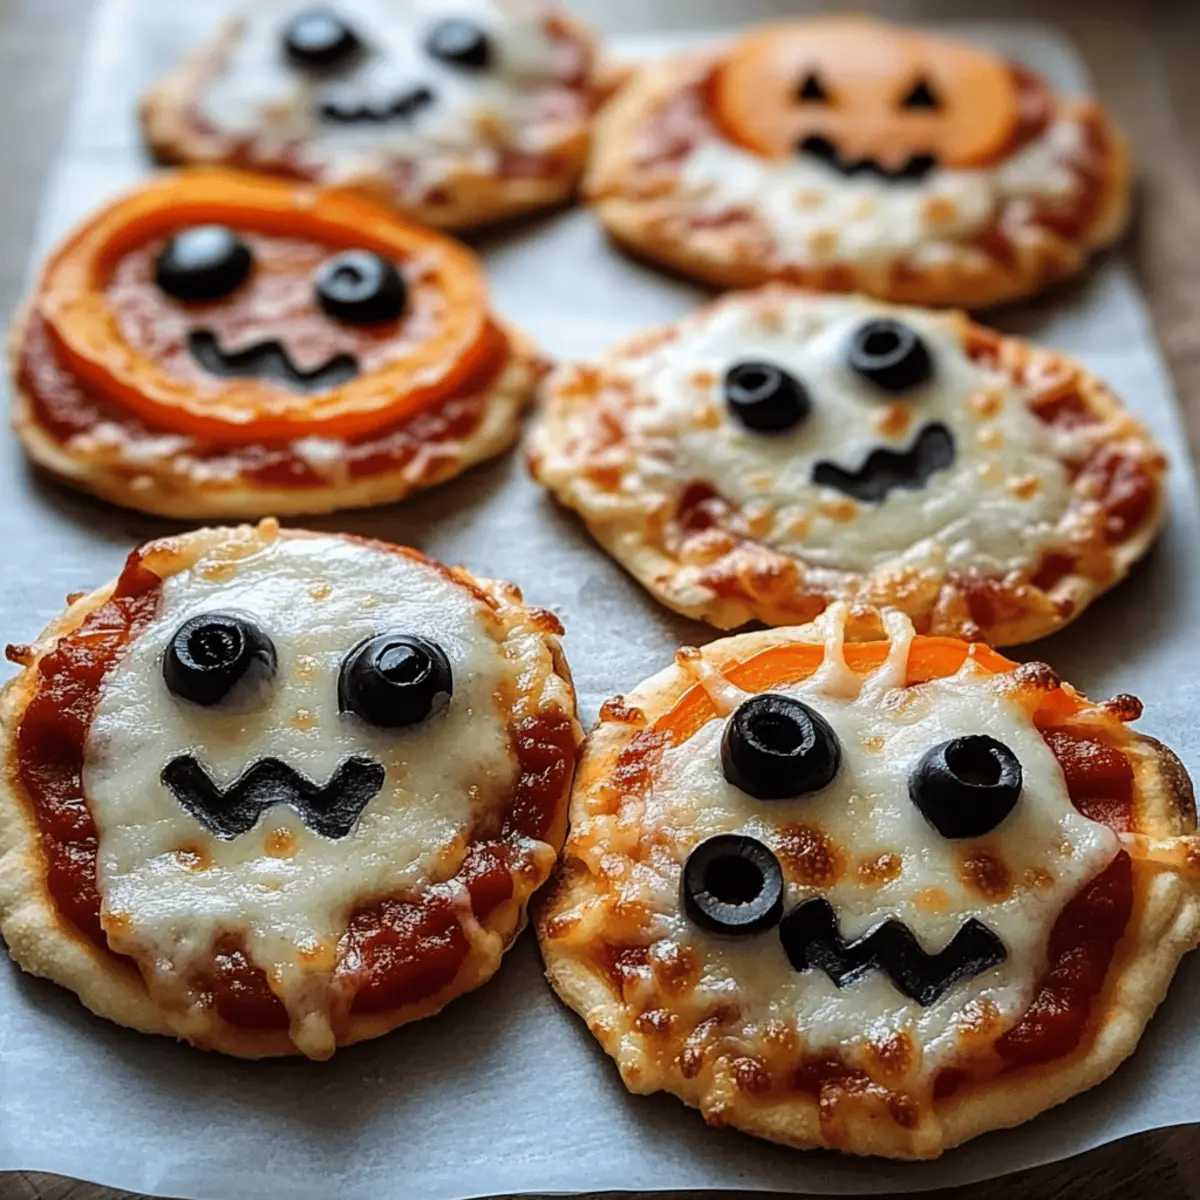
Step 3: Create Your Ghost Pizzas
For the spooky ghost pizzas, cut mozzarella slices into ghost shapes using a cookie cutter or a knife—let your creativity shine here! Once you have your ghostly shapes ready, place them atop the pizza sauce. To add personality, use sliced black olives for the eyes, creating an eerie and delightful appearance that will excite your little ghouls!
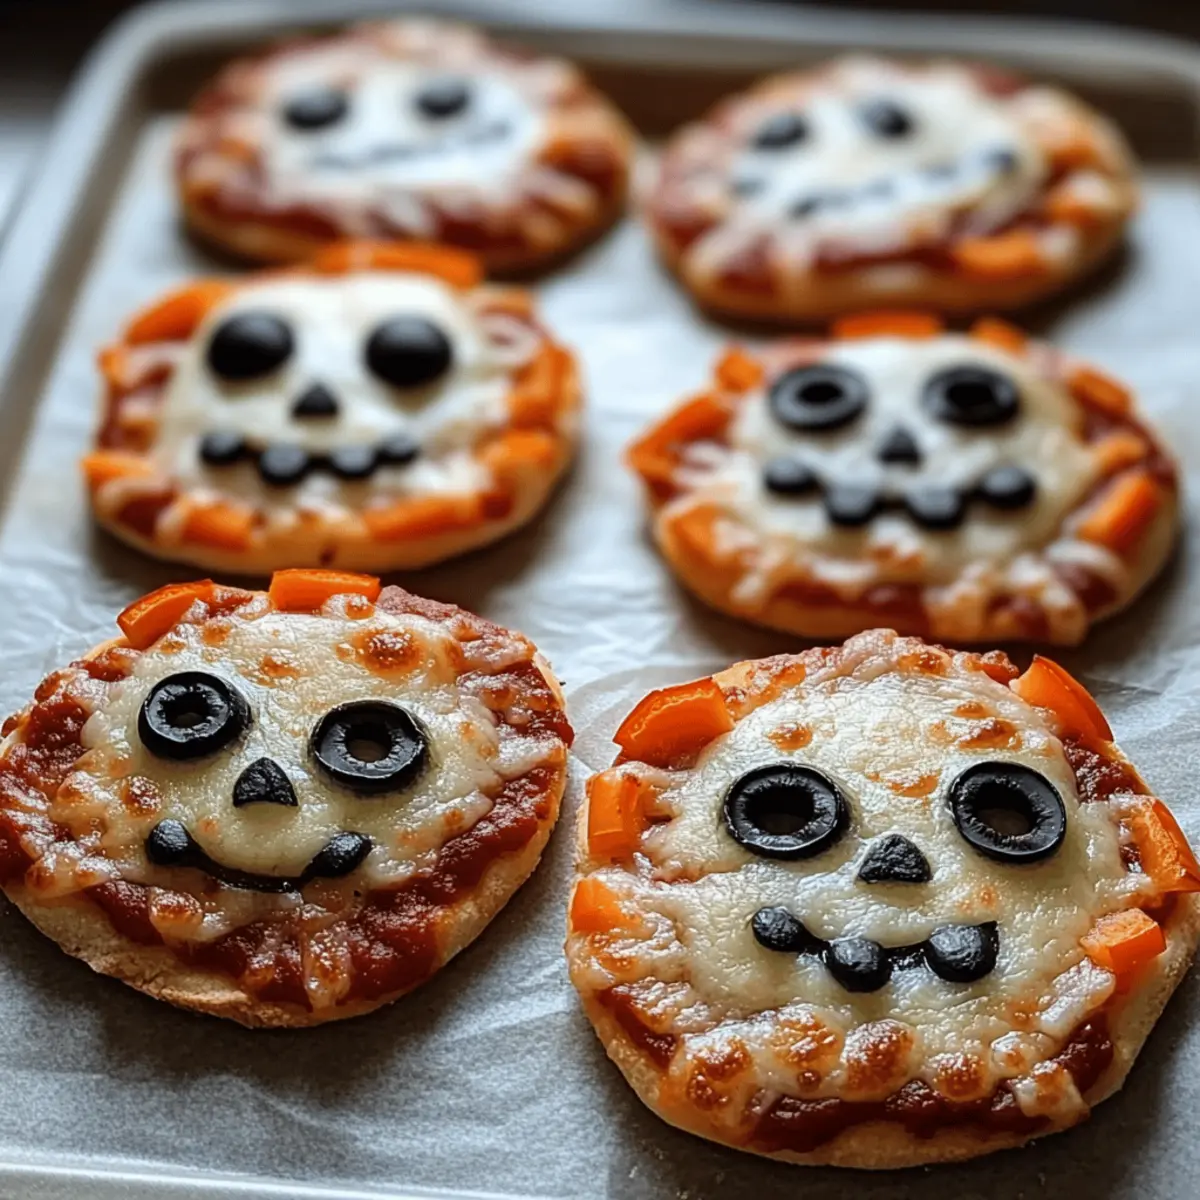
Step 4: Assemble the Mummy Pizzas
Next, transform the remaining mini pizzas into mummy masterpieces. Layer strips of mozzarella cheese over the sauce in a crisscross pattern to resemble bandages, leaving small gaps for the “eyes.” Once you’ve got your mummies looking just right, place sliced black olives at the top of the pizza for the eyes, ready to bake into a cheesy, delicious horror!
Step 5: Design the Jack-o’-Lantern Pizzas
For the jack-o’-lantern pizzas, sprinkle shredded mozzarella cheese generously over the sauce. Next, meticulously arrange orange bell pepper slices into playful pumpkin faces, giving each pizza character. This is a great opportunity for the kids to join in and get creative. They’ll look fantastic and flavorful, adding a festive touch to your Halloween Mini Pizzas.
Step 6: Bake Until Golden
Slide the baking sheet with your mini creations into the preheated oven. Bake for 8-10 minutes or until the cheese is beautifully melted and bubbly with a hint of golden brown. Keep a watchful eye on them as they bake, ensuring they reach that perfect level of doneness, which will ensure your Halloween Mini Pizzas are as delicious as they are charming!
Step 7: Serve and Enjoy
Once baked to perfection, carefully remove the mini pizzas from the oven. Allow them to cool for a minute before serving. These spooky delights are best enjoyed warm and are perfect for sharing with family and friends. Gather everyone around and watch their faces light up as they dig into these festive Halloween Mini Pizzas!
Halloween Mini Pizzas: Customize Your Spookiness
Dive into personalizing your Halloween Mini Pizzas with these fun and creative variations! Each adjustment brings a new twist that delights both the eyes and the taste buds.
- Gluten-Free: Substitute mini pizza crusts with gluten-free alternatives to accommodate dietary needs without sacrificing flavor.
- Veggie Delight: Revamp your classic pepperoni with roasted zucchini, mushrooms, or spinach, making it a deliciously healthy option.
- Spicy Kick: Add a sprinkle of red pepper flakes or sliced jalapeños for those who like their pizzas with a bit of heat.
- Sweet Twist: Use a base of BBQ sauce instead of pizza sauce and top with shredded chicken and red onions for a gourmet twist.
- Cheese Lover’s Dream: Mix shredded mozzarella with sharp cheddar or creamy goat cheese for an extra gooey, flavorful punch.
- Creative Faces: Get playful with toppings! Use cherry tomatoes and green onions to create whimsical designs, perfect for playful family fun.
- Sauce Swap: For a different flavor, try pesto or Alfredo sauce; they add a rich dimension to your mini masterpieces.
- Chill Out: Let your pizzas cool slightly and top with fresh arugula or basil for a fresh, herbaceous finish that’ll impress everyone.
For even more delightful bites, check out my recipe for Mini Blueberry Muffins as a sweet dessert option or serve with festive drinks like Witch’s Brew for a perfectly themed gathering!
What to Serve with DIY Mini Halloween Pizzas
Get ready to elevate your spooky feast with delightful pairings that complement the whimsical charm of mini pizzas.
-
Crispy Garlic Bread: The perfect side, offering buttery, garlicky goodness that balances the flavors of the cheesy pizzas.
-
Halloween Fruit Salad: A colorful medley of fresh fruits like orange cantaloupe and blackberries creates a refreshing contrast. Add some spooky-shaped fruit cutouts for extra fun!
-
Pumpkin Soup: Creamy, warm pumpkin soup serves as a cozy companion, enhancing the festive spirit while offering a velvety texture.
-
Roasted Veggie Platter: A mix of seasonal veggies, roasted to perfection, adds texture and nutrients. Pair with a dip for a savory crunch that enhances the meal’s appeal.
-
Themed Drinks: Serve “Witch’s Brew” soda with vibrant colors, or create a mocktail with fizz and seasonal flavors that intrigue both kids and adults.
-
Chocolate-Covered Pretzels: These sweet treats bring a salty-sweet contrast to your mini pizzas. They’re ideal for snack time and an easy way to add a bit of decadence to the spread.
With these delightful combinations, your DIY Mini Halloween Pizzas will be the star of a memorable, festive gathering!
How to Store and Freeze Halloween Mini Pizzas
Fridge: Store leftover Halloween Mini Pizzas in an airtight container for up to 3 days. This keeps them fresh while maintaining their delightful flavor and texture.
Freezer: For longer storage, you can freeze the mini pizzas for up to 2 months. Just wrap them tightly in plastic wrap and place them in a freezer-safe container to prevent freezer burn.
Reheating: When ready to enjoy, reheat the mini pizzas in the oven at 350°F (175°C) for about 10-15 minutes, or until heated through and the cheese is gooey again.
Custom Tips: If you plan to customize your pizzas, consider storing individual toppings separately to maintain freshness and flavor for your Halloween Mini Pizzas.
Tips for the Best Halloween Mini Pizzas
-
Dough Options: Choose the right crust: Store-bought mini crusts save time, but homemade options add a personal touch. Consider gluten-free options to cater to dietary needs.
-
Layer Wisely: Sauce first!: Spread the pizza sauce generously to prevent a soggy crust. A good base enhances flavor and creates that deliciously crispy edge.
-
Garnish Creatively: Shape with love: Use cookie cutters for fun cheese and veggie shapes. This not only adds whimsy but makes the Halloween Mini Pizzas visually appealing!
-
Baking Perfection: Keep an eye on it: Bake until golden brown but avoid overcooking. A lighter baking sheet helps with even cooking, ensuring all pizzas finish perfectly.
-
Customize with Care: Topping choices: Feel free to swap traditional pepperoni with healthier options like turkey slices or veggies, ensuring everyone can enjoy a festive slice!
Make Ahead Options
These DIY Halloween Mini Pizzas are ideal for meal prep, saving you time during the festive rush! You can prepare the mini pizza crusts and toppings up to 24 hours in advance. Simply assemble the mini pizzas without baking and store them in an airtight container in the refrigerator. Make sure to layer parchment paper between the pizzas to prevent sticking, keeping them fresh and delicious. When you’re ready to serve, just pop them in the oven at 400°F (200°C) for 8-10 minutes, watching for that perfect golden melt. This way, you can enjoy spooky, satisfying pumpkin faces or ghostly morsels with minimal effort on busy weeknights!
Halloween Mini Pizzas Recipe FAQs
How do I choose the right mini pizza crust for Halloween Mini Pizzas?
Absolutely! You can use store-bought mini pizza crusts for convenience, or if you’re feeling adventurous, homemade options bring a lovely personal touch to your creation. For those with dietary restrictions, gluten-free crusts are widely available and work perfectly for these festive pizzas.
How should I store leftover Halloween Mini Pizzas?
Very! To keep your leftover Halloween Mini Pizzas fresh, store them in an airtight container in the fridge for up to 3 days. This method helps maintain their delightful flavor and texture, making them just as enjoyable as when they came out of the oven!
Can I freeze Halloween Mini Pizzas for later use?
Absolutely! You can freeze your mini pizzas for up to 2 months. Just wrap each pizza tightly in plastic wrap and place them in a freezer-safe container to prevent freezer burn. When you’re ready to enjoy them, simply reheat in the oven at 350°F (175°C) for about 10-15 minutes until the cheese is gooey again.
What are some common issues I might encounter while making Halloween Mini Pizzas?
Great question! If your pizzas turn out soggy, ensure that you spread the pizza sauce generously but not overly thick. A good layer of sauce should enhance flavor without compromising the crust’s crispiness. Additionally, keep an eye on the baking time—remove them from the oven once the cheese has melted and the crust is golden brown to avoid overcooking.
Are there any dietary considerations for pets or allergies when making Halloween Mini Pizzas?
Absolutely! If you’re storing leftovers, make sure to keep them out of reach of pets, as ingredients like cheese and certain toppings can upset their stomachs. For allergies, always check the labels of your ingredients. Common allergens in pizza include dairy, gluten (if using traditional crusts), and certain meats, so adjust your toppings to accommodate dietary needs.
Can I customize the toppings for Halloween Mini Pizzas?
Very! Feel free to get creative with your toppings! Swap traditional pepperoni for turkey slices or plant-based sausage for a healthier or vegetarian option. Experiment with sauces, too— BBQ and Alfredo can offer unique twists that will surprise your family and friends. Enjoy the customization!
Spooky Halloween Mini Pizzas for a Fun Family Feast
Ingredients
Equipment
Method
- Preheat oven to 400°F (200°C) and line a baking sheet with parchment paper.
- Spread pizza sauce evenly on each mini pizza crust.
- Cut mozzarella slices into ghost shapes and place atop the sauce.
- Layer strips of mozzarella cheese over the sauce for mummy pizzas, leaving gaps for 'eyes.'
- Sprinkle shredded mozzarella cheese and arrange orange bell pepper slices into playful pumpkin faces.
- Bake for 8-10 minutes until cheese is melted and bubbly.
- Remove from oven, let cool briefly, and enjoy your spooky mini pizzas.