Advertisement
“Can you believe it’s almost Halloween? Every year, I find myself dreaming up spooky snacks that not only look great but are also easy to whip up, and this year, it’s all about Creepy Eyeball Deviled Eggs. These delightfully unsettling treats are a showstopper at any gathering, effortlessly combining high protein with a festive flair. Plus, they’re ridiculously easy to prepare, making them the perfect addition for busy home chefs who want to impress without the stress. With their creamy filling and eerie appearance, these deviled eggs are sure to spark curiosity and conversations at your Halloween celebration. Are you ready to make your guests do a double take?”

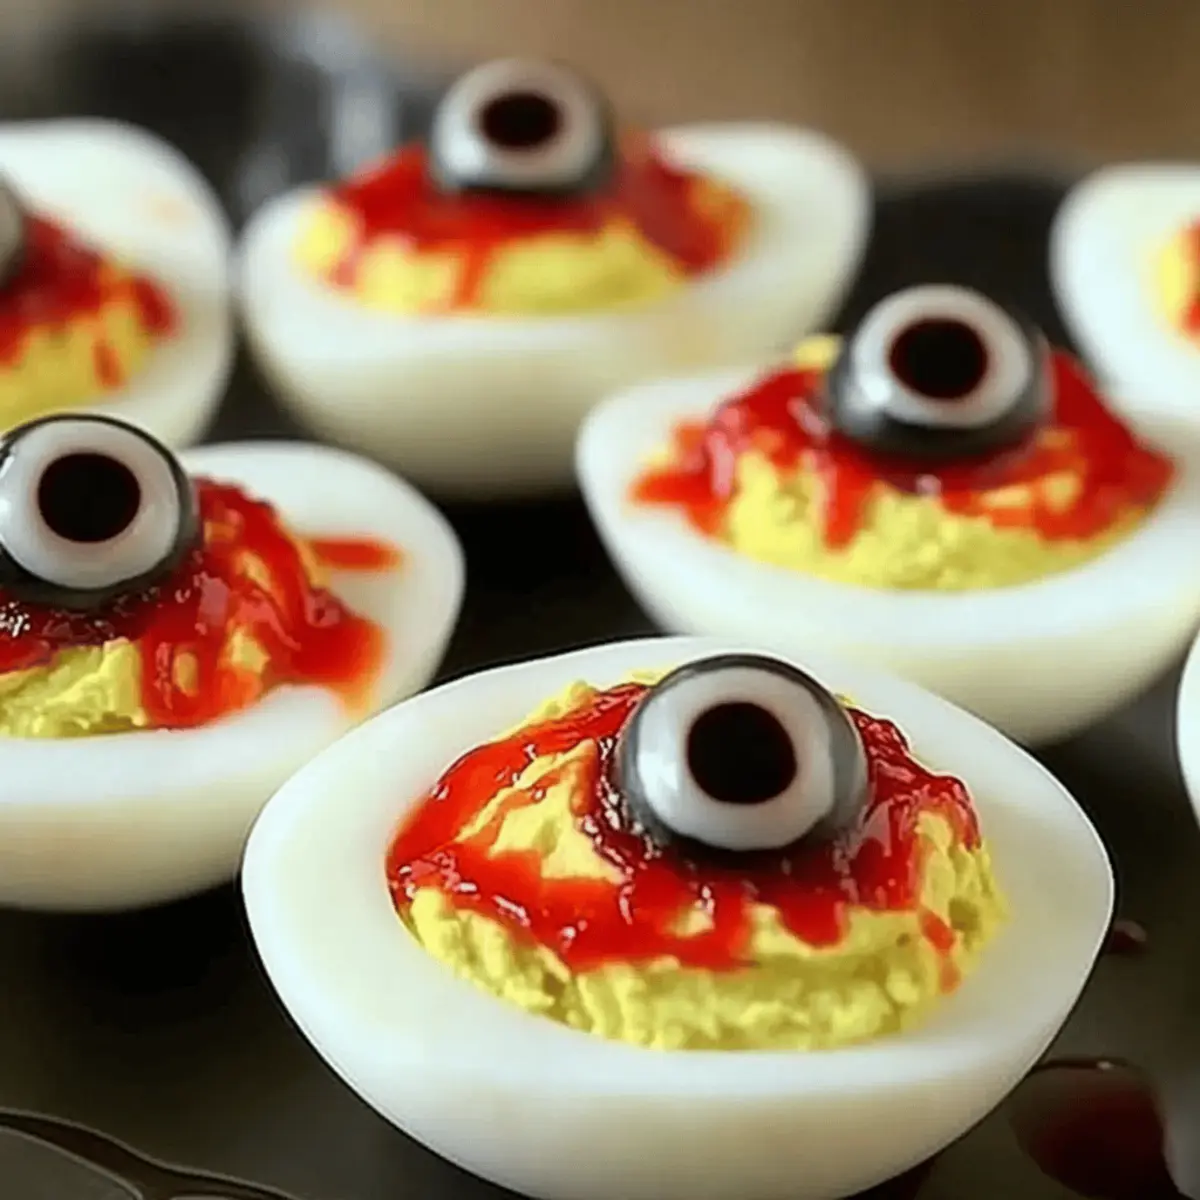
Why Are These Eggs So Creepy?
Versatile: Creepy Eyeball Deviled Eggs can easily transform based on your creativity. Swap black olives for gummy candies for a playful twist, or experiment with various food coloring for unique vein effects!
Easy to Prepare: With just a handful of ingredients and steps, these spooky snacks allow you to impress without spending hours in the kitchen. They’re the ultimate go-to for busy hosts wanting to charm their guests effortlessly.
Advertisement
High-Protein, Low-Carb: Packed with nutrients, these deviled eggs maintain a healthy profile, perfect for those mindful about nutrition while still indulging in festive fun.
Crowd-Pleaser: Whether you’re serving a family party or a spooky gathering with friends, these creepy creations will surely be a hit, grabbing attention and sparking delight! Pair them with other delicious snacks like a Hash Brown Food to create a well-rounded feast.
Eye-Catching Presentation: The blend of vibrant colors and eerie decorations makes these deviled eggs not just a dish but a centerpiece, elevating any Halloween spread.
Creepy Eyeball Deviled Eggs Ingredients
For the Filling
• Eggs – Large eggs are best for consistency and easy peeling.
• Mayonnaise – Provides rich creaminess; Greek yogurt can be used for a lighter taste.
• Mustard – Adds a zesty kick; Dijon mustard offers an aromatic depth.
• White Vinegar – Introduces needed acidity; lemon juice is a fresh alternative.
• Salt & Pepper – Season to taste for a well-balanced filling.
For the Creepy Decorations
• Red Food Coloring – Perfect for creating “veins” on the egg whites; gel coloring is preferred for intense color.
• Black Olives – Serve as the pupils for your creepy eyeballs; green olives or chocolate chips can be fun substitutes.
With these ingredients, you’re all set to whip up a batch of Creepy Eyeball Deviled Eggs that are sure to haunt your Halloween party!
Step‑by‑Step Instructions for Creepy Eyeball Deviled Eggs
Step 1: Boil the Eggs
Begin by placing large eggs in a single layer in a saucepan and covering them with cold water. Turn the heat to high, bringing the water to a rapid boil. Once boiling, turn off the heat, cover the pot, and let the eggs sit for 10-12 minutes. This method results in perfectly cooked yolks for your Creepy Eyeball Deviled Eggs.
Step 2: Ice Bath Time
After the timer goes off, quickly transfer the boiled eggs to an ice bath with cold water and ice cubes. Allow them to chill for at least 5 minutes to stop the cooking process and make peeling easier. You’ll know they’re ready when the shells feel cool to the touch, ensuring a comfortable experience as you move on to the next step.
Step 3: Peel the Eggs
Carefully tap the eggs on a hard surface to crack the shells, then roll them gently to create more cracks. Peel the shells off under running water, which helps remove any stubborn bits of shell. Make sure to do this carefully to prevent any damage to the whites, as you want them pristine for your Creepy Eyeball Deviled Eggs.
Step 4: Halve the Eggs
Once peeled, slice each egg in half lengthwise, exposing the rich yellow yolk. Gently scoop out the yolks into a mixing bowl using a small spoon, being careful not to tear the egg white halves. The creamy yolks are essential for the filling of your Creepy Eyeball Deviled Eggs, so ensure they are set aside neatly.
Step 5: Make the Filling
In your mixing bowl, combine the yolks with mayonnaise, mustard, white vinegar, salt, and pepper. Use a fork to mash and mix until you achieve a smooth, creamy consistency. Taste and adjust the seasoning as necessary, ensuring the filling will be flavorful and delicious for your Creepy Eyeball Deviled Eggs.
Step 6: Create Veins
Prepare your decorations by carefully using red food coloring. With a small brush or toothpick, draw thin, creepy “veins” on the egg whites to give them a haunting look. Let the color spread slightly for a more realistic effect. This step adds the perfect spooky touch to your Creepy Eyeball Deviled Eggs.
Step 7: Fill the Egg Whites
Using a piping bag or a resealable Ziploc bag with a corner snipped off, fill each egg white half with the yolk mixture. Mound the filling slightly for an eye-catching, convex shape—this enhances the appearance of the eyeball. Make sure each egg is generously filled, giving your Creepy Eyeball Deviled Eggs a delightful look.
Step 8: Add the Pupils
To create the final touch, place a half of a black olive in the center of each filled egg to serve as the “pupil.” If desired, add a little extra red food coloring around the olive for a bloodshot effect, enhancing the spooky theme. Finish your Creepy Eyeball Deviled Eggs for an unforgettable Halloween treat!
Make Ahead Options
These Creepy Eyeball Deviled Eggs are perfect for meal prep, allowing busy home cooks to save time on the day of their Halloween festivities! You can prepare the egg whites and decorate them with red food coloring up to 24 hours in advance; simply store them in an airtight container in the refrigerator to maintain freshness. Additionally, the yolk filling can be made up to 3 days ahead. Just keep it in a sealed container to prevent drying out. When you’re ready to serve, simply fill each egg white with the yolk mixture, add the black olive pupils, and voila—spooktacular snacks with minimal effort!
How to Store and Freeze Creepy Eyeball Deviled Eggs
Fridge: Store your Creepy Eyeball Deviled Eggs in an airtight container for up to 3 days. This keeps them fresh while preventing any strong odors from the fridge affecting their delightful taste.
Make-Ahead: You can prepare the egg whites and apply the veining a day in advance. Keep them in an airtight container in the refrigerator until you’re ready to fill them.
Freezer: It’s not recommended to freeze filled deviled eggs, as the texture of the filling can change. However, you can freeze the boiled egg whites for up to 1 month; just be sure to thaw and fill them with fresh ingredients later.
Reheating: If you’ve stored the egg whites, thaw them in the fridge overnight, then fill with the yolk mixture and decorate as desired for your next spooky gathering.
What to Serve with Creepy Eyeball Deviled Eggs
Elevate your Halloween gathering with these delightful and unsettling snacks that are sure to start conversations and cravings!
-
Crispy Vegetable Platter: Fresh-cut veggies add a crunchy contrast, and their vibrant colors balance the eerie theme beautifully. Pairing them with a ranch or hummus dip provides a refreshing break from the rich deviled eggs.
-
Spooky Cheese Board: A selection of cheeses with decorative Halloween accents like ghost-shaped crackers and spider-shaped fruit offers a fun and thematic twist. The savory flavors perfectly complement the creamy filling of the eggs.
-
Appetizing Pumpkin Soup: Served warm and spiced just right, this creamy soup is a cozy addition to your spread. Its smooth texture seamlessly balances the rich deviled eggs while continuing the seasonal flavors.
-
Creepy Cocktail Punch: A fruity punch with floating “eyeballs” made from lychee and blueberries will excite your guests. This whimsical drink pairs well with the savory taste of the Creepy Eyeball Deviled Eggs, making for a festive experience.
-
Freaky Fruit Skewers: Stack assorted fruits on skewers, mixing colors and shapes for an eye-catching presentation. The refreshing sweetness cuts through the richness of the eggs and adds a cheerful vibe to your Halloween buffet.
-
Monster Meatballs: These savory bites can be made with ground turkey or beef, offering a delightful protein-packed addition that complements the nutritional profile of the Creepy Eyeball Deviled Eggs.
-
Eerie Dessert Jars: Layer chocolate mousse or whipped cream with crushed cookies in jars topped with gummy worms. The rich desserts contrast the savory deviled eggs while still keeping that spooky fun alive at your gathering.
Creepy Eyeball Deviled Eggs Variations
Feel free to let your imagination run wild and add your personal touch to these spooky snacks!
-
Pupil Swap: Replace black olives with gummy candies or chocolate chips for a sweet twist that kids will love. These alternative pupils will not only change the flavor but add a fun surprise element.
-
Spice It Up: Incorporate spicy mustard or a dash of hot sauce into the filling for those who enjoy a little heat. This fiery variation brings a surprising kick to your Creepy Eyeball Deviled Eggs, making them memorable!
-
Herb-Infused Filling: Mix in fresh dill or chives to your yolk mixture for a burst of flavor. The aromatic herbs contrast beautifully with the creepiness of the eggs and add an unexpected herbaceous note.
-
Plant-Based Twist: Substituting mayonnaise with avocado or tahini can create a creamy vegan version. This adaptability ensures that even plant-based friends can enjoy these eerie delights!
-
Colorful Veins: Experiment with different colors of food coloring to create vibrant veins, possibly orange for a pumpkin vibe or purple for a spooky flair. This creative approach makes it fun for kids to join in on the decorating!
-
Eggless Option: For a truly unique take, consider using egg-like substitutes like tofu or chickpea filling to create a playful version of these deviled eggs. This technique not only enhances the festive spirit but also caters to various dietary preferences.
-
Garnished Goodness: Top your filled egg whites with tiny pieces of roasted red peppers or sliced jalapeños for a pop of color and flavor. These toppings enhance not just the visual appeal but can also add a delightful crunch!
-
Fearsome Filling: For a touch of darkness, add activated charcoal into the filling for a striking black color. This daring rendition will surely grab attention at your Halloween bash!
These variations are just a starting point, so don’t hesitate to combine ideas and create your own spine-chilling rendition of these Creepy Eyeball Deviled Eggs! For more spooky-themed delights, you might enjoy serving them alongside some comforting Hash Brown Food to satisfy all your Halloween cravings!
Expert Tips for Creepy Eyeball Deviled Eggs
-
Peeling Made Easy: Add a teaspoon of baking soda to boiling water; it helps make peeling your eggs a breeze, ensuring perfect whites for your Creepy Eyeball Deviled Eggs.
-
Coloring Technique: Before applying red food coloring, practice on a paper towel to achieve your desired vein effect without any mess.
-
Piping Perfection: Use a piping bag or a Ziploc bag with a corner snipped off for neat and even filling of yolk into the whites, enhancing the appeal of your Creepy Eyeball Deviled Eggs.
-
Fresh Egg Tip: If using fresh eggs, peel them underwater. This approach can help reduce shell adherence and make the peeling process much smoother.
-
Creepy Customizations: Don’t hesitate to experiment with the decorations; swap the olives with candy or different decorations to create unique variations of your Creepy Eyeball Deviled Eggs.

Creepy Eyeball Deviled Eggs Recipe FAQs
What kind of eggs should I use for Creepy Eyeball Deviled Eggs?
I recommend using large eggs for consistency and ease of peeling. They provide the best structure and are ideal for holding the creamy filling. If you’re up for it, look for organic or free-range eggs, as their yolks often have a richer color!
How should I store Creepy Eyeball Deviled Eggs?
Keep your Creepy Eyeball Deviled Eggs in an airtight container in the refrigerator for up to 3 days. This ensures they stay fresh and flavorful. I always recommend placing a damp paper towel in with them to maintain moisture without making them soggy.
Can I freeze Creepy Eyeball Deviled Eggs?
I wouldn’t freeze the filled deviled eggs since the texture of the filling can become grainy once thawed. However, you can freeze the boiled egg whites for up to 1 month. To do this, simply chill them in the fridge overnight to thaw before filling them with the yolk mixture and decorating!
What if my egg whites crack while boiling?
No need to worry! If your egg whites crack, a sprinkle of vinegar in the boiling water can help seal them up during cooking. Alternatively, using slightly older eggs can lead to easier peeling and less cracking overall. Just remember, eggs should be stored properly for freshness!
Are Creepy Eyeball Deviled Eggs suitable for people with dietary restrictions?
Absolutely! These deviled eggs are versatile. If you’d like a lighter option, substitute mayonnaise with Greek yogurt. For those with egg allergies, consider vegan egg alternatives or recipes that capture the essence without using eggs. Always double-check for allergies with guests to keep it safe!
How can I make my Creepy Eyeball Deviled Eggs look more spooky?
You can enhance their creepiness by adding extra red food coloring around the olives for a bloodshot effect. Additionally, you could experiment with different colored food dye for various “vein” effects. Don’t hesitate to get creative and make these sketches as terrifying as your imagination allows!

Creepy Eyeball Deviled Eggs That Will Haunt Your Halloween Party
Ingredients
Equipment
Method
- Begin by placing large eggs in a single layer in a saucepan and covering them with cold water. Turn the heat to high, bringing the water to a rapid boil. Once boiling, turn off the heat, cover the pot, and let the eggs sit for 10-12 minutes.
- After the timer goes off, quickly transfer the boiled eggs to an ice bath with cold water and ice cubes. Allow them to chill for at least 5 minutes.
- Carefully tap the eggs on a hard surface to crack the shells, then roll them gently to create more cracks. Peel the shells off under running water.
- Once peeled, slice each egg in half lengthwise, exposing the rich yellow yolk. Gently scoop out the yolks into a mixing bowl.
- In your mixing bowl, combine the yolks with mayonnaise, mustard, white vinegar, salt, and pepper. Use a fork to mix until smooth.
- Prepare your decorations by carefully using red food coloring to draw thin, creepy ‘veins’ on the egg whites.
- Using a piping bag or a Ziploc bag with a corner snipped off, fill each egg white half with the yolk mixture.
- Place a half of a black olive in the center of each filled egg to serve as the ‘pupil.’