Advertisement
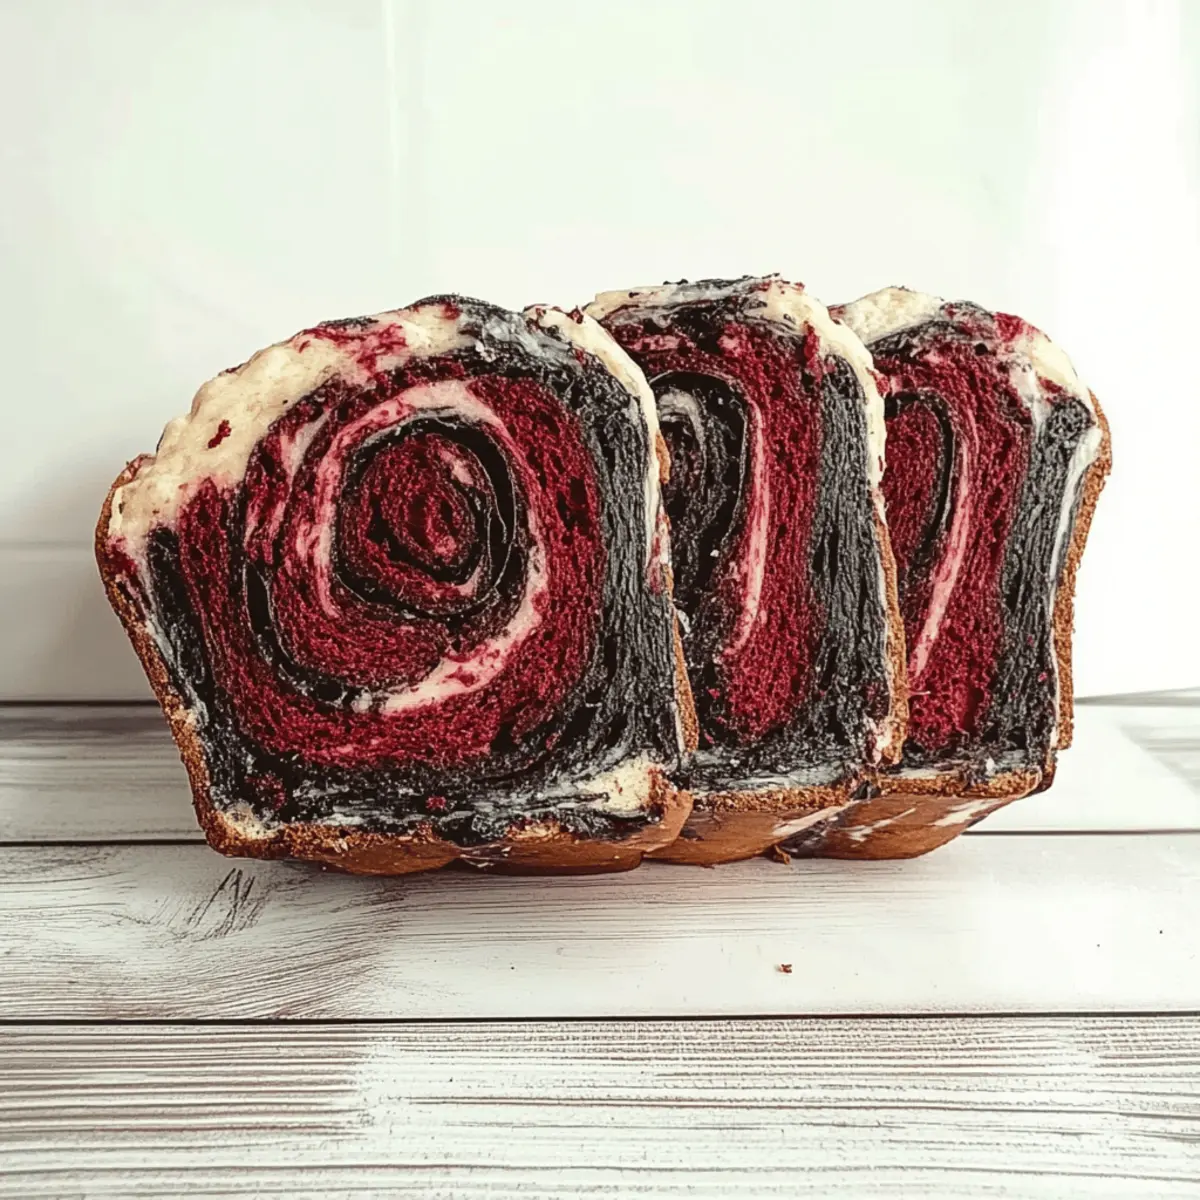
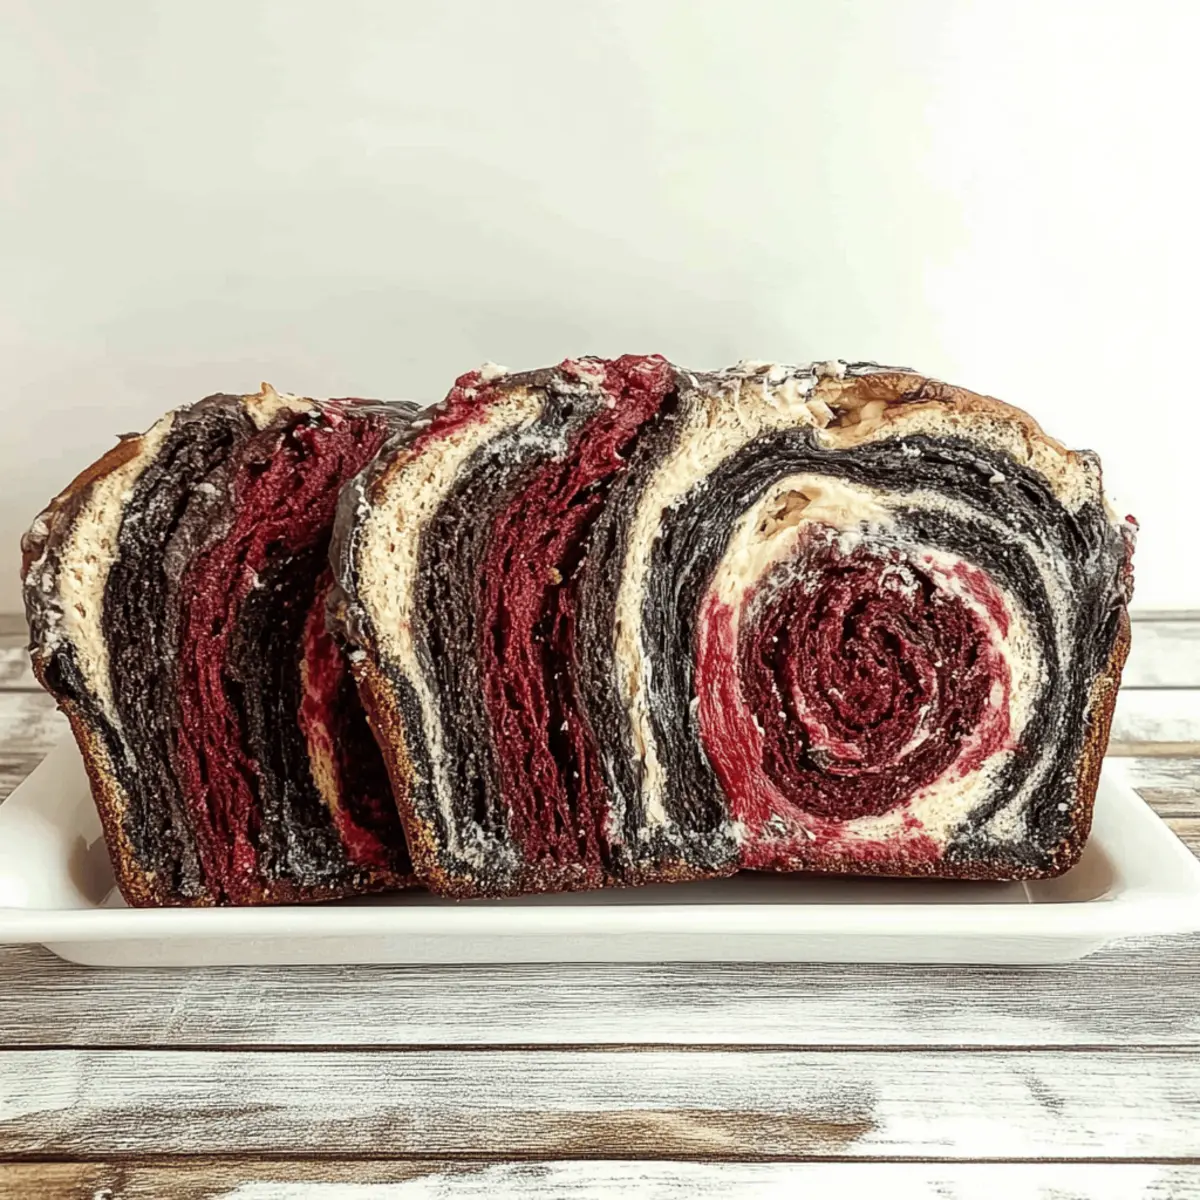
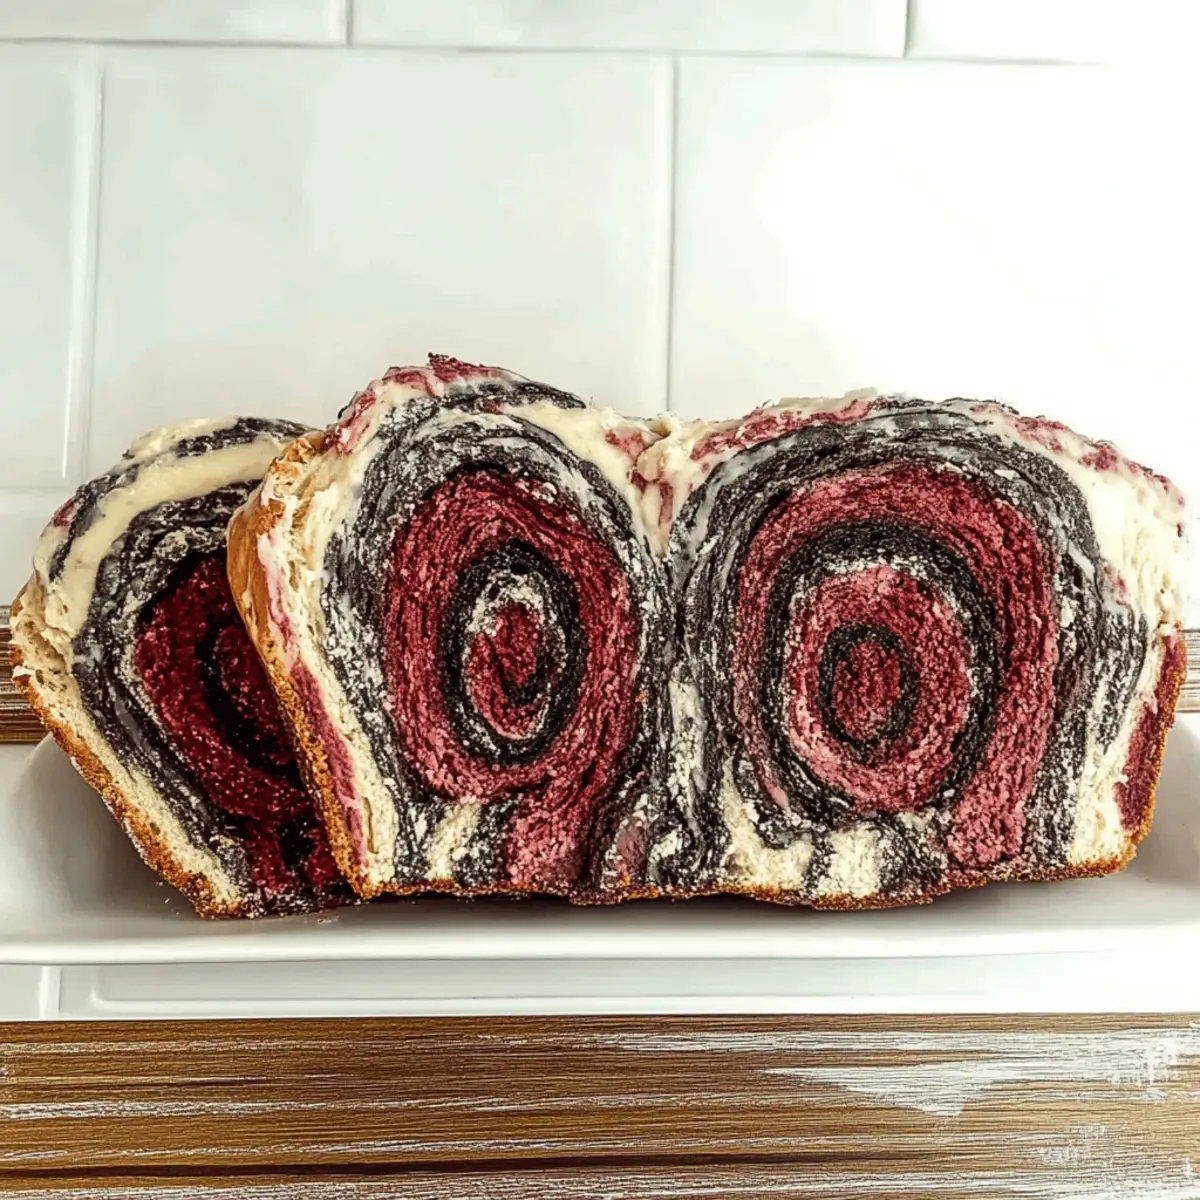
As the crisp autumn air envelops us, I find myself enchanted by the charm of Halloween—the season where whimsy meets spookiness, and creativity knows no bounds. Enter Vampire Bread, a colorful and spooky loaf that’s the perfect addition to your Halloween festivities! Not only is this fun recipe easy to make together with family or friends, but it’s also guilt-free, serving as a delightful, kid-friendly treat that sparks smiles across all ages. Each slice reveals vibrant swirls of deep red and black, inviting everyone to dive into the flavors of the season. Whether you serve it with your favorite spreads or savor it on its own, this homemade bread will surely be a hit at any gathering. Curious about how to make your own masterpiece? Let’s create some Halloween magic together!
Why Is Vampire Bread a Must-Try?
Colorful and Fun: Vampire Bread transforms an ordinary moment into a festive celebration with its eye-catching red and black swirls, making it the perfect Halloween treat.
Easy to Make: With simple steps and accessible ingredients, baking this bread together can become a cherished family tradition—just like our Breakfast Egg Muffins!
Advertisement
Kid-Friendly: Designed to enchant both young and old, this recipe brings joy and creativity to your kitchen.
Guilt-Free Indulgence: Made with natural ingredients and less refined sugar, this delicious bread is a healthier choice that doesn’t compromise on flavor.
Versatile Delight: Perfectly pairs with your favorite toppings or can be enjoyed fresh from the oven. Imagine serving it alongside a warm soup or a spooky-themed spread!
Mix in a little Halloween spirit, and you’ll have a show-stopping treat everyone will love.
Spooky Vampire Bread Ingredients
Unleash your creativity in the kitchen with these simple ingredients!
For the Dough
- Flour – Provides the foundation; use all-purpose or bread flour for the best texture.
- Sugar – Adds sweetness; coconut sugar is a tasty substitute for a less refined option.
- Yeast – Helps the bread rise and become fluffy; instant yeast makes for quicker preparation.
- Water – Hydrates the dough; ensure it’s lukewarm for optimal yeast activation.
- Salt – Enhances flavor and strengthens the dough; don’t skip this vital ingredient!
For the Color
- Food Coloring (Red & Black) – Creates the spooky aesthetic; gel colors yield the most vibrant results.
Get ready to whip up your Spooky Vampire Bread easy Halloween treats that’ll not only impress but also delight!
Step‑by‑Step Instructions for Spooky Vampire Bread Easy Halloween Treats
Step 1: Dough Preparation
In a large mixing bowl, combine flour, sugar, instant yeast, and salt. Gradually pour in lukewarm water while mixing to form a cohesive dough. Aim for a smooth consistency; the mixture should pull away from the bowl’s sides but still be slightly sticky to touch. This initial blending stage is crucial for your Spooky Vampire Bread, ensuring the yeast activates properly.
Step 2: Kneading the Dough
Turn the dough onto a lightly floured surface and knead for about 8-10 minutes. Press and fold the dough repeatedly until it becomes smooth and elastic. When finished, it should spring back when gently poked. Kneading develops gluten, giving your Vampire Bread its fluffy texture, so make sure to put in the effort for a delightful rise!
Step 3: Coloring the Dough
Divide the kneaded dough into two equal portions. Using red and black gel food coloring, add a few drops to each portion, then knead thoroughly until the colors are fully incorporated. You want vibrant swirls for your Spooky Vampire Bread; ensure each color is distinct yet well-mixed. Don your gloves for easy cleanup during this fun coloring step!
Step 4: Shaping the Bread
Roll out each colored dough section into long strips, approximately 12 inches long. Gently twist the red and black strips together, forming a beautiful swirl pattern. Shape this twisted dough into a loaf, tucking the ends under. This step creates the spooky visual appeal of your Vampire Bread, so take your time to make those swirls striking!
Step 5: Proofing the Dough
Place your shaped loaf into a lightly greased loaf pan or on a parchment-lined baking sheet. Cover it with a clean kitchen towel and let it rise in a warm, draft-free place until it has doubled in size, about 1 hour. This step is crucial for achieving that soft, airy texture in your Spooky Vampire Bread, ensuring a perfect spooky snack.
Step 6: Baking the Bread
Preheat your oven to 350°F (175°C). Once the dough has risen, bake the loaf for 25-30 minutes until it turns golden brown. To check for doneness, tap the bottom of the loaf; it should sound hollow. The delightful aroma of baking Vampire Bread will fill your home, creating an inviting atmosphere for all ages!
Step 7: Cooling the Bread
After removing the loaf from the oven, let it cool in the pan for about 10 minutes. Carefully transfer it to a wire rack to cool completely before slicing. This cooling phase is vital, as it allows the flavors to settle and prevents the bread from becoming gummy. Your Spooky Vampire Bread is now ready to be enjoyed in all its colorful glory!

What to Serve with Vampire Bread?
Imagine enjoying a freshly baked slice of spooky delight, perfectly paired to elevate your Halloween gatherings.
-
Creamy Pumpkin Soup: This warm, velvety soup perfectly complements the subtle sweetness of Vampire Bread, creating a cozy autumn experience.
-
Herbed Butter: Spreadable and rich, this buttery addition enhances the bread’s flavor and creates a delightful contrast to the visually striking loaf.
-
Spicy Tomato Jam: The sweet heat of this jam contrasts beautifully with the mild flavors of the bread, adding an exciting twist to every bite.
-
Chili Con Carne: This hearty dish brings a robust flavor that pairs wonderfully with the soft texture of your Vampire Bread, making for a satisfying meal.
-
Roasted Vegetable Medley: A mix of colorful, caramelized veggies adds warmth and freshness, balancing out the sweetness of the bread with earthy notes.
-
Halloween-Themed Punch: A fruity, fizzy drink can enliven your table, providing a fun, festive touch that both kids and adults will love while they enjoy their treats.
-
Black Bean Dip: This creamy dip offers protein and depth of flavor, making it an excellent side for dipping the soft Vampire Bread slices.
Each of these suggestions contributes texture and flavor, ensuring that your Vampire Bread shines during spooky season celebrations!
Spooky Vampire Bread Variations
Unleash your creativity and make this Halloween treat even more magical with these delightful variations!
-
Pumpkin Spice: Incorporate pumpkin puree and warm spices like cinnamon and nutmeg into the dough for a seasonal twist that will fill your kitchen with cozy aromas.
-
Activated Charcoal: Instead of traditional food coloring, use activated charcoal for a natural black hue. It’s a fun and unique way to maintain the spooky aesthetic!
-
Fun Shapes: Shape your dough into Halloween favorites—bat silhouettes or skulls! Personalizing your bread adds extra charm and excitement for kids and adults alike.
-
Sweet Glaze: Drizzle a simple glaze made of powdered sugar and vanilla extract over the cooled bread for added sweetness and a lovely finish. The shine will catch everyone’s eye.
-
Herb Infusion: Blend dried herbs such as rosemary or thyme into the dough for a savory touch, bringing an unexpected flavor profile that pairs beautifully with soups.
-
Zesty Citrus Touch: Mix in a bit of lemon or orange zest in the dough to brighten up the flavors. This delightful zing complements the sweetness perfectly.
-
Chocolate Swirls: Make it a dessert by adding cocoa powder to one portion of the dough for a sweet surprise beneath its spooky surface. Imagine the joy of finding chocolate swirls!
-
Red Velvet Version: For a festive twist, replace some of the flour with cocoa powder and red food coloring to create a rich red velvet-style bread that will wow any Halloween gathering.
Let your imagination run wild, and turn your Vampire Bread into a spectacular creation that suits your tastes! If you’re looking for more festive ideas, check out these Lemon Sweet Rolls or whip up some delicious Nutty Caramel Treats for variety.
Expert Tips for Spooky Vampire Bread
-
Color Mixing: Ensure even distribution of colors by kneading thoroughly, but avoid overmixing. Too much can lead to a solid color rather than lovely swirls in your Vampire Bread.
-
Warm Water: Use lukewarm water to activate yeast efficiently; hot water can kill it, resulting in a dense loaf. Check water temperature before adding!
-
Proper Proofing: To achieve a perfect rise, place the dough in a draft-free area while proofing. Cold air can affect its fluffiness and final texture.
-
Check for Doneness: Tap the bottom of the loaf to check for doneness—if it sounds hollow, your Vampire Bread is perfectly baked and ready!
-
Storage Secrets: Store any leftover bread in an airtight container to maintain freshness, preventing it from drying out and keeping it delicious for your Halloween treats.
Make Ahead Options
These Spooky Vampire Bread are perfect for busy home cooks looking to save time during Halloween festivities! You can prepare the dough up to 24 hours in advance—simply follow the first three steps (dough preparation, kneading, and coloring) and refrigerate the colored dough wrapped tightly in plastic. To maintain its quality, make sure to allow the dough to come to room temperature before shaping and proofing on baking day. If you want to prep even further ahead, you can shape the loaf and let it proof in the fridge for up to 3 days. Just ensure you cover it properly to prevent drying out. When you’re ready to enjoy, bake as instructed, and you’ll have a stunning Halloween treat with minimal effort!
How to Store and Freeze Vampire Bread
Room Temperature: Keep the Vampire Bread wrapped tightly in plastic or in a bread bag for up to 3 days. This will help maintain its soft texture and prevent it from drying out.
Fridge: While it’s best stored at room temperature, you can refrigerate the bread for up to 5 days if you prefer. Just make sure it’s sealed in an airtight container to avoid absorbing odors.
Freezer: For longer storage, slice the Vampire Bread and freeze individual pieces for up to 2 months. Wrap slices tightly in plastic wrap, then place them in a freezer bag to preserve freshness.
Reheating: To enjoy your Vampire Bread, simply thaw it at room temperature or warm slices in a toaster or oven. This will revive the delightful taste of your spooky Halloween treat!
Spooky Vampire Bread Recipe FAQs
How do I choose the right flour for Vampire Bread?
Absolutely! For the best texture in your Vampire Bread, I recommend using all-purpose or bread flour. All-purpose flour provides adequate gluten structure while keeping it soft, whereas bread flour can yield a slightly chewier loaf. Both options create a delightful base for your colorful creation!
How should I store leftover Vampire Bread?
To keep your Vampire Bread fresh and delicious, wrap it tightly in plastic or store it in a bread bag at room temperature for up to 3 days. If you want to extend its shelf life, refrigerate it in an airtight container for up to 5 days. Make sure to check for any signs of mold or dryness before indulging again!
Can I freeze my Vampire Bread?
Yes, you can! To freeze, slice the Vampire Bread and wrap each slice tightly in plastic wrap, then place them in a freezer bag. This method protects the slices from freezer burn and keeps them fresh for up to 2 months. When you’re ready to enjoy, simply thaw at room temperature or pop slices in the toaster for a warm treat!
What should I do if my dough isn’t rising?
If your dough isn’t rising, it might be due to inactive yeast. First, check that your yeast is fresh—it should bubble when mixed with warm water. If it didn’t rise during proofing, try placing it in a warmer area or, if it’s too cold, near a heated oven. Alternatively, sprinkle a bit of sugar into the new mixture to give it extra food for the yeast to thrive!
Is Vampire Bread safe for pets or allergies?
Great question! This recipe is vegetarian-friendly, but ingredients like flour, sugar, and yeast can cause issues for some pets. It’s best to keep this delightful bread away from animals. Additionally, if you have allergies in mind, ensure that any substitutions you make (like gluten-free flour) suit your dietary needs!
How can I make my Vampire Bread even more festive?
If you want to crank up the Halloween spirit, consider adding spooky toppings! After baking, try decorating your Vampire Bread with edible eyes or monster-shaped butter, jam, or frosting. You could also use cookie cutters to create fun shapes from the soft slices, making each serving a surprise!
Spooky Vampire Bread: Easy Halloween Treats for Everyone
Ingredients
Equipment
Method
- In a large mixing bowl, combine flour, sugar, instant yeast, and salt. Gradually pour in lukewarm water while mixing to form a cohesive dough.
- Turn the dough onto a lightly floured surface and knead for about 8-10 minutes until smooth and elastic.
- Divide the kneaded dough into two equal portions. Add red and black gel food coloring to each portion and knead until colors are well incorporated.
- Roll out each colored dough section into long strips, twist them together to form a swirl pattern, then shape into a loaf.
- Place the shaped loaf into a greased loaf pan. Cover with a kitchen towel and let it rise until doubled, about 1 hour.
- Preheat the oven to 350°F (175°C). Bake the loaf for 25-30 minutes until golden brown and sounds hollow when tapped.
- Let the loaf cool in the pan for 10 minutes, then transfer to a wire rack to cool completely before slicing.