Advertisement
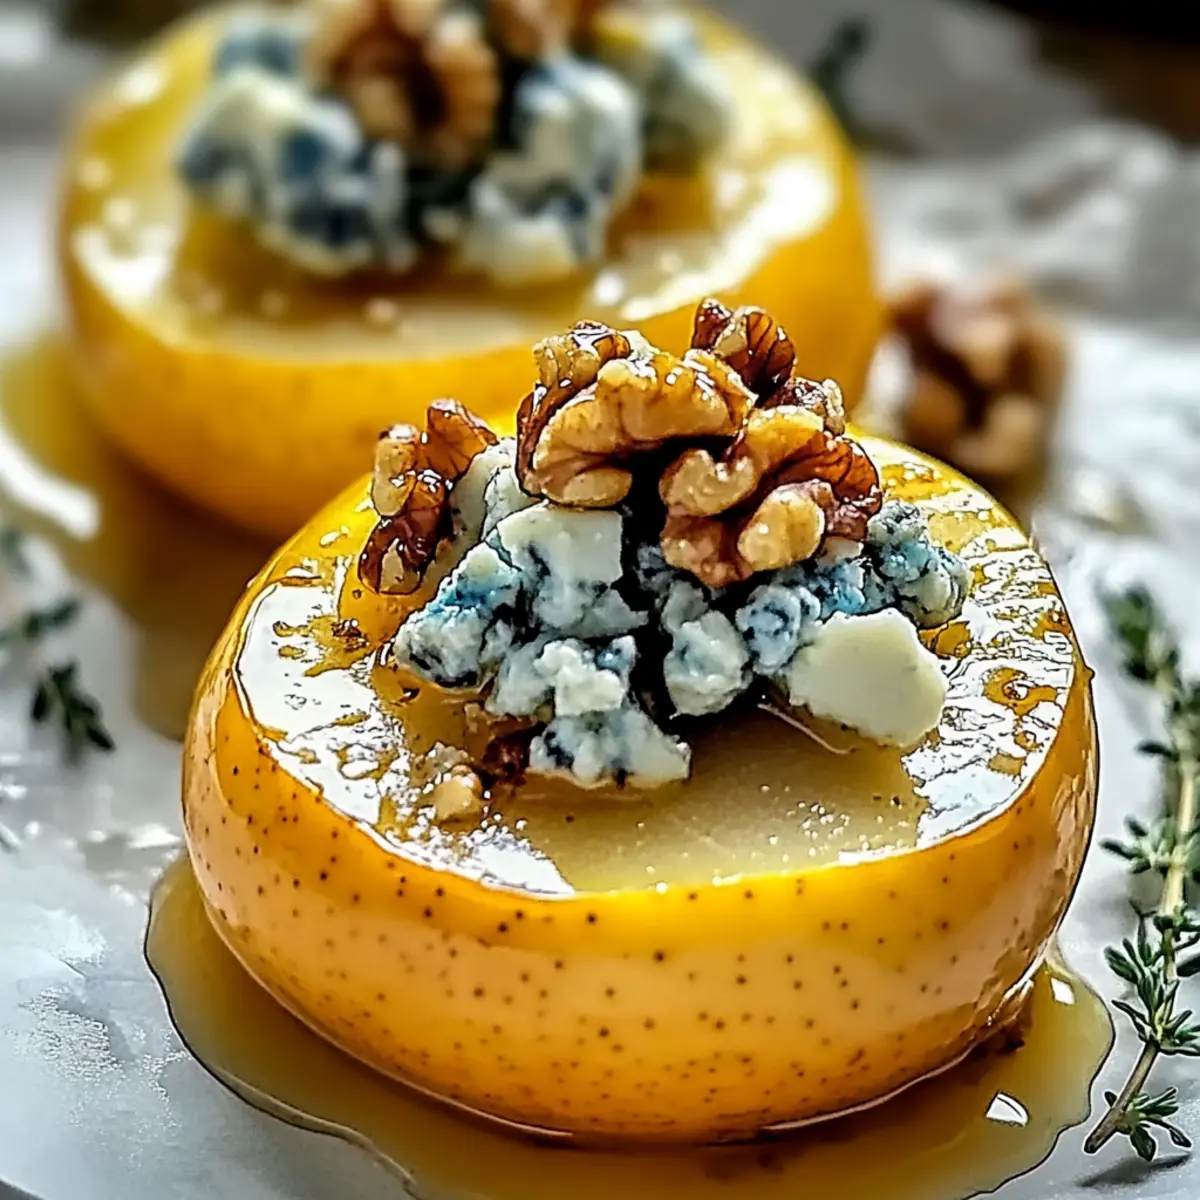
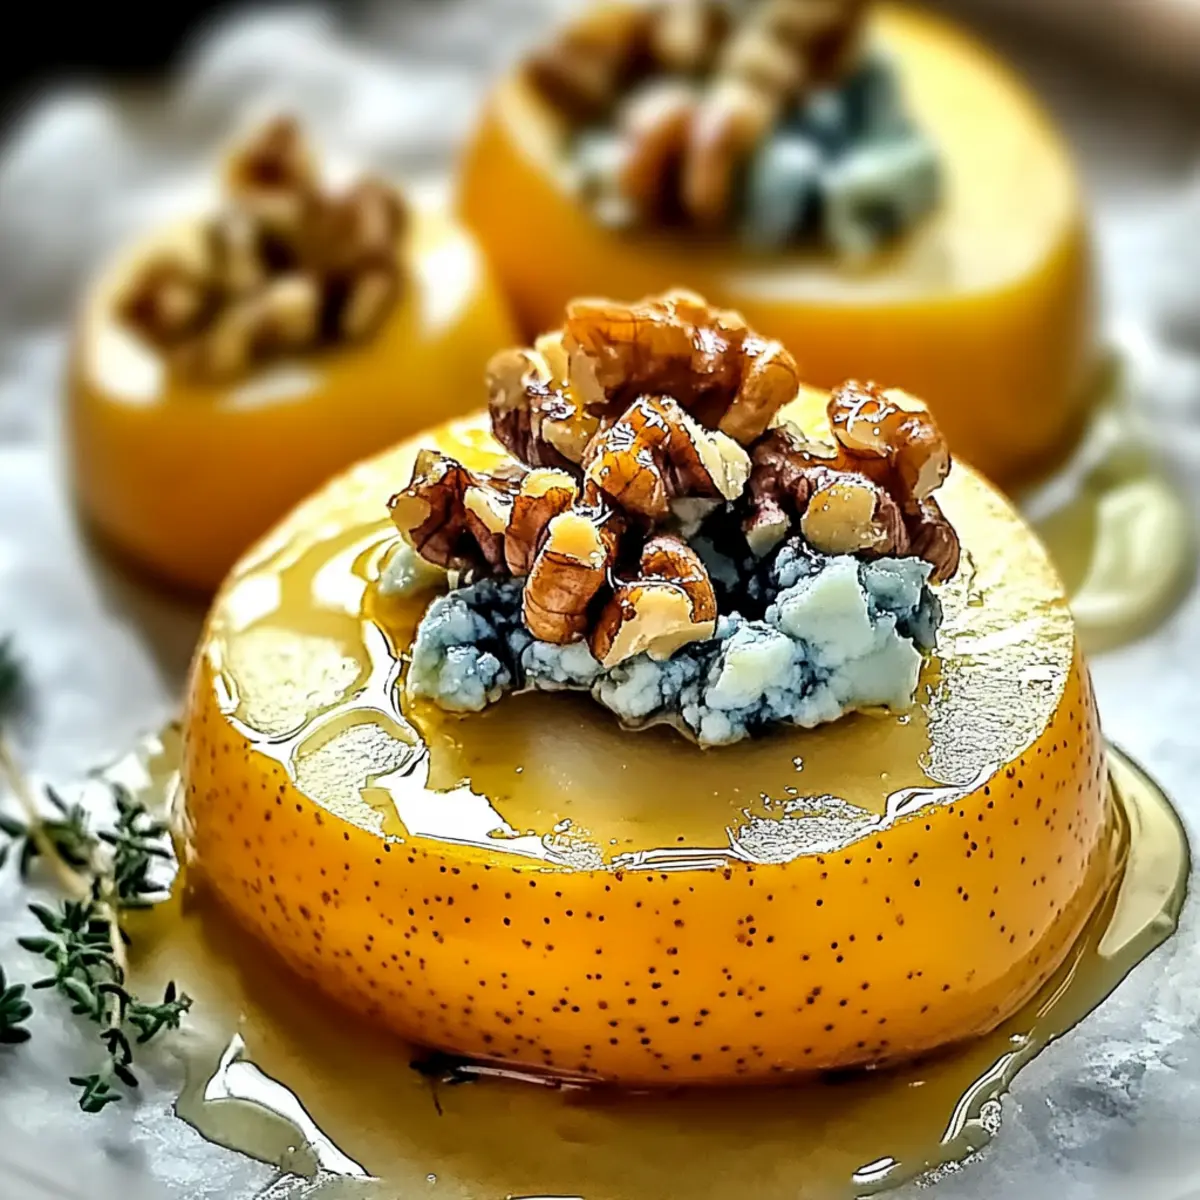
As I preheat my oven, the anticipation of what’s to come is palpable. When I merge sweet, caramelized pears with tangy blue cheese, crunchy walnuts, and a drizzle of honey, something truly magical happens. This recipe for Roasted Pears with Blue Cheese & Walnuts combines quick prep time with an unmistakable elegance, making it an ideal candidate for a chic appetizer or a delightful dessert. In just 35 minutes, you can impress both yourself and your guests with this gourmet dish that’s as versatile as it is delicious. Plus, with simple ingredient substitutions, it caters to various dietary needs, ensuring everyone at your table feels included. Are you ready to elevate tonight’s dinner with this whimsical twist?

Why are Roasted Pears So Elegant?
Simplicity makes this dish a breeze to whip up in just 35 minutes, perfect for any busy home cook. Gourmet appeal shines through with the delightful combination of flavors—sweet pears, tangy blue cheese, and crunchy walnuts. Customizable options allow you to adapt to dietary preferences, whether gluten-free or vegetarian, keeping everyone happy. Serve warm for maximal enjoyment; this dish always impresses guests as chic appetizers or dessert. For a complete meal, pair it with a fresh salad or creamy polenta for a comforting touch!
Roasted Pears with Blue Cheese Ingredients
• Explore the magic of flavor combinations!
Advertisement
For the Pears
- Pears – Use firm but ripe varieties like Bartlett, Anjou, or Bosc to avoid mushiness.
- Lemon Juice – Adds brightness and prevents oxidation, essential for vibrant flavor.
For the Topping
- Blue Cheese – A rich, tangy contrast to the pears’ sweetness; swap with Gorgonzola for a milder option.
- Walnuts – Adds delightful crunch and nutty flavor; pecans can be used as a sweeter choice.
- Honey – Provides sweetness and a glossy finish; maple syrup offers a unique alternative.
For Baking
- Unsalted Butter – Enhances flavor and aids caramelization; can be omitted for a dairy-free version.
- Cinnamon (optional) – Enhances warmth and complexity; skip if you prefer a more straightforward flavor.
- Fresh Thyme (optional) – Adds a lovely herbal note; rosemary can serve as an alternative.
Step‑by‑Step Instructions for Roasted Pears with Blue Cheese & Walnuts
Step 1: Preheat the Oven
Begin by preheating your oven to 375°F (190°C). This essential step sets the stage for perfectly roasted pears that are both tender and golden. While the oven is heating, gather your ingredients to streamline the cooking process and ensure everything is within reach for a smooth preparation.
Step 2: Prepare the Pears
Carefully halve your firm but ripe pears lengthwise and remove the seeds. Arrange the pear halves cut side up on a baking sheet lined with parchment paper for easy cleanup. This positioning not only neatly showcases the pears but also allows for optimal caramelization during roasting.
Step 3: Add Flavor with Butter and Lemon
Melt some unsalted butter and use a pastry brush to generously coat the cut sides of the pears. Squeeze fresh lemon juice over them for a bright, tangy flavor and to prevent oxidation. This combination enriches the pears while enhancing their natural sweetness, setting a delightful tone for your roasted pears with blue cheese and walnuts.
Step 4: Roast the Pears
Place the prepared pears into the preheated oven and roast for 20 to 25 minutes until they become tender and develop a beautiful golden-brown color. Keep an eye on them as they roast, using a fork to check for tenderness gently. They should be soft but still hold their shape—perfectly cooked for your elegant dish.
Step 5: Flip and Drizzle More Lemon
Once the pears are roasted, remove them from the oven and carefully flip each half cut side up. Drizzle additional lemon juice over the top for a fresh burst of acidity. This step not only heightens the flavor profile but also adds a lovely sheen to your roasted pears with blue cheese and walnuts.
Step 6: Add Cheese and Nuts
Sprinkle crumbled blue cheese evenly over the warm pears, ensuring every bite gets that rich, tangy flavor. Follow with a generous scattering of toasted walnuts for that satisfying crunch. These toppings are essential, melding perfectly with the pears’ sweetness to create a beautiful harmony of flavors.
Step 7: Final Roasting Step
Return the baking sheet to the oven and allow the pears to roast for an additional 5 minutes. This brief time in the oven will slightly melt the blue cheese, creating a creamy and decadent topping. As the cheese softens, the aromas will envelop your kitchen, making the anticipation even sweeter.
Step 8: Serve with a Touch of Elegance
Once achieved the perfect melt on the cheese, remove the pears from the oven. Serve them warm, beautifully plated, ready to impress as a chic appetizer or delightful dessert. If desired, garnish with fresh thyme for a pop of color and an herbal touch that complements the dish flawlessly.
What to Serve with Elegant Roasted Pears with Blue Cheese, Walnuts, and Honey
Elevate your dining experience by crafting a complete meal that captivates the senses with delightful pairings.
-
Mixed Greens Salad: A light and fresh salad with a tangy vinaigrette balances the richness of the roasted pears beautifully.
-
Crostini with Soft Cheese: These crispy delights provide a contrast of textures while complementing the creamy blue cheese found in the pears.
-
Creamy Polenta: This comforting side adds a velvety texture and subtle flavor, making it an ideal canvas for the sweet and savory elements of the dish.
-
Balsamic Glazed Brussels Sprouts: Roasted Brussels sprouts glazed with balsamic vinegar offer a tangy flavor that perfectly complements the sweetness of the pears.
-
Lemon Herb Quinoa: A vibrant, zesty quinoa dish enhances the meal’s freshness and provides a protein-packed option that pairs wonderfully with the flavors at play.
-
Sparkling White Wine: A bubbly, crisp wine refreshes the palate, enhancing the gourmet experience and elevating your meal’s sophistication.
-
Dark Chocolate Mousse: For dessert, this rich, velvety treat rounds off the meal, echoing the sweetness of the pears while providing an indulgent finish.
Roasted Pears with Blue Cheese Variations
Feel free to let your creativity shine as you customize this delightful dish to suit your taste and dietary preferences!
- Nut-Free: Omit the walnuts for a simple yet elegant dish suitable for nut allergies.
- Cheese Swap: Use feta or goat cheese for a milder flavor that complements the sweetness of the pears beautifully.
- Maple Twist: Replace honey with maple syrup for a unique, earthy sweetness that adds depth.
- Cinnamon Touch: Add a pinch of cinnamon or nutmeg before roasting for an extra layer of warm, comforting aroma.
- Spicy Kick: Sprinkle crushed red pepper flakes on top for an unexpected spicy twist that contrasts with the sweetness.
- Herbal Garnish: Try garnishing with arugula instead of thyme for a peppery bite that pairs well with the rich cheese.
- Fruity Burst: Mix in dried cranberries or tart cherries to amplify the flavors with a tangy sweetness that balances perfectly.
- Vegan Version: Substitute butter with coconut oil and replace cheese with a nut-based cheese alternative for a delicious vegan twist.
As you explore these variations, consider what might pair well with your roasted pears! A refreshing mixed greens salad or a slice of creamy polenta can create a wonderful dining experience. If you’re interested in other mouthwatering recipes, you can also check out my White Chicken Chili or indulge in my Cream Cheese Chicken!
How to Store and Freeze Roasted Pears with Blue Cheese & Walnuts
Fridge: Store any leftover roasted pears in an airtight container for up to 3 days. This helps maintain their texture while preserving the delightful flavors of blue cheese and walnuts.
Freezer: If you want to freeze roasted pears, place them in a single layer on a baking sheet to freeze thoroughly before transferring to a freezer-safe bag. They can be stored for up to 3 months.
Reheating: To enjoy your roasted pears again, reheat them in the oven at 350°F (175°C) for about 10 minutes, or until warmed through. This helps to revive their comforting aroma and flavors.
Make-Ahead: You can prepare the pears up to 24 hours in advance by slicing and brushing them with butter and lemon juice. Store them in the fridge until you’re ready to roast!
Expert Tips for Roasted Pears with Blue Cheese & Walnuts
-
Choose Ripe Pears: Ensure your pears are ripe but firm to maintain structure during roasting. Overripe pears may turn mushy, losing that delightful texture.
-
Experiment with Cheeses: Swap blue cheese for feta or goat cheese for a milder taste. Adjust the type of cheese to suit your flavor preferences or dietary needs.
-
Nut Alternatives: For those with nut allergies, replace walnuts with pecans for a sweeter option or omit the nuts entirely. This keeps the dish inclusive for all.
-
Prepare Ahead: Consider prepping the pears by slicing and brushing with butter and lemon juice up to 24 hours in advance. Roasting just before serving maintains freshness and texture.
-
Add Flavor Depth: A pinch of cinnamon or nutmeg can enhance the flavor profile. Just a small amount can elevate your roasted pears with blue cheese & walnuts to new heights.
Make Ahead Options
These Elegant Roasted Pears with Blue Cheese, Walnuts, and Honey are perfect for meal prep enthusiasts! You can slice the pears and brush them with butter and lemon juice up to 24 hours in advance. Simply store them in an airtight container in the refrigerator to maintain their freshness and prevent browning. When you’re ready to serve, preheat your oven and roast the pears for 20-25 minutes until tender and golden. After that, add the blue cheese and walnuts, followed by another 5 minutes in the oven to melt the cheese. This way, you’ll be able to enjoy restaurant-quality results with minimal effort, making your busy weeknights just that much easier!
Roasted Pears with Blue Cheese & Walnuts Recipe FAQs
How do I pick the right pears for roasting?
Absolutely! Look for firm yet ripe pears, like Bartlett, Anjou, or Bosc. Avoid any with dark spots all over or overly soft texture, as they can become mushy when roasted. A slight give when gently pressed indicates they are perfectly ripe.
What is the best way to store leftover roasted pears?
After your delightful meal, you can store leftover roasted pears in an airtight container in the fridge for up to 3 days. This keeps them fresh and allows the flavors to meld beautifully for your next indulgence.
Can I freeze roasted pears with blue cheese and walnuts?
Yes! To freeze your roasted pears, place them in a single layer on a baking sheet and freeze until solid. Then transfer them to a freezer-safe bag, ensuring all air is removed. They can be stored for up to 3 months. When you’re ready to enjoy, just reheat them in the oven at 350°F (175°C) for about 10 minutes until warmed through.
What should I do if my pears turn mushy while roasting?
Very! If your pears turn mushy, it’s likely they were too ripe at the start. To avoid this, always use pears that are firm yet slightly ripe. To remedy mushy pears, consider blending them into a puree for a delightful sauce or adding them to a dessert instead of serving them whole.
Are there dietary considerations I should keep in mind?
Absolutely! For those with nut allergies, feel free to swap walnuts with pecans or omit them entirely. If you’re looking for a gluten-free option, rest assured that this recipe is naturally gluten-free. Additionally, you can substitute blue cheese with feta or goat cheese for a milder flavor, ensuring everyone can indulge.

Decadent Roasted Pears with Blue Cheese & Walnuts Unveiled
Ingredients
Equipment
Method
- Preheat the oven to 375°F (190°C). Gather your ingredients while it heats.
- Halve the pears lengthwise and remove the seeds. Arrange cut side up on a lined baking sheet.
- Melt unsalted butter and brush it on the cut sides of the pears. Squeeze lemon juice over them.
- Roast pears in the oven for 20 to 25 minutes, checking for tenderness.
- Carefully flip the pears and drizzle with more lemon juice.
- Sprinkle blue cheese and walnuts over the warm pears.
- Return to the oven for an additional 5 minutes to melt the cheese.
- Serve warm, garnished with fresh thyme if desired.