Advertisement
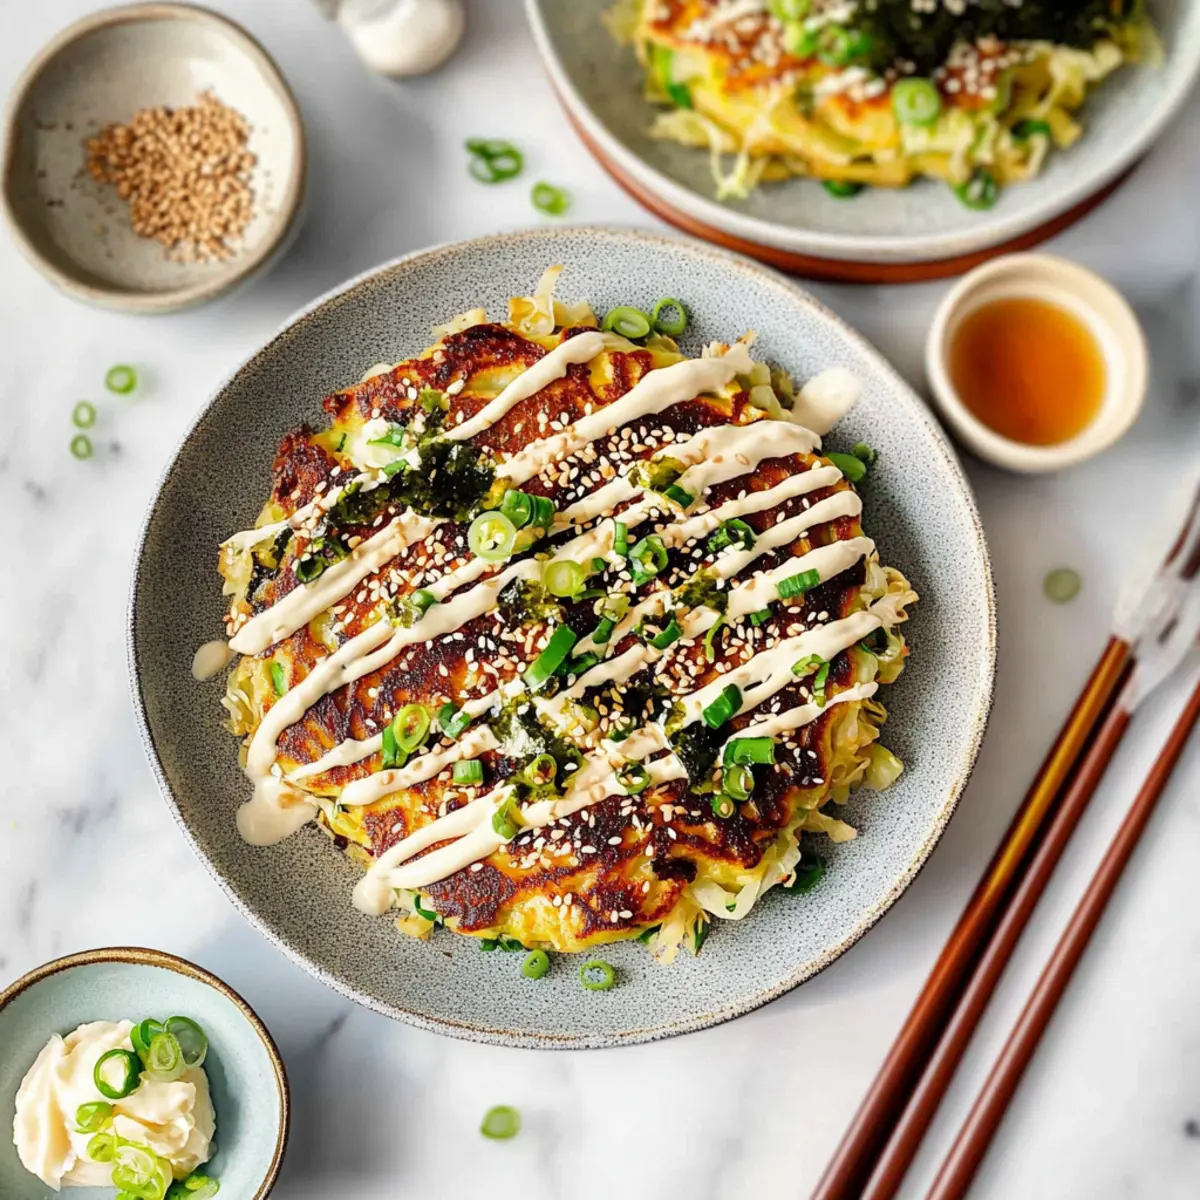
As I flipped the delicate pancake in my skillet, the aroma of sautéing cabbage filled my kitchen, transporting me to the vibrant street food stalls of Osaka. Today, I’m excited to share my recipe for Easy Vegetarian Okonomiyaki, a delightful Japanese savory pancake that’s quick enough for a weeknight meal yet packed with flavor. With a crispy exterior and a soft, satisfying interior, this dish not only puts pantry staples to good use but also makes cooking feel like a fun project. In just 25 minutes, you can enjoy a wholesome dinner that’s perfect for those craving a healthier alternative to fast food. Curious about how to make this delicious dish come together? Let’s dive in!
Why will you love this okonomiyaki?
Simplicity at Its Best: This recipe is incredibly easy to follow, making it a perfect choice for both novice and experienced cooks.
Wholesome and Healthy: Packed with cabbage and scallions, this okonomiyaki offers plenty of fiber and nutrients, ensuring a guilt-free indulgence.
Advertisement
Quick Cooking Time: Ready in just 25 minutes, it’s the ultimate weeknight meal that won’t keep you in the kitchen for long.
Versatile Ingredients: Feel free to customize with your favorite veggies or swap in different toppings to make it truly your own.
Family-Friendly Fun: Invite the kids to help mix and flip, turning cooking into an enjoyable family activity that will have everyone smiling.
Enjoy this delightful dish that offers a unique taste of Japan right at home, and if you’re looking for more ways to use pantry staples, check out our guide on creative meal inspirations.
Okonomiyaki Ingredients
For the Pancake
- Cabbage – Provides the main structure and texture; can use pre-packaged coleslaw mix for convenience.
- Scallions – Adds freshness and mild onion flavor; green onions can be used as an alternative.
- Panko Breadcrumbs – Binds the mixture while adding a bit of crunch; use flour for a more traditional recipe, but adjust moisture as needed.
- Sea Salt – Enhances flavor.
- Large Eggs – Acts as the binder for the ingredients; more eggs may be needed if the cabbage is particularly dry.
- Extra-virgin Olive Oil – For greasing the skillet, ensuring pancakes don’t stick.
For the Toppings
- Vegan Worcestershire Sauce – Adds a tangy flavor when drizzled on top; use Annie’s brand for a good option.
- Mayo – Traditional topping that adds creaminess; Kewpie mayo or Sir Kensington’s recommended, or use sriracha mayo for a kick.
- Sesame Seeds – Provides garnish and crunch.
- Pickled Ginger – Offers a refreshing contrast.
- Nori – Adds umami and texture; cut into thin strips using scissors.
- Microgreens – Optional fresh garnish.
Step‑by‑Step Instructions for Okonomiyaki
Step 1: Prepare Ingredients
In a large mixing bowl, combine the shredded cabbage, chopped scallions, panko breadcrumbs, and a pinch of sea salt. This will be the base of your okonomiyaki, which should look bright and colorful. Stir gently until evenly mixed, ensuring every piece is well-coated.
Step 2: Mix Wet Ingredients
Add the beaten eggs to the cabbage mixture, folding them in gently with a spatula. The resulting mixture should be a bit loose but dense with cabbage. If it feels dry, let it rest for about 10 minutes, as this allows the cabbage to release moisture, enhancing the overall texture of your okonomiyaki.
Step 3: Cook Pancakes
Heat a nonstick skillet over medium heat and add a tablespoon of extra-virgin olive oil, ensuring a shiny coat covers the entire surface. Once hot, scoop ¼ cup of the mixture into the skillet, flattening it gently to about ½ inch thick. Cook for approximately 3 minutes per side until golden brown, adjusting the heat if necessary to prevent burning.
Step 4: Add Toppings
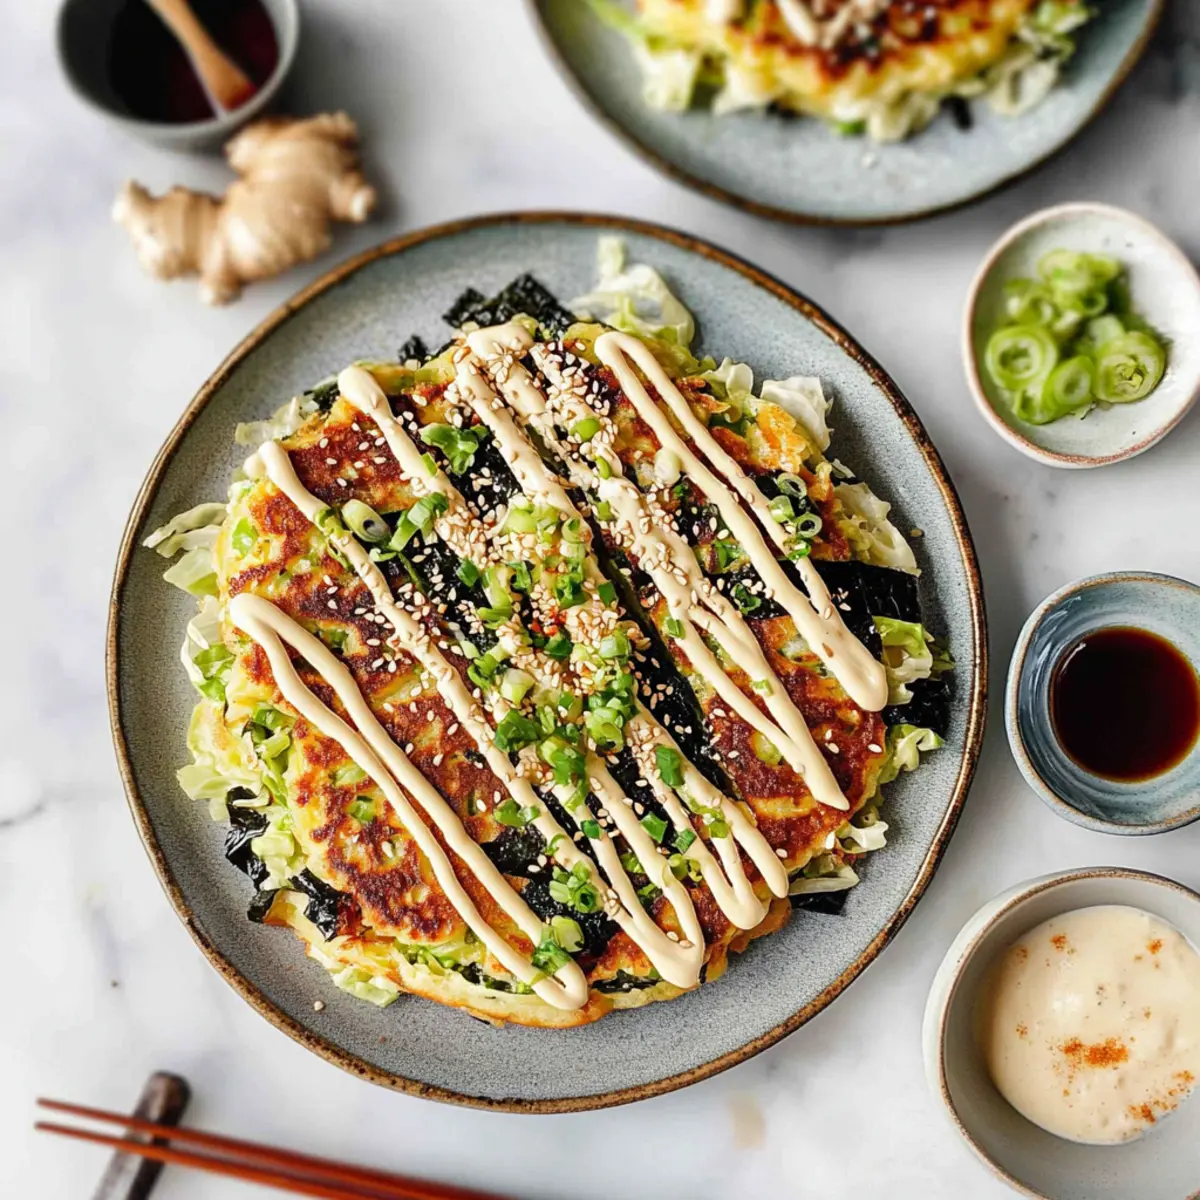
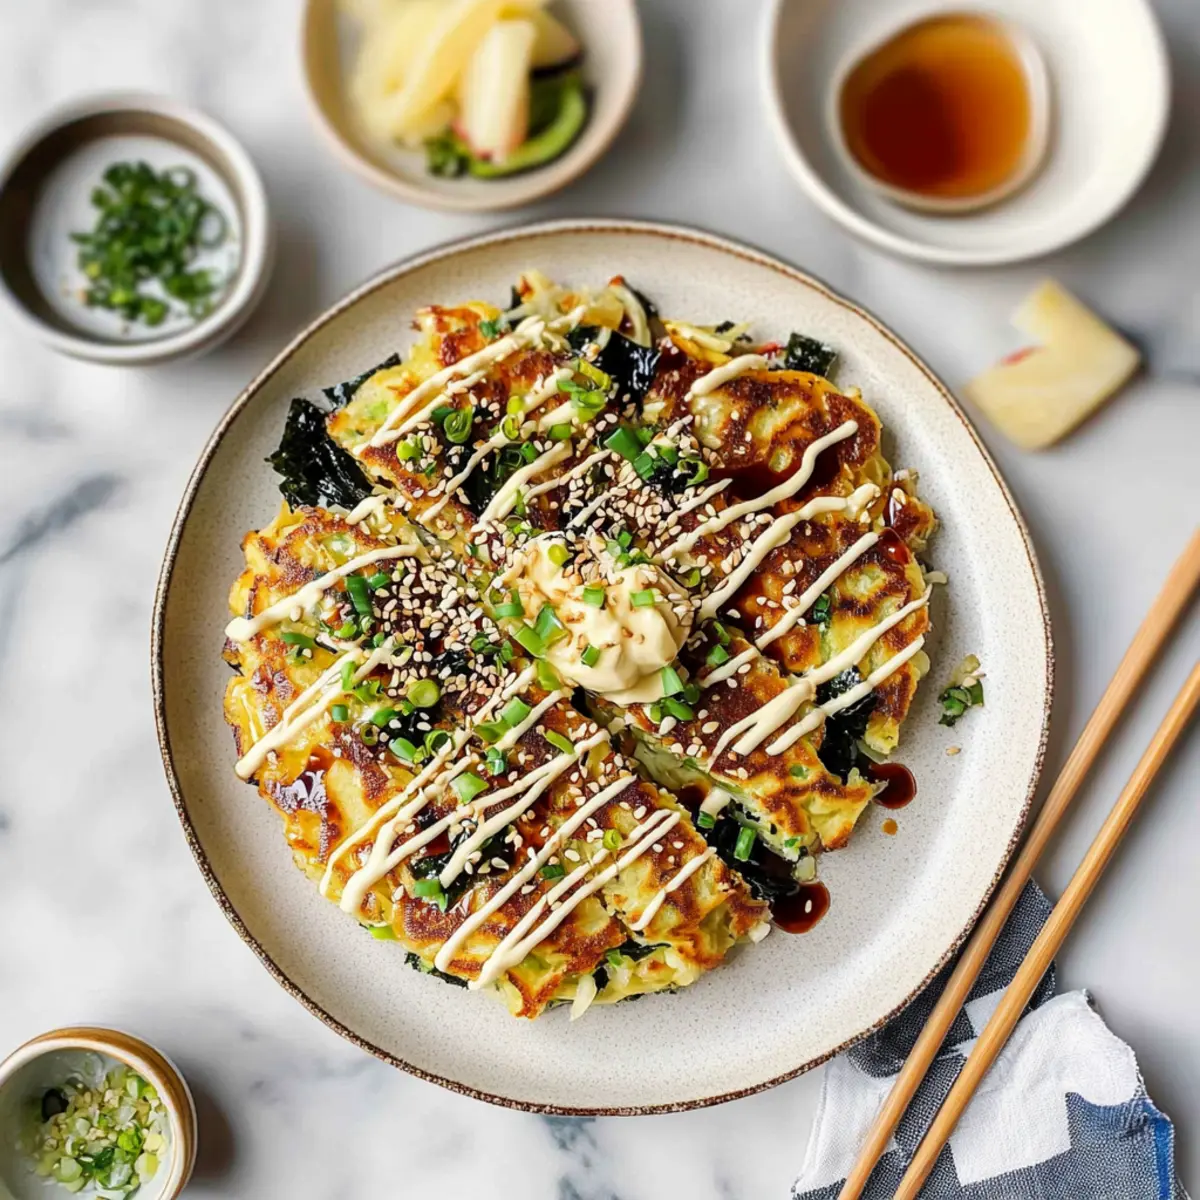
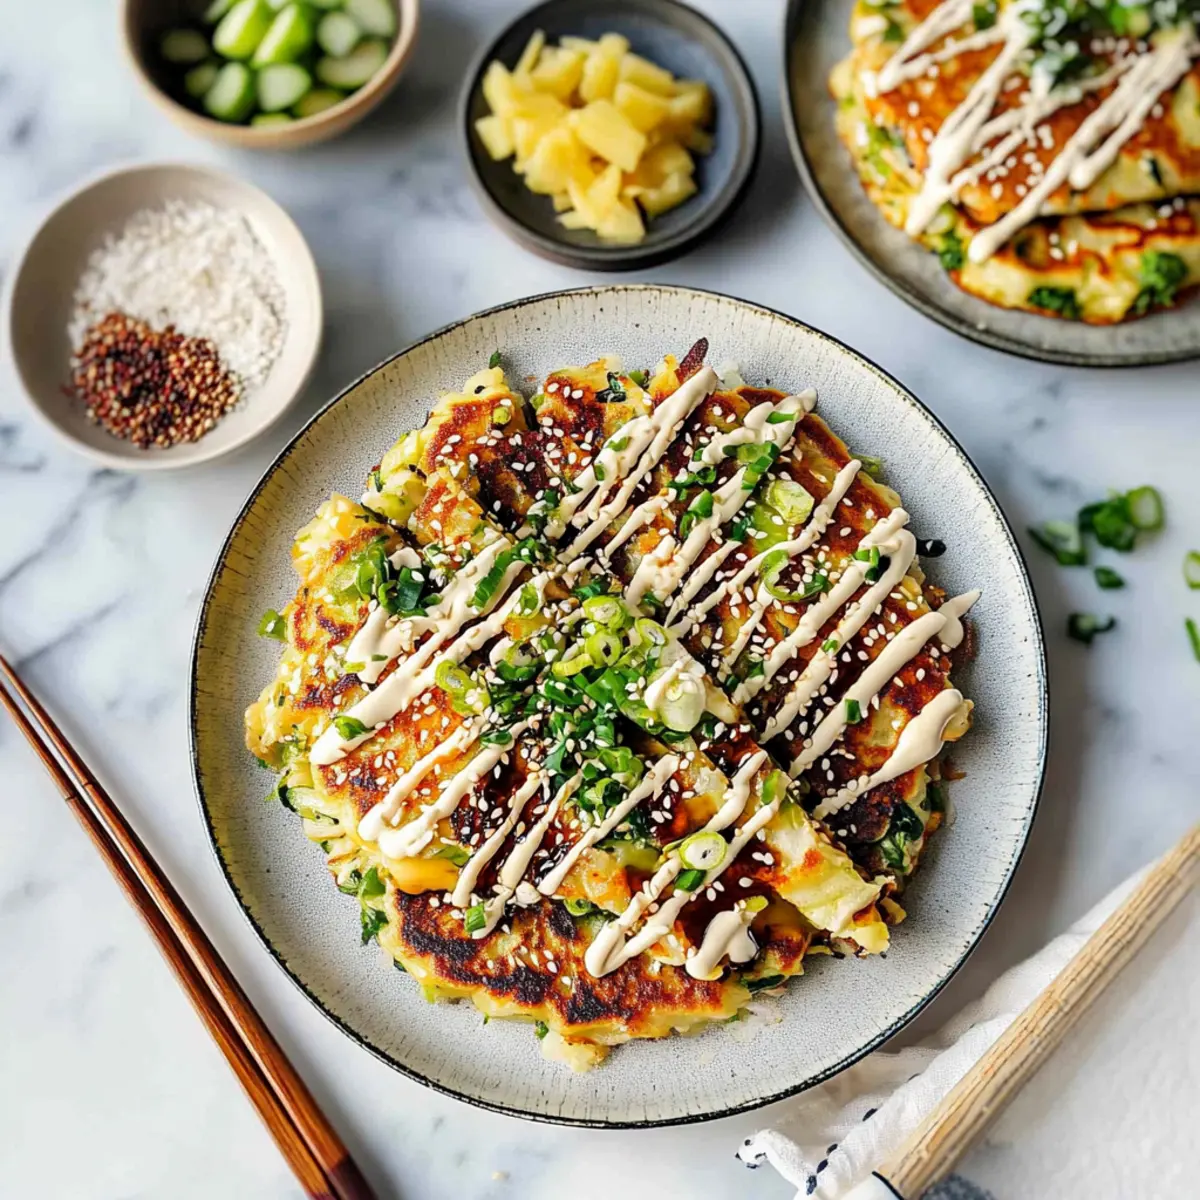
Once the okonomiyaki is crispy and golden, carefully transfer it to a plate. Drizzle vegan Worcestershire sauce and creamy mayonnaise over the pancake, imparting a tantalizing tang. Sprinkle sesame seeds, add pickled ginger, and finish with strips of nori on top. If desired, garnishing with microgreens adds a fresh, vibrant finish. Serve hot for an unforgettable experience!
Storage Tips for Okonomiyaki
Fridge: Store leftover okonomiyaki in an airtight container for up to 2 days to maintain its freshness.
Freezer: For longer storage, freeze cooked okonomiyaki for up to 3 months. Wrap individually in plastic wrap and place them in a freezer-safe bag.
Reheating: To enjoy, reheat frozen okonomiyaki in a skillet over medium heat for about 5 minutes on each side until warmed through and crispy again. Enjoy this delicious okonomiyaki warm for best flavor!
Room Temperature: If left out, consume within 2 hours to ensure safety and quality.
Make Ahead Options
These Easy Vegetarian Okonomiyaki are perfect for busy weeknights when you want to save time without sacrificing flavor! You can prep the cabbage, scallions, and panko mixture up to 24 hours in advance, storing it in an airtight container in the refrigerator. This allows the flavors to meld beautifully while keeping the ingredients fresh. When you’re ready to cook, simply mix in the beaten eggs and follow the cooking instructions. If desired, you can also cook the pancakes ahead of time and refrigerate for up to 2 days; just reheat gently in a skillet to maintain their delightful texture. Enjoy the convenience and deliciousness of homemade okonomiyaki with minimal effort!
What to Serve with Easy Vegetarian Okonomiyaki?
Pairing this delightful savory pancake with complementary flavors and textures will elevate your meal experience!
-
Crispy Edamame: A crunchy, protein-packed snack that adds a delightful bite and a splash of green to your plate.
-
Asian Cucumber Salad: Refreshing and tangy, this salad with crisp cucumbers and rice vinegar balances the rich flavors of okonomiyaki, making it perfect for summer.
-
Miso Soup: Warm and nourishing, a bowl of miso soup offers a comforting umami flavor that beautifully complements the savory pancake.
-
Sautéed Bok Choy: Lightly sautéed bok choy highlights the freshness of the vegetables, adding a tender texture and bright green color to your meal.
-
Pickled Vegetables: A tangy assortment of pickles provides a perfect contrast and revitalizes the palate with their zesty crunch.
-
Chilled Green Tea: Refreshing and light, a glass of chilled green tea not only cleanses the palate but also enhances the flavors of your meal.
-
Fruit Mochi Dessert: For a sweet ending, delightful mochi filled with fruit offers a chewy, satisfying contrast to the savory pancake, rounding off your meal perfectly.
Enjoy mixing and matching these options to create a vibrant, fulfilling dining experience that highlights the deliciousness of your okonomiyaki!
Okonomiyaki Variations & Substitutions
Feel free to get creative with this delightful okonomiyaki recipe, making it uniquely yours through exciting swaps and additions!
-
Veggie Boost: Add grated carrots or zucchini to the mixture for extra nutrients and a bit of sweetness. Every bite will be colorful and vibrant!
-
Gluten-Free Option: Substitute panko breadcrumbs with almond flour to keep it gluten-free while still achieving a lovely texture. This swap maintains the recipe’s integrity without losing flavor.
-
Noodle Twist: Incorporate cooked soba noodles into the batter for a heartier pancake inspired by Hiroshima-style okonomiyaki. It brings a delightful chewiness that’s absolutely satisfying.
-
Spicy Kick: Top your okonomiyaki with sriracha mayo instead of regular mayo for an exciting heat that complements the savory base perfectly. This adds a nice zing to each bite!
-
Herb Infusion: Stir in fresh cilantro or basil to the mixture for a fragrant twist. These herbs add freshness and elevate the dining experience!
-
Vegan Delight: To make this dish completely plant-based, use flax eggs (1 tablespoon ground flaxseed mixed with 2.5 tablespoons water per egg) as a binder, and opt for your favorite vegan mayo. This ensures everyone can enjoy it!
-
Crunchy Topping: Add toasted peanuts for garnish instead of sesame seeds, delivering a delightful crunch and nutty flavor. Don’t be afraid to experiment with different toppings!
-
Savory Umami Boost: Sprinkle some shiitake mushroom powder or dried bonito flakes on top to enhance the umami notes of this dish, if you’re not keeping it vegan. This twist takes it to another level of deliciousness!
These suggestions not only make your okonomiyaki special but also keep it aligned with preferences or dietary needs. Want more cooking ideas? Check out our guide on fun ingredient swaps to spark your culinary creativity!
Expert Tips for Okonomiyaki
-
Skillet Temperature: Ensure your skillet is hot enough to achieve that perfect crispy exterior; adjust heat as needed to avoid burning.
-
Don’t Over-Mix: Keep the batter chunky to maintain texture; over-mixing can lead to a dense okonomiyaki rather than a fluffy delight.
-
Rest Time: Letting the mixture rest for 10 minutes can significantly improve the cabbage’s moisture, resulting in a better final texture.
-
Flipping Technique: Be patient when browning each side; allow the pancake to cook until golden before flipping to enhance flavor.
-
Customization Options: Experiment with added vegetables like grated carrots or zucchini to keep your okonomiyaki fresh and exciting!
Okonomiyaki Recipe FAQs
What type of cabbage should I use for okonomiyaki?
Absolutely! For okonomiyaki, I recommend using green cabbage for its crisp texture and mild flavor. Look for heads that are tightly packed with vibrant, crisp leaves. Avoid any with dark spots or wilting leaves—freshness is key! You can even opt for pre-packaged coleslaw mix if you’re pressed for time.
How long can I store leftover okonomiyaki?
Very! Leftover okonomiyaki can be stored in an airtight container in the fridge for up to 2 days. To retain its delightful crispy texture, simply reheat it in a skillet over medium heat for about 5 minutes per side until warmed through and crispy again.
Can I freeze okonomiyaki for later?
Absolutely! To freeze okonomiyaki, allow it to cool completely, then wrap each pancake individually in plastic wrap and place them in a freezer-safe bag. They can be stored in the freezer for up to 3 months. When you’re ready to enjoy, reheat them in a skillet as mentioned above for the best results.
What should I do if my okonomiyaki is too dry?
A great question! If your okonomiyaki mixture seems too dry, adding an extra egg can help bind everything together. I also suggest letting the mixture rest for about 10 minutes—this allows the cabbage to release moisture, which can enhance the texture and flavor.
Are there any allergy considerations for okonomiyaki?
Definitely! If you have dietary restrictions, you can easily modify the recipe. Ensure the mayo is vegan if you are avoiding eggs; brands like Kewpie mayo may contain allergens, so always check labels. Also, if you’re making this for pets, be cautious with ingredients like onions and garlic, as they can be harmful to them.
What’s the ideal cooking temperature for the skillet?
Very! To achieve that perfect crispy exterior, heat your skillet over medium heat before adding the oil. If the oil shimmers, it’s hot enough! If you notice the okonomiyaki browning too quickly, lower the heat slightly—patience is key to ensuring a beautifully cooked pancake.
Delicious Okonomiyaki: Quick Vegetarian Pancake Bliss
Ingredients
Equipment
Method
- In a large mixing bowl, combine the shredded cabbage, chopped scallions, panko breadcrumbs, and sea salt. Stir gently until evenly mixed.
- Add the beaten eggs to the cabbage mixture, folding them in gently. Let it rest for about 10 minutes to enhance texture.
- Heat a nonstick skillet over medium heat and add a tablespoon of olive oil. Scoop 1/4 cup of the mixture into the skillet and cook for approximately 3 minutes per side.
- Once crispy and golden, transfer to a plate. Drizzle with vegan Worcestershire sauce and mayonnaise, sprinkle sesame seeds, add pickled ginger, and finish with nori. Garnish with microgreens if desired.