Advertisement
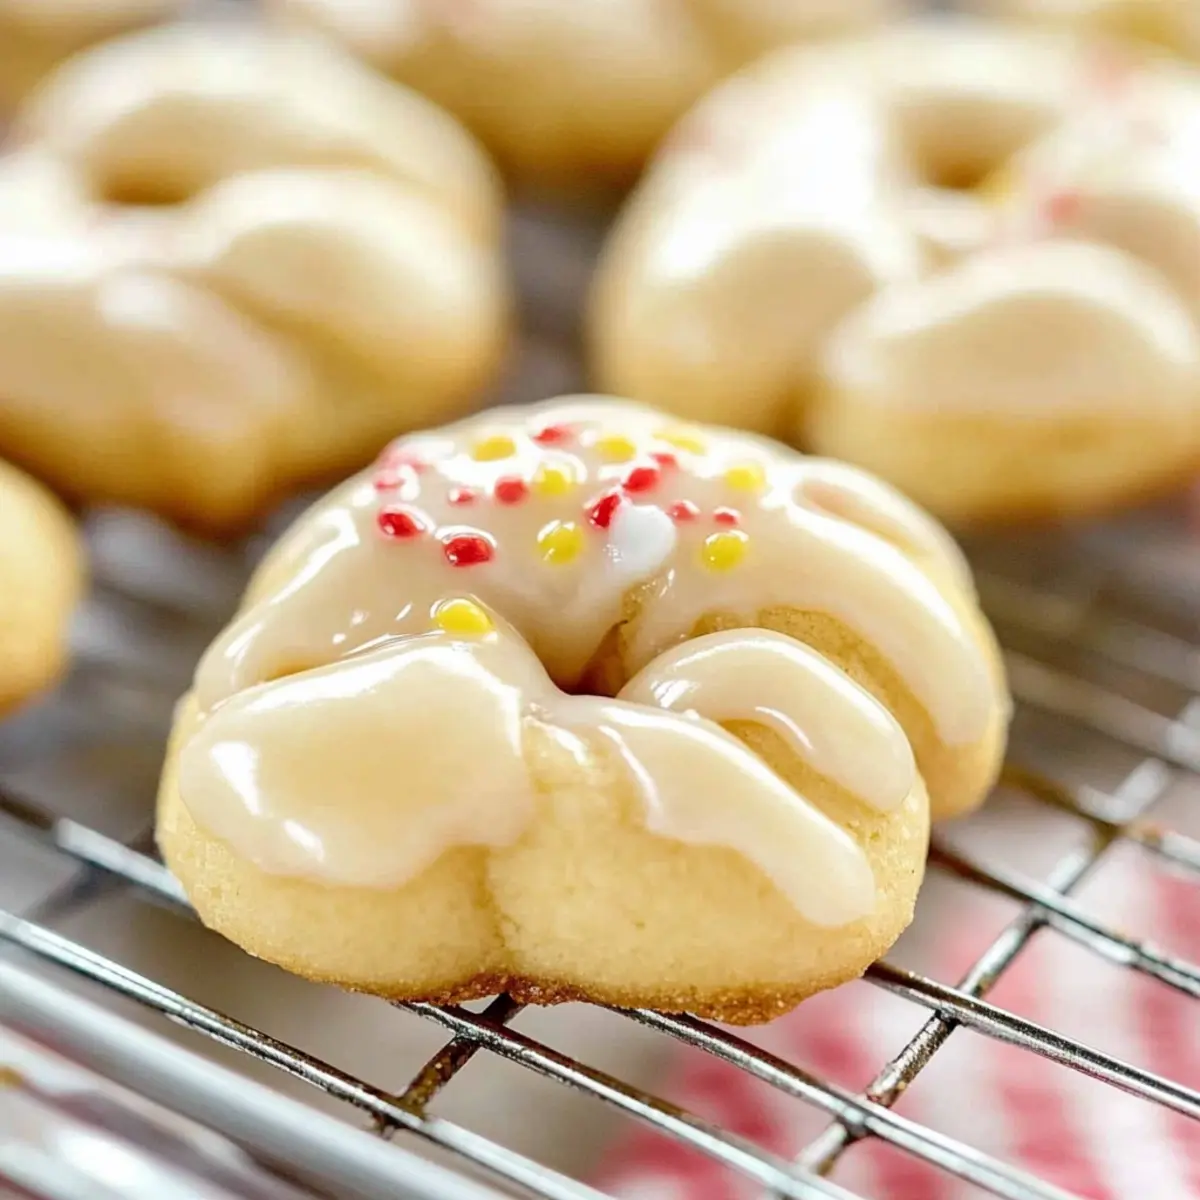
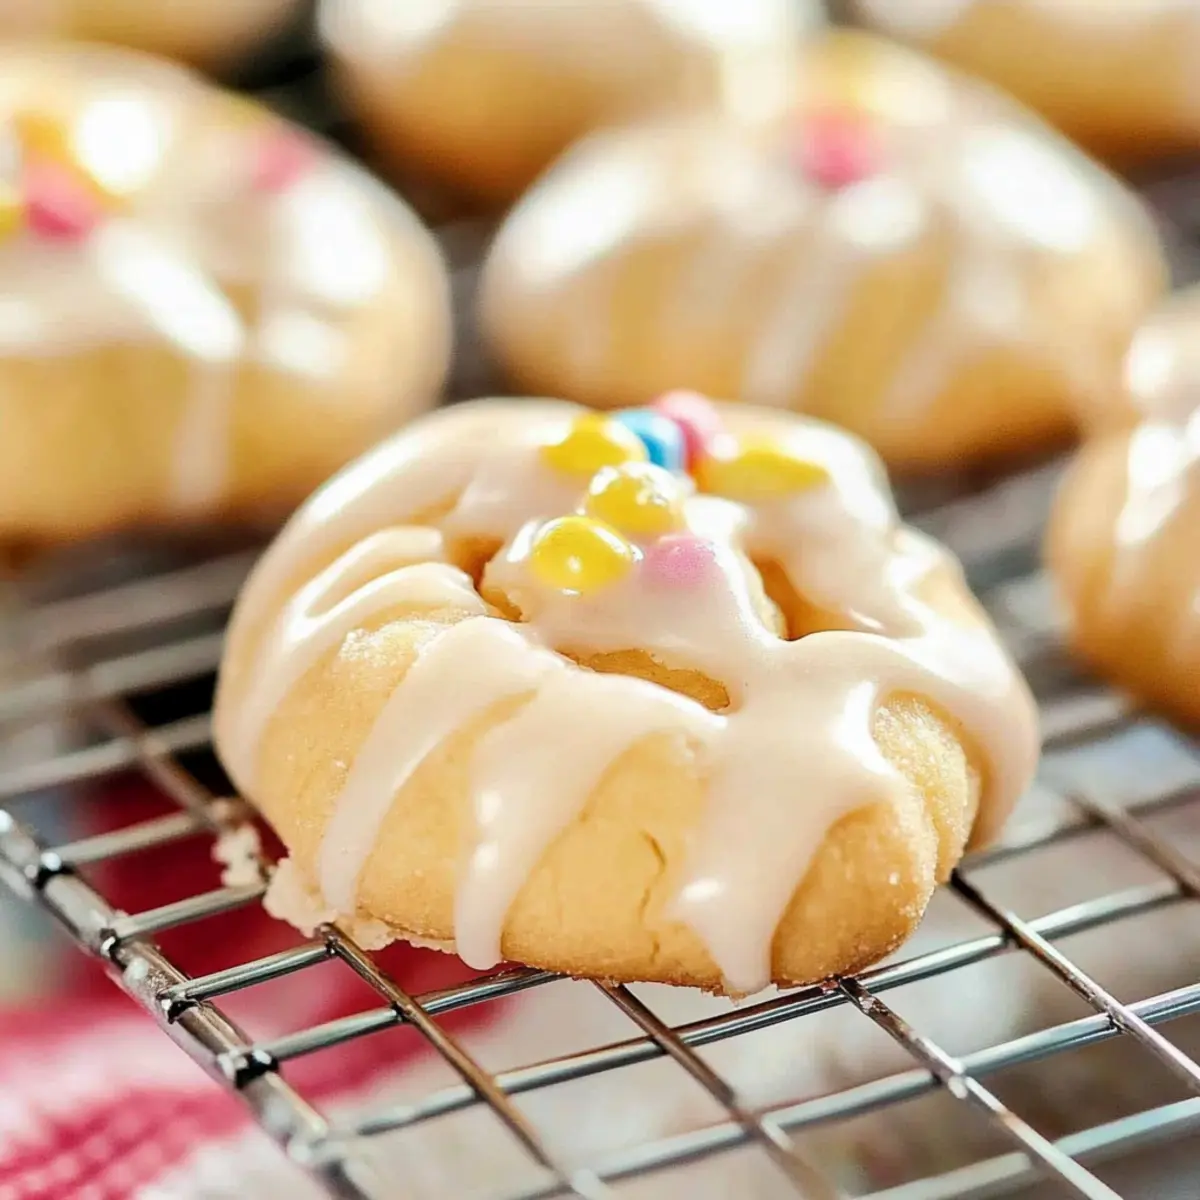
As I unwrap the warm, lemon-scented Italian Easter Cookies, a wave of nostalgia washes over me, transporting me to vibrant family gatherings in Calabria. These traditional cookies, known as Uncinetti, are not just delightful treats; they offer a light sweetness that perfectly balances the holiday spirit. The beauty of this recipe is its simplicity, making these Italian Easter Cookies a quick and easy addition to any festive table. With just a handful of ingredients, you can create beautiful knots that are both crunchy and chewy, pairing wonderfully with your favorite coffee or tea. Plus, they’re versatile enough to enjoy beyond the Easter season, making them a year-round crowd-pleaser. Ready to bring a taste of Italy into your kitchen? Let me take you deeper into this delicious tradition!
Why are Italian Easter Cookies special?
Tradition: These cookies, known as Uncinetti, are a cherished part of Southern Italian Easter celebrations, bringing a taste of home with every bite.
Delectable Flavor: The light citrus notes from lemon zest give these cookies a refreshing twist, making them perfect for any occasion.
Quick Preparation: With straightforward steps, you’ll have these delightful treats ready to impress your family and friends in no time!
Low Sugar: Sweetened just right, they offer a guilt-free indulgence that doesn’t compromise on taste. Perfect for those who are tired of overly sweet desserts!
Versatile Treat: Enjoy them as a delightful accompaniment to your morning coffee or as a snack anytime, just like Pistachio Shortbread Cookies or Filled Snowball Cookies. These Italian Easter Cookies will surely become a favorite!
Italian Easter Cookies Ingredients
• Perfect for your festive baking!
Advertisement
For the Cookies
- All-Purpose Flour – Provides structure for the cookies. (Use gluten-free flour if needed.)
- Granulated Sugar – Adds sweetness to the cookie base. (Coconut sugar can be used as a substitute.)
- Baking Powder – Helps leaven the cookies slightly.
- Salt – Enhances flavor. (Use unsalted butter here, if preferred, and adjust salt accordingly.)
- Lemon Zest – Imparts fresh citrus flavor, essential for Italian Easter Cookies.
- Egg – Binds ingredients together.
- Butter (Melted and Cooled) – Adds richness and flavor. (Light olive oil can be used as a dairy-free alternative.)
- Milk (2% preferred) – Adds moisture to the dough.
For the Lemon Glaze
- Powdered Sugar – Base for the lemon glaze.
- Lemon Juice – Adds zest to the glaze.
- Milk (for Glaze) – Adjust consistency of the glaze.
Step‑by‑Step Instructions for Italian Easter Cookies
Step 1: Preheat the Oven
Begin by preheating your oven to 300°F (150°C). Line a large cookie sheet with parchment paper to prevent the cookies from sticking. This setup is crucial as it ensures even baking and makes cleanup a breeze. While the oven heats, gather your ingredients to streamline the mixing process.
Step 2: Combine Dry Ingredients
In a large mixing bowl, whisk together all-purpose flour, granulated sugar, baking powder, salt, and lemon zest. Make sure to combine them thoroughly to create a uniform mixture. The zest will add a refreshing lemon aroma, which is essential for the delightful Italian Easter Cookies. Set aside once done.
Step 3: Mix Wet Ingredients
Next, create a well in the center of your dry ingredients. Add the egg, melted and cooled butter, and milk into the well. Using a fork, gradually mix the wet ingredients into the flour mixture until it is nearly combined. This step ensures that your cookie dough will be rich and flavorful.
Step 4: Knead the Dough
Once the ingredients are almost mixed, turn the dough out onto a lightly floured surface. Knead the dough gently until it becomes smooth and elastic, about 2-3 minutes. Be careful not to over-knead, as you want to maintain a tender texture perfect for your Italian Easter Cookies.
Step 5: Shape the Cookies
Divide the dough into smaller pieces and roll each piece into ropes approximately 5-6 inches long. Form these ropes into knots or circles, as your heart desires. This shaping not only makes them visually appealing but also allows for an even bake during the next step.
Step 6: Bake the Cookies
Place the shaped cookies on your prepared cookie sheet, ensuring they have room to spread. Bake in the preheated oven for 15-18 minutes, or until the cookies are lightly golden. Keep an eye on them to avoid overbaking, as you want them to have a delicate crunch without becoming too hard.
Step 7: Cool the Cookies
Once baked, carefully remove the cookies from the oven and let them cool completely on a wire rack. It’s important to let them cool thoroughly, as this allows the flavors to settle and makes glazing easier. The contrast of the cool cookies and the warm lemon glaze will be delightful.
Step 8: Prepare the Lemon Glaze
While the cookies are cooling, prepare the lemon glaze. In a mixing bowl, combine sifted powdered sugar with fresh lemon juice and a splash of milk, whisking until you achieve your desired consistency. The glaze should be smooth and pourable but thick enough to coat the cookies.
Step 9: Glaze the Cookies
Once the cookies have cooled, generously drizzle the lemon glaze over them for that essential sweetness. This final touch not only enhances the flavor but adds a lovely shine. If you desire, sprinkle colorful candies immediately after glazing to add a festive touch to your Italian Easter Cookies.

What to Serve with Italian Easter Cookies
As you bite into these delightful cookies, consider how to elevate the experience and create a memorable celebration around them.
-
Rich Espresso: A shot of rich espresso pairs beautifully with the lemon notes, enhancing the cookie’s flavors and providing a delicious contrast. Sip while savoring the cookies for an authentic Italian experience.
-
Creamy Mascarpone: Spread a dollop of creamy mascarpone on each cookie for a luscious, smooth addition that complements the crunchy texture and adds a touch of indulgence.
-
Fresh Berries: Serve with a side of fresh berries for a burst of color and natural sweetness, bringing a refreshing balance to the cookies’ lightness.
-
Chilled Prosecco: For a festive touch, enjoy these cookies with chilled Prosecco. The bubbles and delicate flavor make it a perfect pairing for a celebratory atmosphere.
-
Herbal Tea: A warm cup of herbal tea, like chamomile or mint, creates a cozy vibe. The herbal notes harmonize with the citrusy glaze, making for a delightful afternoon treat.
-
Lemon Sorbet: For a bright and refreshing dessert, serve a small scoop of lemon sorbet alongside the cookies. The sorbet’s tanginess will enhance the overall lemon flavor experience.
-
Pastel Sprinkles: Add a fun and colorful twist by topping the cookies with pastel sprinkles. They not only look festive but also add a delightful crunch, making them perfect for Easter gatherings.
By incorporating these delightful pairings, your Italian Easter Cookies will shine even brighter at the center of your celebration!
Expert Tips for Italian Easter Cookies
-
Watch the Time: Baking times can vary; check your cookies around the 15-minute mark for a light golden color to avoid overbaking.
-
Dough Consistency: Ensure your dough is neither too dry nor too sticky. If it feels tacky, sprinkle a touch more flour during kneading.
-
Glaze Application: For the best adherence, drizzle the glaze right after the cookies have cooled. Add sprinkles before the glaze sets for a festive touch.
-
Storage Tips: Keep your Italian Easter Cookies fresh by storing them in an airtight container at room temperature for up to a week.
-
Freezing Dough: Make the dough ahead of time and freeze it for up to three months. Thaw it overnight in the fridge before baking for an effortless treat anytime!
Make Ahead Options
These Italian Easter Cookies are perfect for meal prep, allowing you to spend less time in the kitchen when the holiday season arrives. You can prepare the dough up to 3 days in advance; simply wrap it tightly in plastic wrap and refrigerate. Alternatively, for even longer storage, freeze the dough for up to 3 months. When you’re ready to bake, thaw the dough in the refrigerator overnight before shaping and baking. To maintain the delightful texture of the Italian Easter Cookies, remember to let them cool completely before glazing, ensuring the frosting adheres beautifully. With these tips, you’ll have delicious treats ready to share with family and friends, making holiday celebrations a breeze!
Italian Easter Cookies Variations
Feel free to sprinkle your own magic on these delightful Italian Easter Cookies, customizing them to fit your taste!
- Gluten-Free: Swap all-purpose flour for a gluten-free blend to enjoy these treats without worries. It’s just as simple and delicious!
- Coconut Sugar: Replace granulated sugar with coconut sugar for a deeper caramel flavor while still keeping it light. Your cookies will have a unique twist!
- Dairy-Free Delight: Use light olive oil instead of butter for a dairy-free version that retains richness. It’s perfect for those with dietary restrictions!
- Flavor Infusions: Add a splash of almond extract or some ground anise to the dough for a fragrant twist that complements the lemon beautifully.
- Sprinkle Surprise: Top your cookies with colorful sprinkles or omit the glaze entirely for a more subtle presentation. They’re just as lovely either way!
- Zesty Options: Mix in some orange or lime zest along with lemon zest for an extra burst of citrus flavor that brightens the cookies even more.
- Chocolate Drizzle: For chocolate lovers, drizzle melted dark chocolate over the glazed cookies instead of lemon glaze for a decadent touch.
- Nutty Crunch: Incorporate finely chopped nuts, like pistachios or almonds, into the dough for a delightful texture that pairs wonderfully with the light flavor of the cookies.
These Italian Easter Cookies can easily adapt to any occasion or craving, just like the delightful Pistachio Shortbread Cookies you may also love! Explore these variations and make the recipe truly your own!
How to Store and Freeze Italian Easter Cookies
Room Temperature: Keep the cookies in an airtight container at room temperature for up to one week to maintain freshness and texture.
Freezer: If you want to enjoy these Italian Easter Cookies later, freeze the fully baked cookies for up to three months. Thaw them at room temperature before serving.
Dough Storage: You can also prepare the dough ahead of time and freeze it for up to three months. Just thaw it in the fridge overnight prior to baking.
Reheating: If desired, warm the cookies in a low oven at 300°F (150°C) for a few minutes to regain their delightful texture before enjoying!

Italian Easter Cookies (Uncinetti) Recipe FAQs
What is the best way to select ripe ingredients for Italian Easter Cookies?
Absolutely! When selecting your ingredients, especially for lemon zest, choose lemons that are firm and heavy with a vibrant yellow color, free of dark spots or blemishes. Fresh eggs should be clean and stored properly in the refrigerator. Always use high-quality flour and sugar for the best flavor—organic options often provide a richer taste.
How should I store Italian Easter Cookies?
For optimal freshness, store your Italian Easter Cookies in an airtight container at room temperature for up to one week. Make sure the cookies are completely cooled before sealing them to prevent moisture build-up, which can affect their delightful crunch.
Can I freeze Italian Easter Cookies?
Yes, you can! These Italian Easter Cookies freeze beautifully. Place the cooled, glazed cookies in a single layer on a baking sheet and freeze them for about 1-2 hours until solid. Then, transfer them to a freezer-safe bag or container and store for up to three months. To enjoy, simply thaw at room temperature or warm gently in a 300°F (150°C) oven for a few minutes.
What should I do if my dough is too sticky or too dry?
Very! If your dough feels too sticky, gradually sprinkle in a little more flour while kneading until it reaches the right consistency. Aim for a smooth dough that’s easy to handle, not overly tacky. Conversely, if your dough is too dry, add a teaspoon of milk at a time until it achieves the desired softness. Balancing the moisture will ensure beautifully chewy cookies!
Are Italian Easter Cookies suitable for people with dietary allergies?
Yes! This recipe is versatile. For those with gluten sensitivities, gluten-free all-purpose flour can be used as a substitute. If someone has a dairy allergy, light olive oil is a great alternative to butter. Just ensure that the powdered sugar used in the glaze is also free from allergens, as some brands may contain additives.
How long will my Italian Easter Cookies stay fresh in the freezer?
These delightful cookies can be stored in the freezer for up to three months. Make sure to wrap them well or place them in an airtight container to avoid freezer burn. Defrost them at room temperature before enjoying for the best taste and texture.
Delicious Italian Easter Cookies to Brighten Your Celebration
Ingredients
Equipment
Method
- Preheat your oven to 300°F (150°C). Line a large cookie sheet with parchment paper.
- In a large mixing bowl, whisk together all-purpose flour, granulated sugar, baking powder, salt, and lemon zest.
- Create a well in the center of the dry ingredients and add the egg, melted and cooled butter, and milk. Mix until nearly combined.
- Turn the dough out onto a lightly floured surface and knead gently until smooth and elastic, about 2-3 minutes.
- Divide the dough into smaller pieces and roll each piece into ropes approximately 5-6 inches long, shaping them into knots or circles.
- Place the shaped cookies on your prepared cookie sheet and bake for 15-18 minutes, until lightly golden.
- Remove the cookies from the oven and let them cool completely on a wire rack.
- Prepare the lemon glaze by combining sifted powdered sugar with fresh lemon juice and splash of milk in a mixing bowl.
- Generously drizzle the lemon glaze over the cooled cookies.