Advertisement
As I unwrapped another layer of plastic, a surprise awaited me—a delightful creation that combined two of my greatest indulgences: Oreos and sushi. Yes, you read that right! This easy Oreo Sushi Recipe is a playful no-bake dessert that has taken my kitchen by storm, blending creamy filling with crushed cookies into sushi-like rolls. Not only is it a breeze to whip up, but it also lends itself to endless variations, inviting the playful spirit of both children and adults alike. Perfect for celebrations or a whimsical treat at home, this recipe is just as enjoyable to make as it is to eat. Ready to roll up some sweet fun? Let’s dive into creating these delectable Oreo sushi rolls together!
Why Is Oreo Sushi So Fun to Make?
Endless Variations: Switch up your flavor profile by using different Oreo types like mint or peanut butter.
Quick and Easy: This no-bake dessert comes together in just minutes, making it perfect for unexpected guests or last-minute cravings.
Advertisement
Perfect for Sharing: Slice it into bite-sized pieces for a fun, shareable treat that’s sure to impress at parties or family gatherings.
Kid-Friendly Fun: Involve the little ones in the kitchen! Rolling the dough and slicing the sushi adds an element of excitement that kids will love.
Unique Presentation: Who wouldn’t want to feast on sushi made from Oreos? The whimsical appearance will wow your guests every time.
Give this Oreo Sushi Recipe a try, and if you’re in the mood for more fun desserts, check out my easy Bake Peppermint Oreo or Ground Beef Pasta!
Oreo Sushi Recipe Ingredients
For the Sushi Rolls
• Oreo Cookies – The backbone of this dessert; feel free to swap in your favorite Oreo variant for a creative twist!
• Milk – Helps bind the crushed cookies into a dough; any milk will do, including almond or oat for a dairy-free option.
For the Filling
• Cream Filling – Reserved from the Oreo cookies; this adds that indulgent, creamy finish to your sushi rolls.
Ready to indulge in this fun Oreo Sushi Recipe? Gather these ingredients and let the sweet adventure begin!
Step‑by‑Step Instructions for Oreo Sushi Recipe
Step 1: Prepare the Cookies
Begin by carefully separating the Oreo cookies, placing the chocolate cookie halves in one bowl and the cream fillings in another. This will ensure that your Oreo sushi recipe has the perfect blend of chocolate and cream once assembled. You can also choose to experiment with different Oreo flavors if you’re feeling adventurous.
Step 2: Crush the Cookies
Place the chocolate cookie halves into a food processor and pulse until they form fine crumbs, about 30 seconds. If you don’t have a food processor, you can put the cookies in a zip-top bag and crush them gently with a rolling pin. Aim for a powdery consistency that will hold together when mixed with milk.
Step 3: Form the Dough
Transfer the crushed Oreo cookies to a mixing bowl and gradually add most of the milk, stirring until a soft dough forms. If the mixture feels too crumbly, add a little more milk, one tablespoon at a time, until you reach a cohesive and pliable texture. This dough will form the base of your sushi rolls.
Step 4: Shape the Dough
Lay out a large piece of plastic wrap on your workspace and transfer the Oreo dough onto it. With clean hands, press the dough into a rectangle approximately 1/4 inch thick. This will ensure your Oreo sushi has a uniform shape and makes rolling easier when it’s time to assemble.
Step 5: Prepare the Filling
In a small bowl, mix the reserved Oreo cream with the remaining milk until smooth, creating a rich filling. Use a spatula to ensure the mixture is well blended, as this filling will provide a creamy texture that complements the cookie dough beautifully. Spread this filling evenly over the rectangular dough layer.
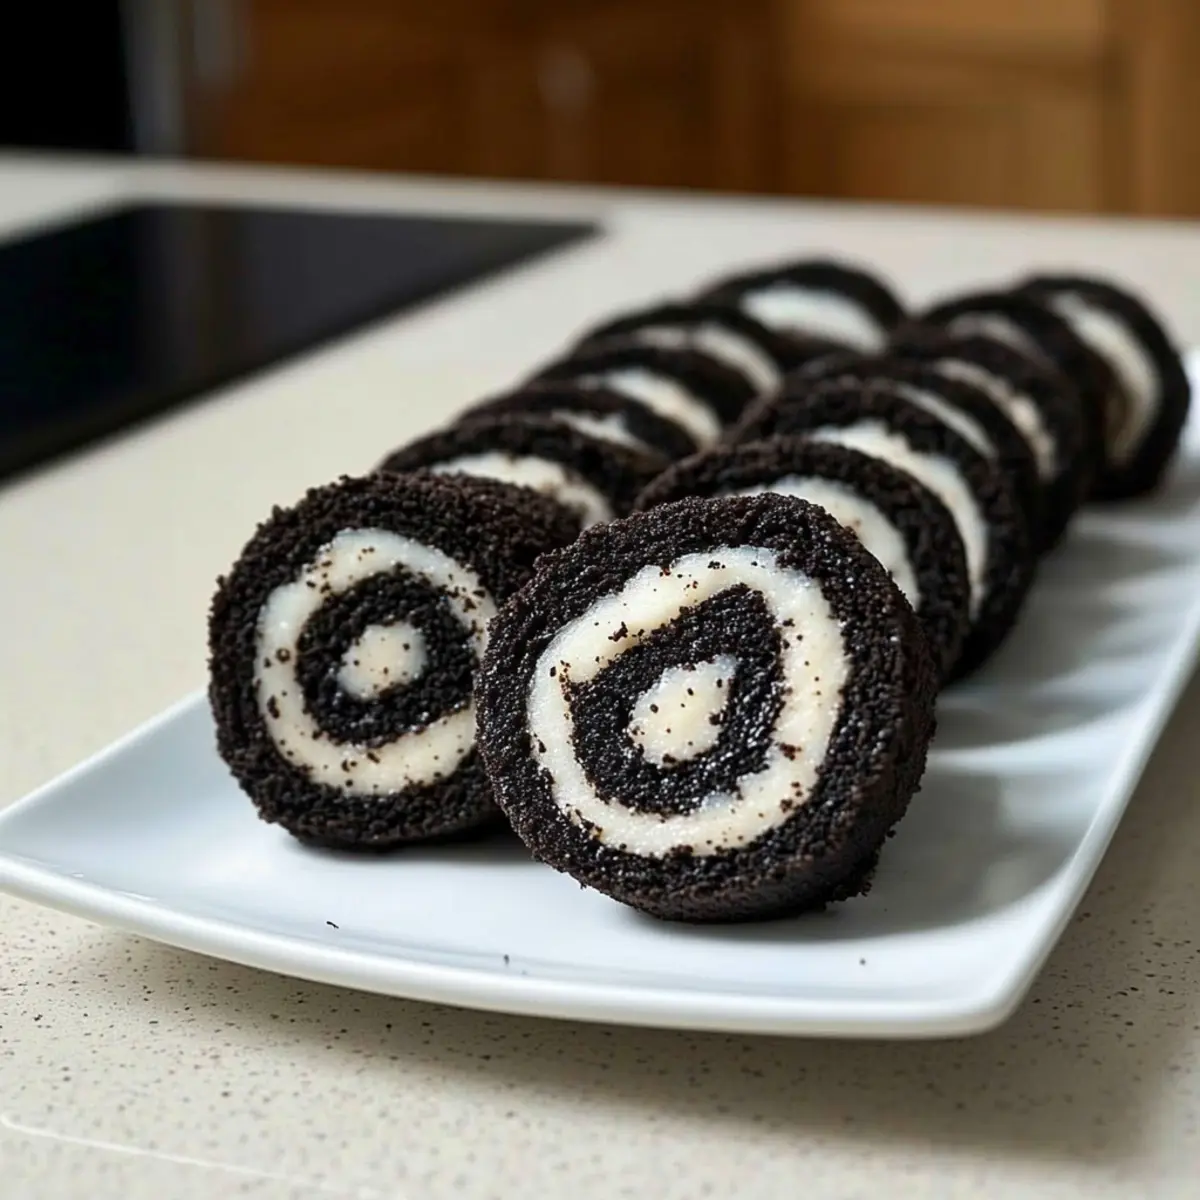
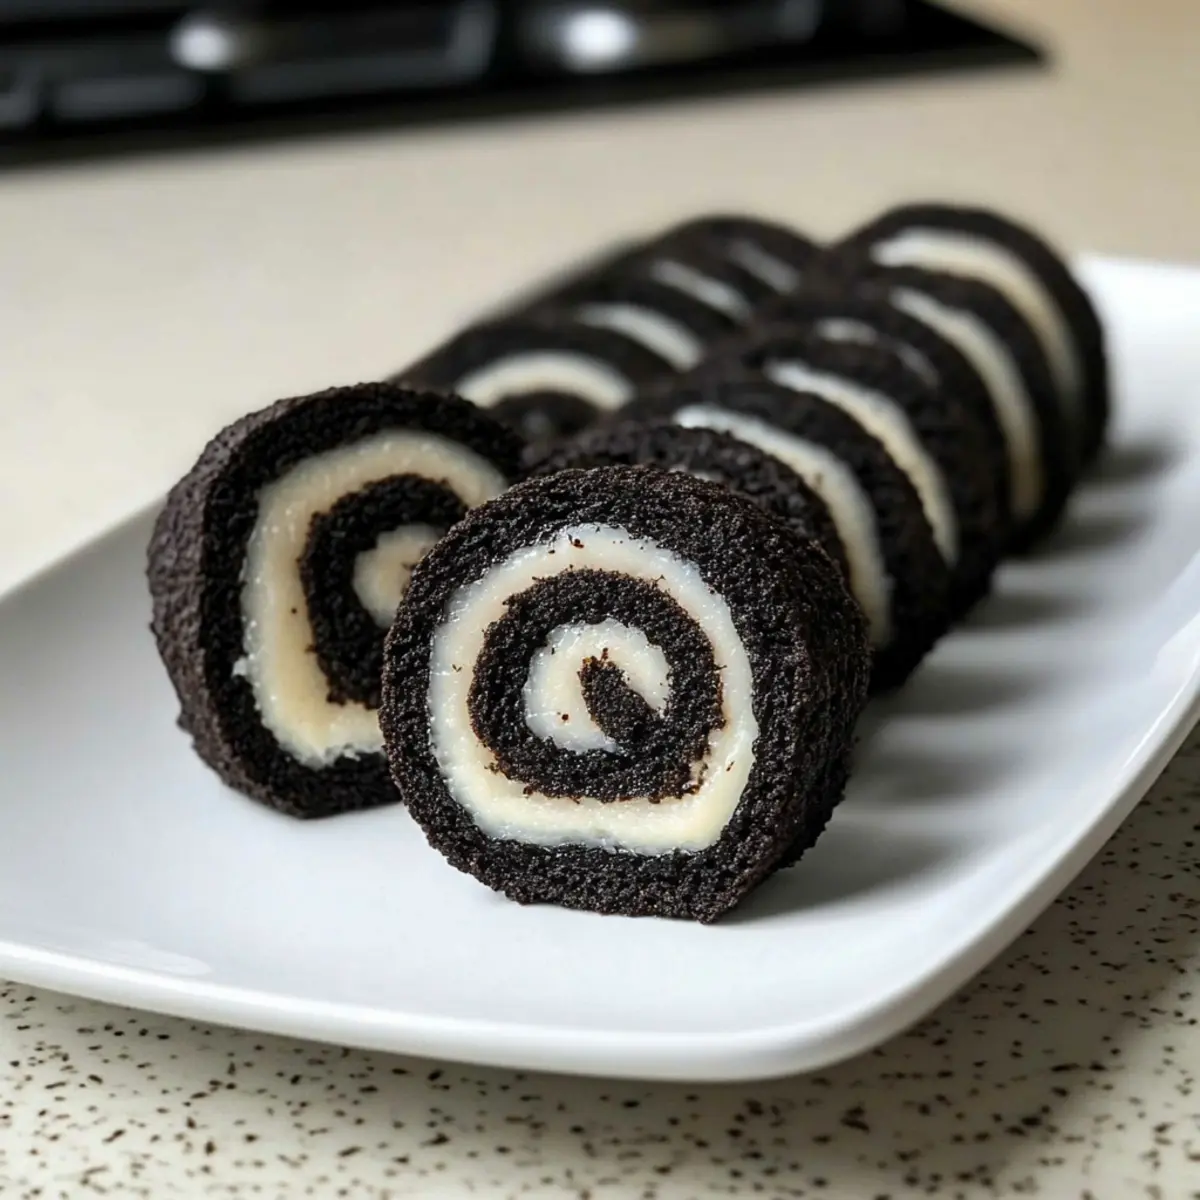
Step 6: Roll and Slice the Sushi
Using the edges of the plastic wrap, carefully lift one side of the dough and begin to roll it tightly into a log, ensuring the filling stays inside. Once you have a tightly rolled log, wrap it in the plastic wrap and refrigerate for about 15 minutes to firm it up. After chilling, slice the log into bite-sized pieces resembling sushi rolls for your Oreo sushi recipe.

Oreo Sushi Recipe Variations & Substitutions
Feel free to let your creativity shine by customizing this delightful dessert to suit your taste and dietary needs!
-
Flavored Oreos: Try using variants like mint or peanut butter Oreos for a fun flavor twist. Each bite will surprise you with new tastes!
-
Dairy-Free: Swap regular milk for almond or oat milk to create a delicious dairy-free dessert that everyone can enjoy. The creamy filling will still shine through beautifully.
-
Crunchy Toppings: Sprinkle crushed nuts or even a drizzle of chocolate sauce on top before serving for added texture and flavor. This small addition can elevate your dessert experience!
-
Sweetening Options: For a touch of natural sweetness, consider using maple syrup or honey in place of milk, adding a unique depth to the filling.
-
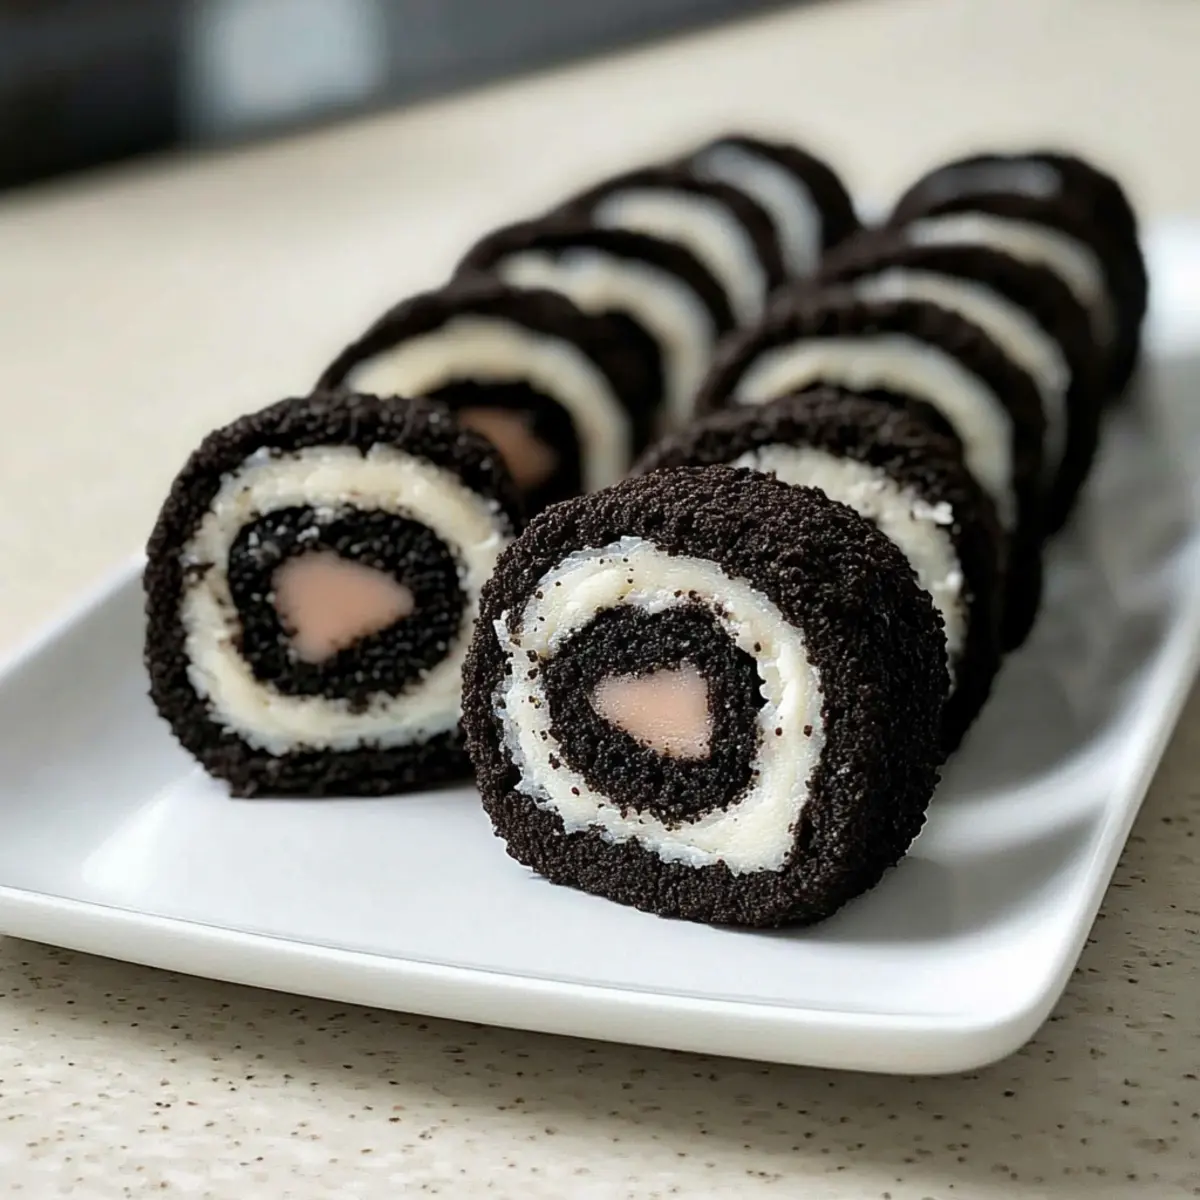
Fruit Infusion: Blend in a small amount of finely chopped fruits like strawberries or bananas into the cream filling to create a colorful, fruity element. The fresh flavors will brighten up your sushi rolls!
-
Layered Delight: Create a layered dessert by adding a thin layer of whipped cream or Greek yogurt between the cookie layers. It’s a creamy addition that enhances taste and presentation.
-
Chocolate Coating: For a decadent finish, dip your sushi rolls in melted chocolate and let them set. This will add a delightful crunch and a chocolaty flavor that pairs perfectly with the Oreos.
-
Party-sized Roll: Rather than making individual pieces, consider rolling a larger log and cutting thicker slices—perfect for serving at gatherings! Just remember, the bigger the roll, the more fun to share.
By exploring these variations, you can create an Oreo sushi experience tailored just for you! And if you’re craving more fun, be sure to check out my easy Breakfast Egg Muffins or dive into some comforting Enchiladas Vegetarian Twist. Enjoy your sweet kitchen adventures!
Expert Tips for Your Oreo Sushi Recipe
-
Crushing Cookies: Use a food processor for fine crumbs to avoid a gritty texture. If you opt for a rolling pin, make sure your cookies are contained tightly.
-
Achieving the Right Dough: If your dough feels too crumbly, add milk gradually, mixing until you get that perfect soft, pliable texture needed for your Oreo sushi recipe.
-
Chill for Clean Slices: Refrigerate the log before slicing. This firming step helps you cut clean pieces without squishing your sushi rolls.
-
Experiment with Flavors: Don’t hesitate to mix and match different types of Oreo cookies! Whether it’s mint or peanut butter, each choice opens up a fun new flavor for your sushi.
-
Involve Kids for Fun: Invite children to help roll the dough and slice the sushi. It turns into a delightful family activity that’ll make them excited about dessert!
What to Serve with Oreo Sushi?
Imagine indulging in a sweet, playful feast that invites laughter and delight at every bite.
-
Fruity Cocktail: A refreshing, fruity drink complements the sweetness of the Oreo sushi, enhancing its playful vibe.
-
Vanilla Ice Cream: The creamy, cold ice cream provides a delightful contrast, making each bite feel like a special treat.
-
Chocolate Dipping Sauce: Drizzle this over your sushi for a decadent finish, elevating the chocolate flavors to sublime heights.
-
Fresh Berries: Light and juicy, berries add a tangy freshness that balances the richness of the chocolate, creating a harmonious dessert experience.
-
Milkshake: A rich, creamy milkshake pairs beautifully with the Oreo sushi, making for an indulgent, nostalgic combination reminiscent of childhood treats.
-
Whipped Cream: Its light, airy texture lends a fluffy element, creating a delightful contrast with the chewy cookie rolls.
Pairing these delightful options with your Oreo sushi recipes will transform your sweet indulgence into a complete celebration of flavors and fun!
Storage Tips for Oreo Sushi
Fridge: Keep your Oreo sushi in an airtight container to maintain freshness for up to 3 days. This helps to preserve the flavors while allowing the filling to meld beautifully.
Freezer: For longer storage, wrap the sushi logs tightly in plastic wrap and foil, then freeze for up to 2 months. When you’re ready to enjoy, simply thaw in the fridge overnight.
Reheating: There’s no need to reheat this no-bake dessert. Serve it chilled directly from the fridge or allow it to sit at room temperature for a few minutes for the best texture.
Enhancing Flavors: Surprisingly, Oreo sushi may taste even better after chilling, giving the flavors and textures a chance to deepen before you indulge!
Make Ahead Options
These Oreo Sushi rolls are the perfect solution for busy home cooks looking to save time and enjoy a fun dessert! You can prepare the Oreo dough and the filling up to 24 hours in advance. Simply follow the instructions to crush the cookies and form the dough, then roll it into a log and wrap it tightly in plastic wrap. Refrigerate the log until ready to finish. For the best flavor and texture, slice the rolls just before serving. This allows the dessert to maintain its creamy filling and texture, ensuring your Oreo Sushi remains just as delicious and appealing as when freshly made!
Oreo Sushi Recipe FAQs
What type of Oreos should I use for the Oreo Sushi Recipe?
Absolutely! While standard Oreo cookies are the classic choice, feel free to explore other flavors like mint, peanut butter, or even seasonal varieties. Each type brings its own unique twist to the sushi rolls, making your dessert even more exciting.
How long can I store Oreo Sushi in the fridge?
Oreo sushi can be stored in an airtight container in the fridge for up to 3 days. This storage method helps maintain its delicious flavors while allowing the creamy filling to meld beautifully with the cookie dough.
Can I freeze Oreo Sushi? If so, how?
Certainly! To freeze your Oreo sushi, wrap the sushi logs tightly in plastic wrap and then in foil to prevent freezer burn. They can be stored in the freezer for up to 2 months. When you’re ready to enjoy, simply thaw them in the fridge overnight to retain their delightful texture.
What should I do if my Oreo dough is too crumbly?
Very! If your dough feels too crumbly and won’t hold together, gradually add more milk, one tablespoon at a time, and mix thoroughly. Keep mixing until you reach a cohesive and pliable dough. This should give your Oreo sushi the perfect texture needed for rolling.
Is this Oreo Sushi Recipe suitable for those with allergies?
It’s important to consider your guests’ dietary needs! While this recipe is vegetarian, make sure to check the ingredients on your cookie packaging for potential allergens like dairy, nuts, or gluten. For a dairy-free option, opt for plant-based milk and use dairy-free cream if needed.
Can I involve kids in making the Oreo Sushi?
Absolutely! This recipe is not only fun but also a fantastic way to get kids involved in the kitchen. Allow them to help crush the cookies, roll the dough, and slice the sushi. It’s a wonderful family activity that can spark their interest in cooking!
Oreo Sushi Recipe: Whimsical No-Bake Dessert Delight
Ingredients
Equipment
Method
- Begin by carefully separating the Oreo cookies, placing the chocolate cookie halves in one bowl and the cream fillings in another.
- Place the chocolate cookie halves into a food processor and pulse until they form fine crumbs, about 30 seconds.
- Transfer the crushed Oreo cookies to a mixing bowl and gradually add most of the milk, stirring until a soft dough forms.
- Lay out a large piece of plastic wrap on your workspace and transfer the Oreo dough onto it. Press the dough into a rectangle approximately 1/4 inch thick.
- In a small bowl, mix the reserved Oreo cream with the remaining milk until smooth, then spread this filling evenly over the dough layer.
- Using the edges of the plastic wrap, carefully lift one side of the dough and begin to roll it tightly into a log. Refrigerate for about 15 minutes to firm it up.
- After chilling, slice the log into bite-sized pieces resembling sushi rolls for your Oreo sushi recipe.