Advertisement
No-Bake Oreo Cheesecake Recipe
If you’re looking for a delightful dessert that’s easy to make, the No-Bake Oreo Cheesecake Recipe is just the ticket! This creamy, dreamy cheesecake combines the rich flavors of cream cheese and Oreo cookies without the need for an oven. Perfect for any occasion, this dessert is sure to impress your family and friends.
What Makes No-Bake Oreo Cheesecake Special?
The No-Bake Oreo Cheesecake stands out for several reasons. First, it’s incredibly simple to prepare. You don’t need to worry about baking times or oven temperatures. Just mix, layer, and chill! This makes it a fantastic option for beginners or anyone short on time.
Moreover, the combination of smooth cream cheese and crunchy Oreo cookies creates a delightful texture. Each bite offers a perfect balance of creaminess and crunch. Plus, the no-bake method allows the flavors to meld beautifully, resulting in a rich and satisfying dessert.
The Popularity of No-Bake Desserts
No-bake desserts have gained immense popularity in recent years. They are not only easy to make but also versatile. From cheesecakes to puddings, the options are endless! Many people appreciate that no-bake recipes often require fewer ingredients and less time than traditional baked goods.
Advertisement
Additionally, no-bake desserts are perfect for warm weather. When the sun is shining, the last thing you want to do is turn on the oven. With a no-bake cheesecake, you can enjoy a delicious treat without heating up your kitchen. This makes it a favorite for summer gatherings, picnics, and parties.
In summary, the No-Bake Oreo Cheesecake Recipe is a delightful treat that combines ease of preparation with delicious flavors. Whether you’re a seasoned baker or a novice in the kitchen, this recipe is sure to become a staple in your dessert repertoire.
Ingredients for No-Bake Oreo Cheesecake Recipe
Essential Ingredients
To create the perfect No-Bake Oreo Cheesecake, you’ll need a few essential ingredients. These components work together to deliver that creamy texture and rich flavor that everyone loves. Here’s what you’ll need:
- 8 ounces of cream cheese, softened
- 1 cup of powdered sugar
- 1 teaspoon of vanilla extract
- 1 cup of heavy whipping cream
- 15 Oreo cookies, crushed
- 8 Oreo cookies, halved (for garnish)
- 1 pre-made 9-inch graham cracker crust
These ingredients are easy to find at your local grocery store. The cream cheese provides a rich base, while the heavy whipping cream adds lightness. The crushed Oreos give the cheesecake its signature flavor and texture. With these essentials, you’re well on your way to making a delicious dessert!
Optional Ingredients for Customization
While the essential ingredients create a fantastic No-Bake Oreo Cheesecake, you can also customize it to suit your taste. Here are some optional ingredients to consider:
- 2 tablespoons of cocoa powder for a chocolate twist
- Mint Oreos instead of regular Oreos for a refreshing flavor
- Fresh fruit, like strawberries or raspberries, for a fruity topping
- Chocolate syrup or caramel sauce for drizzling on top
These optional ingredients allow you to get creative! Feel free to mix and match to find your favorite combination. Whether you want a chocolatey delight or a fruity treat, the No-Bake Oreo Cheesecake can adapt to your preferences.
Step-by-Step Preparation of No-Bake Oreo Cheesecake Recipe
Step 1: Prepare the Crust
To start, you need to prepare the crust. Since this is a no-bake recipe, using a pre-made graham cracker crust saves time. Simply take the crust out of its packaging and set it aside. If you prefer a homemade crust, you can crush about 10 Oreo cookies and mix them with 4 tablespoons of melted butter. Press this mixture into the bottom of a 9-inch pie dish. Make sure it’s packed tightly for a sturdy base.
Step 2: Make the Cheesecake Filling
Next, it’s time to make the cheesecake filling. In a large mixing bowl, beat the softened cream cheese with an electric mixer. Mix until it’s smooth and creamy. Gradually add in the powdered sugar and vanilla extract. Continue mixing until everything is well combined. This step is crucial for achieving a smooth texture, so take your time!
Step 3: Combine and Layer
Now, let’s add some fluffiness to the filling! In a separate bowl, whip the heavy cream until stiff peaks form. This means the cream should hold its shape when you lift the beaters. Gently fold the whipped cream into the cream cheese mixture. Be careful not to deflate the whipped cream; you want to keep that light texture. Once combined, add the crushed Oreo cookies and fold them in gently. This will give your cheesecake that delicious Oreo flavor!
Step 4: Chill the Cheesecake
After combining everything, pour the cheesecake filling into the prepared crust. Use a spatula to smooth the top. Now, it’s time to chill! Place the cheesecake in the refrigerator for at least 4 hours. This allows it to set properly. If you can wait overnight, that’s even better! The longer it chills, the firmer and tastier it becomes.
Step 5: Serve and Enjoy
Once the cheesecake is set, it’s time to serve! Take it out of the fridge and garnish with the halved Oreo cookies on top. You can also add a drizzle of chocolate syrup or whipped cream for extra flair. Slice it into pieces and enjoy this delightful dessert with family and friends. Each bite will be a creamy, crunchy delight that everyone will love!
Variations of No-Bake Oreo Cheesecake Recipe
Different Flavors to Try
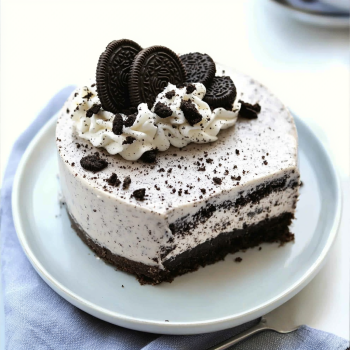
If you’re feeling adventurous, there are many delicious variations of the No-Bake Oreo Cheesecake Recipe to explore! Here are some fun ideas to switch things up:
- Chocolate Oreo Cheesecake: Add 2 tablespoons of cocoa powder to the cream cheese mixture. This will give your cheesecake a rich chocolate flavor that pairs perfectly with the Oreos.
- Mint Oreo Cheesecake: Swap regular Oreos for mint-flavored Oreos. This refreshing twist is perfect for mint lovers and adds a cool flavor to your dessert.
- Peanut Butter Oreo Cheesecake: Mix in 1/2 cup of creamy peanut butter into the cream cheese mixture. This adds a nutty flavor that complements the Oreos beautifully.
- Fruit-Infused Oreo Cheesecake: Top your cheesecake with fresh fruit like strawberries, raspberries, or blueberries. You can also mix in some fruit puree into the filling for a fruity twist.
These variations allow you to customize your cheesecake to suit your taste. Feel free to experiment and find your favorite flavor combination!
Gluten-Free Options
For those who need gluten-free options, you can still enjoy this delightful dessert! Here are some tips to make your No-Bake Oreo Cheesecake gluten-free:
- Gluten-Free Oreos: Use gluten-free Oreos instead of regular ones. Many brands offer gluten-free cookie options that taste just as good!
- Gluten-Free Crust: If you prefer a homemade crust, you can use gluten-free graham crackers or crushed gluten-free cookies mixed with melted butter. Press this mixture into your pie dish for a sturdy base.
With these simple substitutions, everyone can enjoy a slice of this delicious No-Bake Oreo Cheesecake, regardless of dietary restrictions!
Cooking Note for No-Bake Oreo Cheesecake Recipe
Tips for Achieving the Perfect Texture
Getting the right texture for your No-Bake Oreo Cheesecake is key to its success. Here are some helpful tips to ensure your cheesecake turns out perfectly creamy and smooth:
- Soften the Cream Cheese: Make sure your cream cheese is at room temperature before mixing. This helps it blend smoothly without lumps.
- Whip the Cream Properly: When whipping the heavy cream, beat it until stiff peaks form. This adds air and lightness to your cheesecake, making it fluffy.
- Fold Gently: When combining the whipped cream with the cream cheese mixture, fold gently. This keeps the air in the whipped cream, ensuring a light texture.
- Chill Long Enough: Allow the cheesecake to chill for at least 4 hours, but overnight is best. This helps it set properly and enhances the flavors.
By following these tips, you’ll create a cheesecake that’s not only delicious but also has the perfect texture that everyone will love!
Common Mistakes to Avoid
Even the best bakers can make mistakes! Here are some common pitfalls to watch out for when making your No-Bake Oreo Cheesecake:
- Using Cold Cream Cheese: If your cream cheese is cold, it can create lumps in your mixture. Always let it soften at room temperature first.
- Overmixing the Filling: Mixing too much can deflate the whipped cream, leading to a denser cheesecake. Mix just until combined.
- Not Chilling Long Enough: Rushing the chilling process can result in a cheesecake that doesn’t set properly. Patience is key!
- Skipping the Garnish: While it’s optional, garnishing with halved Oreos or whipped cream adds a nice touch and enhances the presentation.
Avoiding these common mistakes will help you create a stunning No-Bake Oreo Cheesecake that’s sure to impress!
Serving Suggestions for No-Bake Oreo Cheesecake Recipe
Ideal Pairings and Garnishes
When it comes to serving your No-Bake Oreo Cheesecake, the right pairings and garnishes can elevate the experience. Here are some delightful suggestions to consider:
- Whipped Cream: A dollop of freshly whipped cream on top adds a light and airy touch. It complements the rich cheesecake beautifully.
- Chocolate Sauce: Drizzling chocolate sauce over the cheesecake not only enhances the flavor but also adds a visually appealing contrast.
- Fresh Berries: Strawberries, raspberries, or blueberries can add a burst of freshness. They provide a nice balance to the sweetness of the cheesecake.
- Mint Leaves: A sprig of fresh mint can add a pop of color and a refreshing flavor. It’s a simple yet elegant garnish.
- Crushed Oreos: Sprinkle some crushed Oreos on top for an extra crunch. This reinforces the Oreo flavor and adds texture.
These pairings not only enhance the taste but also make your dessert look more inviting. Feel free to mix and match to find your favorite combinations!
Presentation Ideas
Presentation is key when serving your No-Bake Oreo Cheesecake. Here are some creative ideas to make your dessert stand out:
- Individual Servings: Consider serving the cheesecake in small cups or jars. This makes for a fun and personal dessert experience.
- Layered Dessert: Create a layered dessert by alternating layers of cheesecake filling and crushed Oreos in a clear glass. This showcases the beautiful layers and adds visual interest.
- Decorative Plates: Use decorative plates or platters to serve your cheesecake. A beautiful presentation can make even the simplest dessert feel special.
- Chocolate Shavings: For an elegant touch, sprinkle chocolate shavings on top. This adds a gourmet feel to your dessert.
- Theme-Based Decorations: If you’re serving for a special occasion, consider themed decorations. For example, use festive sprinkles for birthdays or seasonal fruits for holidays.
With these presentation ideas, your No-Bake Oreo Cheesecake will not only taste amazing but also look stunning on the table. Enjoy impressing your guests with both flavor and style!
Tips for Perfecting Your No-Bake Oreo Cheesecake Recipe
Storage Tips
Storing your No-Bake Oreo Cheesecake properly is essential to keep it fresh and delicious. Here are some helpful storage tips:
- Refrigeration: Always store your cheesecake in the refrigerator. Cover it with plastic wrap or place it in an airtight container. This helps prevent it from absorbing any odors from the fridge.
- Duration: Your cheesecake can last up to 5 days in the refrigerator. However, it’s best enjoyed within the first few days for optimal freshness.
- Freezing: If you want to keep it longer, you can freeze the cheesecake. Wrap it tightly in plastic wrap and then in aluminum foil. It can last up to 2 months in the freezer.
- Thawing: To enjoy a frozen cheesecake, transfer it to the refrigerator and let it thaw overnight. Avoid thawing at room temperature, as this can affect the texture.
By following these storage tips, you can ensure that your No-Bake Oreo Cheesecake remains as delightful as the day you made it!
How to Make Ahead
Making your No-Bake Oreo Cheesecake ahead of time is a great way to save time on busy days or special occasions. Here’s how to do it:
- Prepare in Advance: You can make the cheesecake filling and crust a day or two before you plan to serve it. Just follow the recipe as usual and store it in the fridge.
- Chill Time: Allow the cheesecake to chill for at least 4 hours, or overnight, to ensure it sets properly. This is a perfect way to enhance the flavors!
- Garnish Just Before Serving: If you’re planning to add garnishes like whipped cream or fresh fruit, do this right before serving. This keeps them fresh and visually appealing.
- Portion Control: Consider making individual servings in cups or jars. This way, you can prepare them ahead of time and serve them easily at your gathering.
Making your No-Bake Oreo Cheesecake ahead of time not only saves you stress but also allows the flavors to develop beautifully. Enjoy the convenience of having a delicious dessert ready to impress your guests!
Breakdown of Time for No-Bake Oreo Cheesecake Recipe
Prep Time
The prep time for the No-Bake Oreo Cheesecake Recipe is quite minimal. You’ll need about 20 to 30 minutes to gather your ingredients and prepare the cheesecake filling. This includes softening the cream cheese, whipping the heavy cream, and mixing everything together. It’s a quick and easy process that anyone can manage!
Chilling Time
After you’ve prepared the cheesecake, it’s essential to let it chill. The chilling time is crucial for the cheesecake to set properly. You should refrigerate it for at least 4 hours. However, if you can wait overnight, that’s even better! The longer it chills, the firmer and more flavorful it becomes. So, plan ahead to enjoy the best results!
Total Time
In total, you’re looking at about 4 hours and 30 minutes from start to finish. This includes the prep time and the minimum chilling time. If you choose to chill it overnight, the total time will extend to about 24 hours, but the active time in the kitchen remains just around 30 minutes. This makes the No-Bake Oreo Cheesecake a fantastic option for those who want a delicious dessert without spending all day in the kitchen!
Nutritional Information for No-Bake Oreo Cheesecake Recipe
Calories and Macronutrients
Understanding the nutritional content of your No-Bake Oreo Cheesecake is important, especially if you’re mindful of your diet. Each serving of this delightful dessert contains approximately 320 calories. Here’s a breakdown of the macronutrients per serving:
- Calories: 320
- Net Carbs: 25g
- Protein: 4g
- Fat: 24g
These numbers can vary slightly based on the specific brands of ingredients you use. For instance, using low-fat cream cheese or a sugar substitute can reduce the calorie count. However, the rich and creamy nature of this cheesecake makes it a treat best enjoyed in moderation.
Health Considerations
While the No-Bake Oreo Cheesecake is undeniably delicious, it’s also important to consider its health aspects. Here are a few points to keep in mind:
- High in Sugar: The powdered sugar and Oreos contribute to the overall sugar content. If you’re watching your sugar intake, consider using a sugar substitute or reducing the amount of sugar in the recipe.
- Rich in Fat: The heavy whipping cream and cream cheese add a significant amount of fat. While some fats are essential for a balanced diet, moderation is key. You can opt for lighter versions of these ingredients if desired.
- Protein Content: With only 4g of protein per serving, this cheesecake isn’t a significant source of protein. Pairing it with a protein-rich snack, like nuts or yogurt, can help balance your meal.
- Allergens: This recipe contains dairy and gluten, which may not be suitable for everyone. Always check for allergies and consider gluten-free options if needed.
In conclusion, while the No-Bake Oreo Cheesecake is a delightful dessert, it’s best enjoyed as an occasional treat. Being aware of its nutritional content can help you make informed choices while still indulging in this creamy delight!
FAQs about No-Bake Oreo Cheesecake Recipe
Can I use different cookies for the crust?
Absolutely! While the classic graham cracker crust is a favorite, you can get creative with your crust. For a different flavor, consider using crushed chocolate cookies, like chocolate wafers or even more Oreos. If you prefer a gluten-free option, look for gluten-free cookies that can be crushed and mixed with melted butter. This flexibility allows you to customize your cheesecake to suit your taste!
How long does the cheesecake need to chill?
The cheesecake needs to chill for at least 4 hours to set properly. However, if you can wait overnight, that’s even better! Chilling it longer allows the flavors to meld beautifully and results in a firmer texture. So, if you have the time, let it sit in the fridge overnight for the best results!
Can I freeze No-Bake Oreo Cheesecake?
Yes, you can freeze your No-Bake Oreo Cheesecake! To do this, wrap it tightly in plastic wrap and then in aluminum foil. It can last up to 2 months in the freezer. When you’re ready to enjoy it, simply transfer it to the refrigerator and let it thaw overnight. Avoid thawing at room temperature, as this can affect the texture. Freezing is a great way to save leftovers or prepare ahead for special occasions!
What can I substitute for cream cheese?
If you’re looking for a substitute for cream cheese, there are a few options. You can use mascarpone cheese for a similar creamy texture. Greek yogurt is another alternative, offering a tangy flavor and lower fat content. For a dairy-free option, consider using cashew cream or a vegan cream cheese alternative. Just keep in mind that these substitutes may slightly alter the flavor and texture of your cheesecake, but they can still create a delicious dessert!
Conclusion on No-Bake Oreo Cheesecake Recipe
Recap of Key Points
In summary, the No-Bake Oreo Cheesecake Recipe is a delightful and easy dessert that anyone can make. With just a few simple ingredients, you can create a creamy, rich cheesecake that features the beloved flavor of Oreo cookies. The steps are straightforward, from preparing the crust to chilling the cheesecake until it’s perfectly set. Remember to customize it with optional ingredients for a unique twist, and don’t forget the garnishes for that extra touch!
We also discussed the importance of proper storage and how to make this cheesecake ahead of time. With its versatility, you can enjoy different flavors and variations, making it a perfect dessert for any occasion. Whether you’re hosting a party or simply treating yourself, this cheesecake is sure to impress.
Encouragement to Try the Recipe
Now that you have all the tips and tricks, it’s time to roll up your sleeves and give this No-Bake Oreo Cheesecake Recipe a try! Don’t be afraid to experiment with flavors and toppings. The joy of baking (or in this case, no-baking) comes from making it your own. Your family and friends will love this delicious treat, and you’ll feel proud to serve something homemade.
So, gather your ingredients, follow the steps, and enjoy the delightful experience of creating your very own No-Bake Oreo Cheesecake. Happy baking!
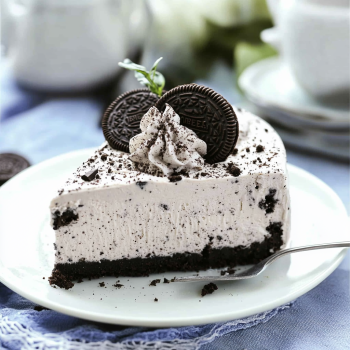
No-Bake Oreo Cheesecake is a must-try dessert!
Ingredients
Method
- Prepare the Oreo Crust: Place 18 Oreos in a food processor and pulse until finely crushed. Add melted butter to the crumbs and pulse again until the mixture is well combined. Press the mixture into the bottom of a 9-inch springform pan or a pie dish to form a crust. Refrigerate while you prepare the filling.
- Make the Cheesecake Filling: In a large mixing bowl, beat the softened cream cheese and powdered sugar until smooth and creamy. Add vanilla extract and mix well.
- Whip the Cream: In a separate bowl, beat the heavy cream and ¼ cup powdered sugar until stiff peaks form.
- Combine the Filling: Gently fold the whipped cream into the cream cheese mixture until smooth and well combined.
- Assemble the Cheesecake: Pour the cheesecake filling over the chilled Oreo crust. Use a spatula to smooth the top.
- Chill: Cover the cheesecake with plastic wrap and refrigerate for at least 4 hours, or overnight for the best results.
- Add Toppings: Once the cheesecake is set, crush the remaining 6-8 Oreos and sprinkle them over the top for garnish.
- Serve: Slice and serve chilled. Enjoy!
Notes
- For an extra indulgent touch, drizzle chocolate or caramel sauce on top before serving.
- This cheesecake can be made a day in advance, making it perfect for parties or gatherings.
- If you prefer a thicker filling, use an extra package of cream cheese.
- If you don’t have a food processor, you can place the Oreos in a ziplock bag and crush them with a rolling pin.


