Advertisement
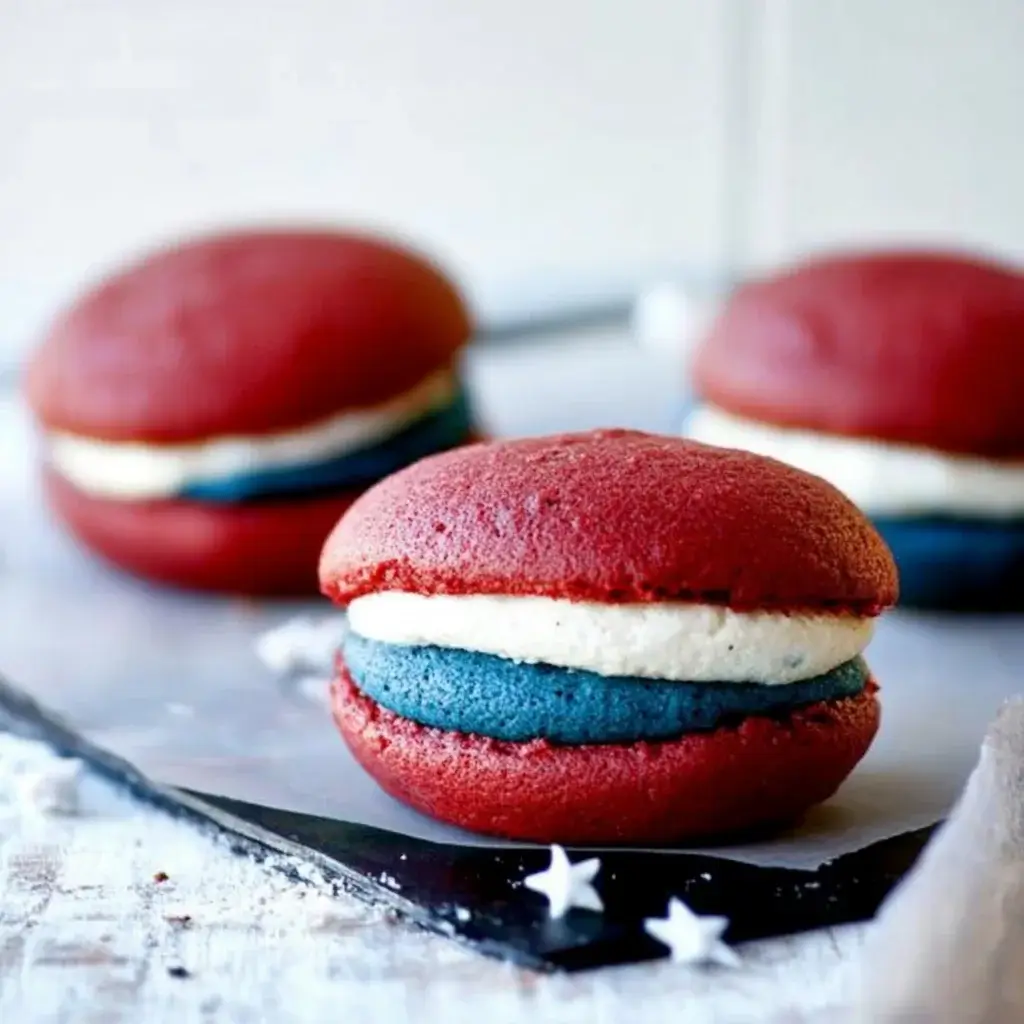
Red, White, and Blue Whoopie Pies
There’s something magical about baking that brings back memories of childhood. The smell of warm cookies wafting through the house, the excitement of licking the spoon, and the joy of sharing treats with family. That’s why I love making Red, White, and Blue Whoopie Pies. These delightful desserts are not just visually stunning; they’re a quick solution for any celebration. Whether it’s a backyard barbecue or a festive gathering, these whoopie pies will impress your loved ones and satisfy your sweet tooth. Let’s dive into this fun and easy recipe that’s perfect for any occasion!
Why You’ll Love This Red, White, and Blue Whoopie Pies
These Red, White, and Blue Whoopie Pies are a delightful treat that combines ease and flavor in one festive package. They come together quickly, making them perfect for busy days or last-minute gatherings. The rich chocolate flavor paired with a creamy filling is simply irresistible. Plus, their vibrant colors make them a showstopper at any event, ensuring you’ll be the star of the dessert table!
Ingredients for Red, White, and Blue Whoopie Pies
Gathering the right ingredients is the first step to creating these festive treats. Here’s what you’ll need:
- All-purpose flour: The backbone of your whoopie pies, providing structure and texture.
- Baking powder: This leavening agent helps the cookies rise, giving them a light and fluffy texture.
- Baking soda: Another leavening agent that works with the acidity of buttermilk for a perfect rise.
- Salt: A pinch enhances the flavors and balances the sweetness.
- Unsweetened cocoa powder: Adds rich chocolate flavor, making these whoopie pies a chocolate lover’s dream.
- Unsalted butter: Softened butter creates a creamy base for the batter and filling, adding richness.
- Granulated sugar: Sweetens the batter and helps achieve that delightful texture.
- Large egg: Binds the ingredients together and adds moisture.
- Vanilla extract: A splash of vanilla brings warmth and depth to the flavor profile.
- Buttermilk: This adds moisture and a slight tang, making the cookies tender.
- Red and blue food coloring: Essential for achieving that festive look, making your whoopie pies pop!
- For the filling:
- Unsalted butter: Again, softened for a creamy filling that complements the cookies.
- Powdered sugar: Sweetens the filling and gives it a smooth texture.
- Vanilla extract: Adds flavor to the filling, making it even more delicious.
- Milk: Adjusts the consistency of the filling to your liking, making it spreadable.
For those looking to switch things up, you can substitute the cocoa powder with additional flour for a vanilla version of these whoopie pies. Exact measurements for each ingredient can be found at the bottom of the article, ready for printing!
Advertisement
How to Make Red, White, and Blue Whoopie Pies
Now that you have all your ingredients ready, it’s time to bring these festive treats to life! Follow these simple steps, and you’ll have a batch of Red, White, and Blue Whoopie Pies that will wow your friends and family.
Step 1: Preheat and Prepare
Start by preheating your oven to 350°F (175°C). While that’s heating up, line two baking sheets with parchment paper. This will prevent the whoopie pies from sticking and make cleanup a breeze.
Step 2: Mix Dry Ingredients
In a large bowl, whisk together the all-purpose flour, baking powder, baking soda, salt, and cocoa powder. This dry mix is the foundation of your whoopie pies, so make sure it’s well combined. Set it aside for now.
Step 3: Cream Butter and Sugar
In another mixing bowl, cream the softened butter and granulated sugar together until the mixture is light and fluffy. This step is crucial; it incorporates air into the batter, giving your whoopie pies that delightful texture.
Step 4: Combine Wet Ingredients
Next, beat in the large egg and vanilla extract until everything is well combined. Now, it’s time to alternate adding the dry ingredients and buttermilk to the butter mixture. Start and end with the dry ingredients. Mix until just combined; overmixing can lead to tough cookies.
Step 5: Color the Batter
Divide the batter into two bowls. Add red food coloring to one bowl and blue food coloring to the other. Mix until you achieve your desired shades. This is where the fun begins—don’t be shy with the colors!
Step 6: Bake the Cookies
Using a tablespoon, drop spoonfuls of the red batter onto one baking sheet and the blue batter onto the other, spacing them about 2 inches apart. Bake for 10-12 minutes, or until the tops spring back when lightly touched. Let them cool on the baking sheets for about 5 minutes before transferring them to wire racks to cool completely.
Step 7: Make the Filling
While the cookies are cooling, prepare the filling. In a mixing bowl, beat the softened butter until creamy. Gradually add the powdered sugar and vanilla extract, mixing until smooth. Add milk, one tablespoon at a time, until the filling reaches your desired consistency. It should be spreadable but not too runny.
Step 8: Assemble the Whoopie Pies
Once the cookies are completely cool, it’s time to assemble! Spread a generous amount of filling on the flat side of one cookie and sandwich it with another cookie. Repeat this process with the remaining cookies. Now you have your beautiful Red, White, and Blue Whoopie Pies ready to enjoy!
Tips for Success
- Make sure your butter is softened for easy creaming; it should be at room temperature.
- Don’t overmix the batter; mix until just combined for tender cookies.
- Use a cookie scoop for even-sized whoopie pies.
- Let the cookies cool completely before adding the filling to prevent it from melting.
- Experiment with different food coloring shades for a unique look!
Equipment Needed
- Baking sheets: If you don’t have these, a large, flat tray will work.
- Parchment paper: Aluminum foil can be a substitute, but it may stick more.
- Mixing bowls: Any large bowls will do; just ensure they’re sturdy.
- Whisk: A fork can work in a pinch for mixing dry ingredients.
- Cookie scoop: A tablespoon can help you portion the batter evenly.
Variations
- For a fruity twist, add a layer of raspberry or strawberry jam between the cookies and filling.
- Try using almond extract instead of vanilla for a nutty flavor in the filling.
- Make them gluten-free by substituting all-purpose flour with a gluten-free blend.
- For a lighter version, use Greek yogurt in place of buttermilk.
- Experiment with different colors for the food coloring to match any holiday or theme!
Serving Suggestions
- Pair these whoopie pies with a scoop of vanilla ice cream for an indulgent dessert.
- Serve alongside fresh berries for a refreshing contrast.
- For drinks, consider iced tea or lemonade to complement the sweetness.
- Present them on a festive platter, garnished with mint leaves for a pop of color.
FAQs about Red, White, and Blue Whoopie Pies
Can I make these whoopie pies ahead of time?
Absolutely! You can bake the cookies a day in advance and store them in an airtight container. Just wait to add the filling until you’re ready to serve to keep them fresh.
What can I use instead of buttermilk?
If you don’t have buttermilk on hand, you can make a quick substitute by mixing one cup of milk with a tablespoon of vinegar or lemon juice. Let it sit for about 5 minutes before using.
How do I store leftover whoopie pies?
Store any leftover Red, White, and Blue Whoopie Pies in an airtight container at room temperature for up to three days. If you want to keep them longer, consider refrigerating them.
Can I freeze whoopie pies?
Yes! These whoopie pies freeze well. Just wrap them individually in plastic wrap and place them in a freezer-safe bag. They can last up to three months in the freezer. Thaw them in the fridge before serving.
What’s the best way to decorate these whoopie pies?
For a festive touch, consider drizzling melted white chocolate over the top or sprinkling edible glitter on the filling before sandwiching the cookies. It adds a fun flair for any celebration!
Final Thoughts
Baking Red, White, and Blue Whoopie Pies is more than just a recipe; it’s an experience filled with joy and creativity. Each bite is a celebration of flavors and colors, perfect for any gathering. The laughter shared while assembling these treats and the smiles they bring to friends and family make the effort worthwhile. Whether you’re enjoying them at a summer barbecue or a festive holiday, these whoopie pies are sure to create lasting memories. So roll up your sleeves, embrace the fun, and let these delightful desserts add a splash of color to your next celebration!
Red, White, and Blue Whoopie Pies: Bake Festive Treats Today!
Ingredients
Method
- Preheat your oven to 350°F (175°C) and line two baking sheets with parchment paper.
- In a bowl, whisk together the flour, baking powder, baking soda, salt, and cocoa powder. Set aside.
- In a large mixing bowl, cream the softened butter and granulated sugar together until light and fluffy.
- Beat in the egg and vanilla extract until well combined.
- Gradually add the dry ingredients to the butter mixture, alternating with the buttermilk, starting and ending with the dry ingredients. Mix until just combined.
- Divide the batter into two bowls. Add red food coloring to one bowl and blue food coloring to the other, mixing until you achieve your desired shades.
- Using a tablespoon, drop spoonfuls of the red batter onto one baking sheet and the blue batter onto the other, spacing them about 2 inches apart.
- Bake for 10-12 minutes, or until the tops spring back when lightly touched. Let cool on the baking sheets for 5 minutes before transferring to wire racks to cool completely.
- For the filling, beat the softened butter in a mixing bowl until creamy. Gradually add powdered sugar and vanilla extract, mixing until smooth. Add milk, one tablespoon at a time, until the filling reaches your desired consistency.
- Once the cookies are completely cool, spread a generous amount of filling on the flat side of one cookie and sandwich it with another cookie. Repeat with the remaining cookies.
Nutrition
Notes
- For a festive touch, sprinkle edible glitter on the filling before sandwiching the cookies.
- You can substitute the cocoa powder with additional flour for a vanilla version of the whoopie pies.