Advertisement
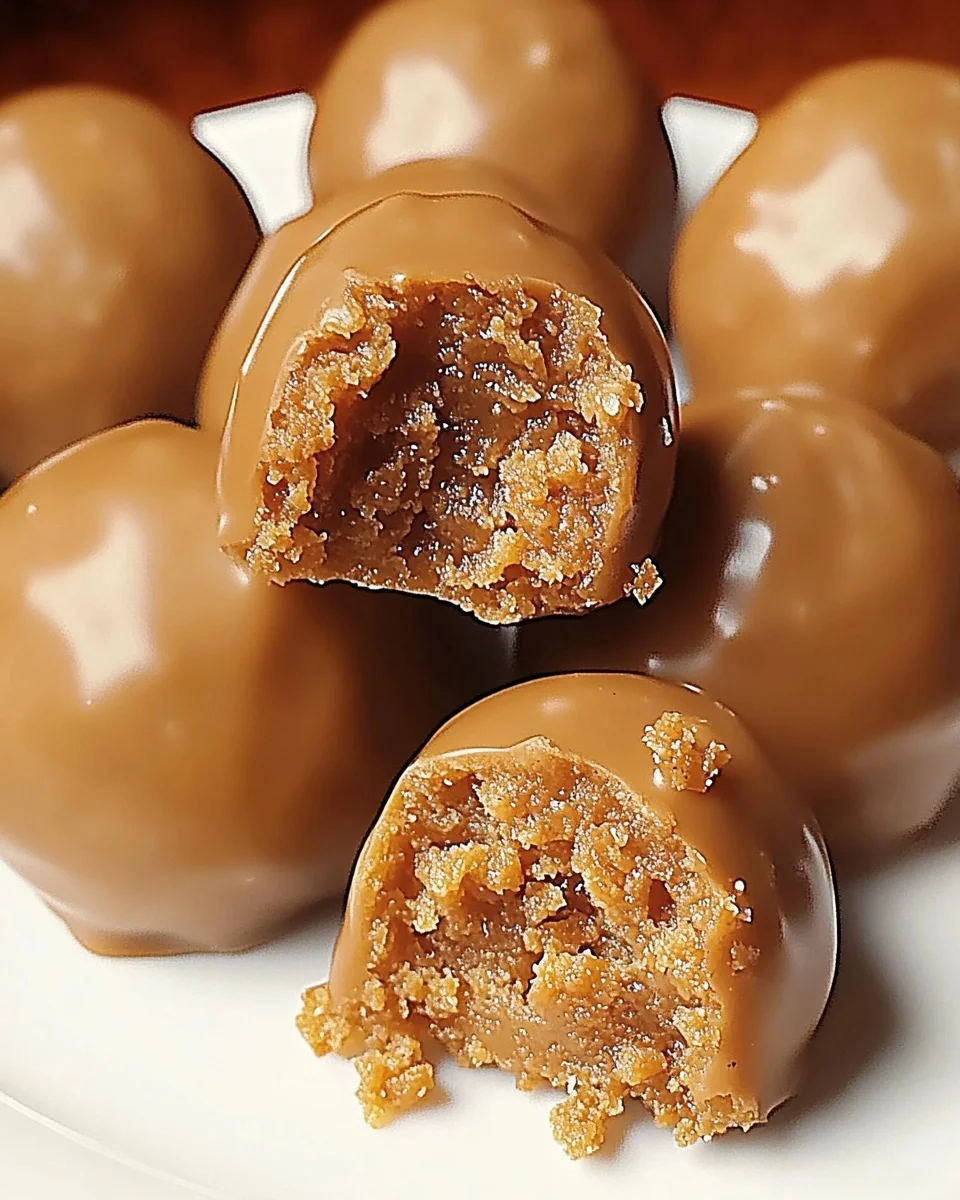
There’s something magical about homemade treats. They bring together the perfect blend of love, creativity, and deliciousness, especially when you’re making something as decadent as Butterfinger Balls. These bite-sized delights combine the nutty richness of peanut butter, the sweetness of powdered sugar, and the crunch of Butterfinger candy, all wrapped in a silky chocolate shell. Whether you’re preparing a dessert for a party, a gift, or just a late-night craving, these no-bake Butterfinger Balls are guaranteed to satisfy.
Why Butterfinger Balls Are Irresistible
- Quick and Easy: With no baking required, these treats come together in no time.
- Perfect for Sharing: They’re bite-sized and portable, making them great for parties or gifts.
- Customizable: You can tweak the recipe to suit dietary needs or flavor preferences.
- All-Year Favorite: Perfect for holidays, birthdays, or any day you need a sweet pick-me-up.
Ingredients for Butterfinger Balls
Here’s everything you need to make these delicious Butterfinger Balls:
- 1 cup creamy peanut butter – Adds a rich and smooth base for the balls.
- 2 cups powdered sugar – Provides sweetness and structure.
- 1 teaspoon vanilla extract – Enhances the overall flavor.
- 2 cups crushed Butterfinger candy bars – Gives the signature crunch and flavor.
- 12 oz milk chocolate, melted – Creates a glossy, chocolatey coating.
Optional Substitutions
- For a nut-free version: Use almond butter or sunflower seed butter instead of peanut butter.
- For a richer flavor: Swap milk chocolate with dark chocolate.
How to Make Butterfinger Balls
Step 1: Prepare the Peanut Butter Mixture
In a large mixing bowl, combine the creamy peanut butter, powdered sugar, and vanilla extract. Stir until all ingredients are fully blended, creating a smooth, pliable mixture.
Step 2: Add the Butterfinger Crunch
Fold the crushed Butterfinger candy bars into the peanut butter mixture. Mix well to ensure every bite is packed with Butterfinger goodness.
Advertisement
Step 3: Shape the Balls
- Scoop out small portions of the mixture using a spoon or a small cookie scoop.
- Roll each portion into a 1-inch ball with your hands.
- Place the balls on a baking sheet lined with parchment paper to prevent sticking.
Step 4: Freeze the Balls
Transfer the baking sheet to the freezer and chill for about 30 minutes. This step firms up the balls, making them easier to coat in chocolate.
Step 5: Melt the Chocolate
In a microwave-safe bowl, melt the milk chocolate in 20-second intervals, stirring after each until smooth and completely melted.
Step 6: Dip in Chocolate
- Remove the balls from the freezer.
- Using a fork or dipping tool, dip each ball into the melted chocolate, coating it evenly.
- Let the excess chocolate drip off before placing the coated balls back onto the parchment-lined baking sheet.
Step 7: Set the Chocolate
Refrigerate the Butterfinger balls for 15 minutes or until the chocolate coating is firm.
Tips for Success
- Use Room-Temperature Peanut Butter: This ensures a smooth mixture that’s easy to work with.
- Chill Before Dipping: Freezing the balls helps them hold their shape during the chocolate-coating process.
- Work Quickly: Melted chocolate can start to harden, so dip the balls promptly after melting.
- Store Properly: Keep the Butterfinger balls in an airtight container in the refrigerator to maintain freshness.
Nutritional Information (Per Butterfinger Ball)
| Nutrient | Amount |
|---|---|
| Calories | 120 |
| Protein | 2g |
| Fat | 7g |
| Carbohydrates | 14g |
| Sugar | 12g |
Values may vary based on specific ingredients used.
Why Butterfinger Balls Are a Crowd-Pleaser
These bite-sized treats are loved by kids and adults alike. Their perfect balance of creamy, crunchy, and sweet flavors makes them a standout dessert for any occasion. Plus, their no-bake nature means you can make a batch without breaking a sweat!
FAQ: Butterfinger Balls
1. Can I make Butterfinger Balls ahead of time?
Yes, Butterfinger Balls can be made up to a week in advance. Store them in an airtight container in the refrigerator for best results.
2. Can I freeze Butterfinger Balls?
Absolutely! Place the finished balls in a freezer-safe container and store them for up to 3 months. Thaw in the refrigerator before serving.
3. What’s the best way to crush Butterfinger candy bars?
Place the candy bars in a resealable plastic bag and use a rolling pin to crush them into small pieces.
4. Can I use white chocolate for coating?
Yes! White chocolate adds a sweet, creamy twist to the recipe.
5. How do I make the balls firmer?
If your mixture is too soft, add a bit more powdered sugar to firm it up.
6. Are these suitable for people with peanut allergies?
You can substitute peanut butter with sunflower seed butter or almond butter for a nut-free alternative.
A Treat Worth Sharing
Butterfinger Balls are a fantastic dessert option for every occasion. Their rich, nutty flavor combined with the signature Butterfinger crunch and a decadent chocolate coating makes them a hit at parties, holiday gatherings, or as a homemade gift.
So, what are you waiting for? Gather your ingredients, roll up your sleeves, and whip up a batch of these crowd-pleasing treats today!
Butterfinger Balls
Ingredients
Method
- Prepare the Peanut Butter Mixture:In a large mixing bowl, combine the creamy peanut butter, powdered sugar, and vanilla extract. Mix thoroughly until smooth and well combined.
- Add the Butterfinger Crunch:Stir in the crushed Butterfinger candy bars, ensuring the pieces are evenly distributed throughout the mixture.
- Shape the Balls:Scoop out small portions of the mixture (about 1 tablespoon) and roll them into 1-inch balls using your hands. Place the balls on a baking sheet lined with parchment paper.
- Freeze the Balls:Transfer the baking sheet to the freezer and let the balls chill for 30 minutes. This step makes them firm and easier to coat in chocolate.
- Dip in Chocolate:Melt the milk chocolate in a microwave-safe bowl, stirring every 20 seconds until smooth. Use a fork or dipping tool to coat each ball in melted chocolate, letting the excess drip off before placing them back on the parchment paper.
- Set the Chocolate:Refrigerate the coated Butterfinger Balls for 15 minutes or until the chocolate is completely set.
Notes
- For a nut-free version, substitute peanut butter with sunflower seed butter or almond butter.
- If you prefer a richer flavor, use dark chocolate instead of milk chocolate.
- To store, place the Butterfinger Balls in an airtight container in the refrigerator for up to one week or freeze for up to three months.
- For a decorative touch, drizzle white chocolate over the top after the coating has set.