Advertisement
Fall is the perfect season to indulge in cozy, spiced treats that celebrate the flavors of the season. Imagine biting into a Sparkling Pumpkin Spice Chocolate Truffle—a soft, spiced pumpkin exterior with a surprise of rich, melted chocolate inside. These truffles are not only delicious but also fun to make and perfect for sharing. Let’s dive into the step-by-step process of creating these sparkling delights in your kitchen.
Why You’ll Love Sparkling Pumpkin Spice Chocolate Truffles
These truffles offer a harmonious blend of warm spices, creamy pumpkin, and rich chocolate. They’re naturally sweetened with maple syrup, making them a healthier indulgence. Plus, their sparkling sugar coating and pumpkin-inspired design make them as festive as they are tasty. Perfect for parties, gifts, or a cozy night in, these truffles will quickly become a fall favorite.
Ingredients for Sparkling Pumpkin Spice Chocolate Truffles
For the Truffles:
- 1 cup pumpkin puree (adds moisture and rich pumpkin flavor)
- 1/2 cup almond flour (for texture and mild nuttiness)
- 1/2 cup coconut flour (adds a hint of coconut and binds the truffles)
- 1/4 cup maple syrup (provides natural sweetness)
- 1/2 teaspoon cinnamon (for warmth)
- 1/2 teaspoon pumpkin pie spice (enhances the pumpkin flavor)
- 1/4 teaspoon salt (balances sweetness)
- 1/2 cup chocolate chips (melted, for the filling)
For the Coating:
- 1/4 cup granulated sugar (for sparkle and crunch)
- Additional chocolate chips (for pumpkin stems, optional)
Step-by-Step Guide to Making Sparkling Pumpkin Spice Chocolate Truffles
Step 1: Prepare the Truffle Dough
Start by creating the base of your truffles.
- In a large mixing bowl, combine pumpkin puree, almond flour, coconut flour, maple syrup, cinnamon, pumpkin pie spice, and salt.
- Stir the mixture until smooth and it forms a soft dough-like consistency.
- If the dough feels too sticky, add more coconut flour, one tablespoon at a time, until it’s easy to handle.
Step 2: Melt the Chocolate for Filling
- Place 1/2 cup of chocolate chips in a microwave-safe bowl.
- Microwave in 15-second intervals, stirring in between, until the chocolate is smooth and fully melted.
- Let the melted chocolate cool slightly, making it easier to handle during shaping.
Step 3: Shape the Truffles
- Scoop about one tablespoon of the pumpkin dough and flatten it slightly in your hand.
- Add a small dollop of melted chocolate to the center.
- Gently wrap the dough around the chocolate filling, ensuring it’s completely enclosed. Roll it into a round truffle shape.
Step 4: Add the Sparkling Sugar Coating
- Roll each truffle in granulated sugar until evenly coated.
- This step not only adds a sparkling finish but also a subtle crunch that complements the creamy interior.
Step 5: Decorate with Pumpkin Stems
- For a festive touch, press a chocolate chip on top of each truffle to resemble a pumpkin stem.
- This step is optional but adds a charming, seasonal look.
Step 6: Chill the Truffles
- Place the truffles on a plate or tray lined with parchment paper.
- Refrigerate for at least 30 minutes to allow them to firm up.
- Once chilled, the truffles are ready to serve and enjoy!
Nutritional Information (Per Truffle)
| Nutrient | Amount |
|---|---|
| Calories | 90 |
| Total Fat | 4g |
| Saturated Fat | 2g |
| Carbohydrates | 12g |
| Sugar | 8g |
| Protein | 2g |
| Fiber | 1g |
Pro Tips for Perfect Truffles
- Use Pure Pumpkin Puree: Opt for pure pumpkin puree, not pumpkin pie filling, to control the sweetness and spice balance.
- Adjust Dough Consistency: If your dough is too wet, add a bit more coconut flour. If it’s too dry, mix in a teaspoon of maple syrup.
- Freeze for Firmer Truffles: For an extra firm texture, freeze the truffles for 10 minutes before rolling in sugar.
- Experiment with Spices: Add a pinch of nutmeg or ginger for a customized spice blend.
- Make Ahead: These truffles can be made a day in advance and stored in the refrigerator.
FAQs About Sparkling Pumpkin Spice Chocolate Truffles
1. Can I use a different sweetener?
Yes, you can substitute maple syrup with honey or agave syrup, but the flavor profile may change slightly.
Advertisement
2. Are these truffles gluten-free?
Yes, they are naturally gluten-free thanks to the almond and coconut flours.
3. How long do these truffles last?
Store them in an airtight container in the refrigerator for up to a week.
4. Can I freeze these truffles?
Absolutely! Place them in a freezer-safe container and store for up to two months. Thaw in the fridge before serving.
5. What can I use instead of almond flour?
You can replace almond flour with oat flour or additional coconut flour. Adjust the wet ingredients slightly if needed.
6. Can I skip the chocolate filling?
Yes, the truffles are delicious even without the chocolate filling. You can also try using nut butter or caramel as a filling alternative.
Why You’ll Love This Recipe
Sparkling Pumpkin Spice Chocolate Truffles are the perfect blend of seasonal flavors and indulgence. They’re fun to make, visually stunning, and packed with the cozy flavors of fall. Plus, they’re naturally gluten-free and easy to adapt to suit different dietary needs.
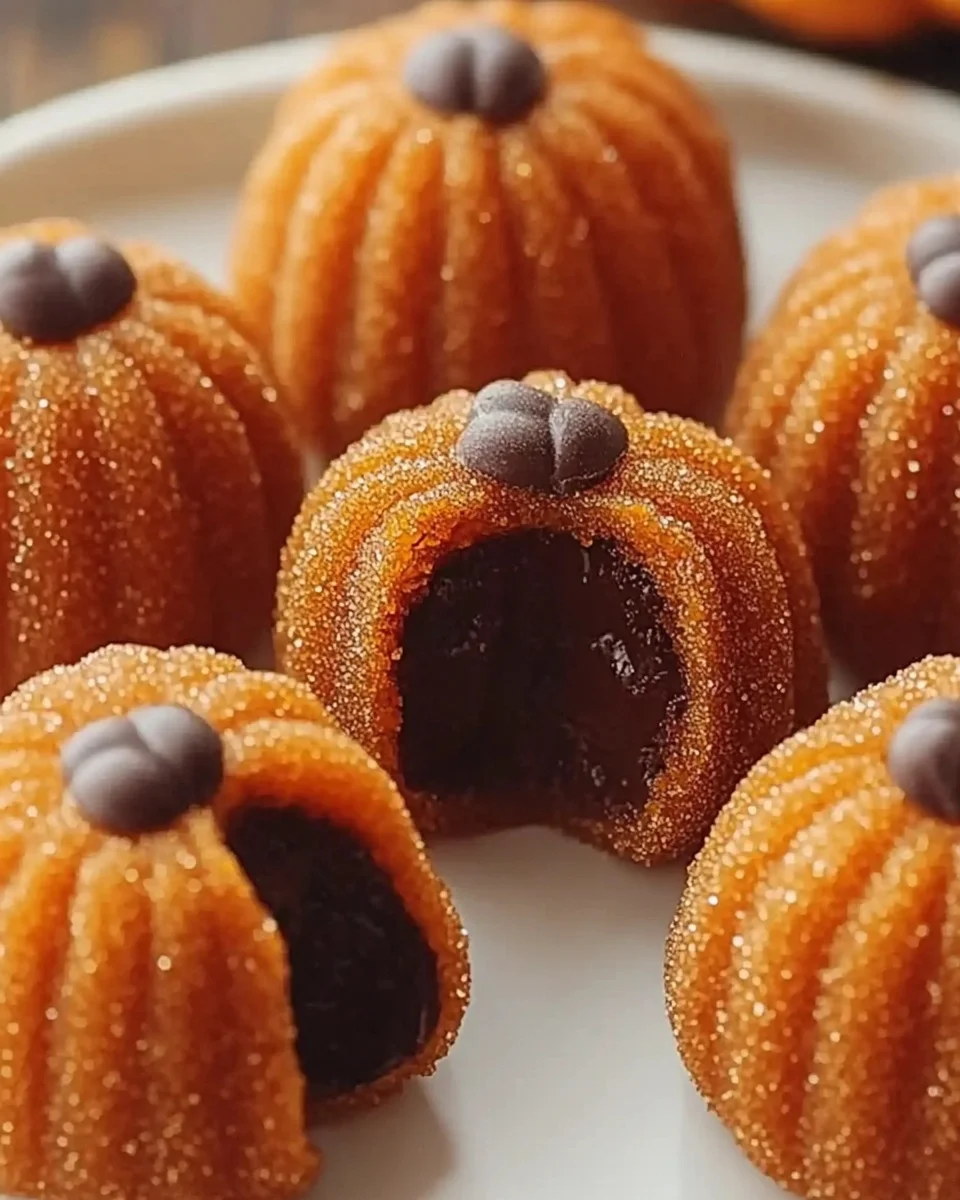
Sparkling Pumpkin Spice Chocolate Truffles
Ingredients
Method
- Make the Dough:In a large bowl, combine pumpkin puree, almond flour, coconut flour, maple syrup, cinnamon, pumpkin pie spice, and salt. Mix until the dough forms a smooth, soft consistency. If the dough is too sticky, add a little more coconut flour until manageable.
- Melt the Chocolate:Place 1/2 cup of chocolate chips in a microwave-safe bowl. Heat in 15-second intervals, stirring in between, until fully melted and smooth. Let cool slightly.
- Shape the Truffles:Scoop about a tablespoon of dough and flatten it slightly in your hand. Add a small dollop of melted chocolate to the center, then wrap the dough around the chocolate to fully enclose it. Roll into a smooth ball. Repeat with the remaining dough.
- Coat in Sugar:Roll each truffle in granulated sugar to create a sparkling effect. This adds a festive touch and a light crunch to the truffles.
- Add Decorative Stems (Optional):For a seasonal pumpkin look, press a chocolate chip on top of each truffle to resemble a pumpkin stem.
- Chill and Set:Place the truffles on a tray or plate lined with parchment paper. Refrigerate for at least 30 minutes to firm up the texture and enhance the flavors.
Notes
- Storage: Keep truffles in an airtight container in the refrigerator for up to 1 week.
- Freezing: These truffles freeze well. Store in a freezer-safe container for up to 2 months and thaw in the fridge before serving.
- Variations: Add a pinch of nutmeg or ginger to the dough for an extra layer of spice, or swap the chocolate filling for caramel or nut butter.
- Dietary Adaptations: For a nut-free version, replace almond flour with oat flour and adjust the consistency with additional coconut flour if needed.


