Advertisement
Easter has always been one of my favorite holidays—not just for the excitement of egg hunts and family gatherings but for the sweet treats that came with it. As a child, I remember waking up on Easter morning, running to the kitchen, and finding a basket filled with chocolate eggs, jelly beans, and marshmallow-filled delights. There was something special about those creamy, melt-in-your-mouth marshmallow eggs, coated in a crisp chocolate shell, that made them the ultimate Easter indulgence.
Years later, I realized that making these treats at home was even more satisfying than unwrapping store-bought versions. There’s a certain joy in melting chocolate, whipping up a marshmallow filling, and creating beautiful, colorful eggs that feel like a work of art. Whether you’re making them for children, gifting them to loved ones, or simply indulging in a bit of nostalgia, these festive marshmallow cream chocolate eggs bring Easter magic to life in the most delicious way.
Why You’ll Love These Homemade Chocolate Eggs
These marshmallow cream chocolate eggs are the perfect way to celebrate Easter with something homemade, fun, and irresistibly delicious. Here’s why they’re a must-try:
- Better than store-bought: Creamy marshmallow filling and real chocolate create a richer, more satisfying treat.
- Fun to make: A great activity for kids and adults alike—decorate them however you like!
- Perfect for gifting: Wrap them up in Easter baskets or give them as homemade holiday treats.
- Customizable flavors and colors: Use different candy melts, sprinkles, or fillings to create your own unique versions.
- Great make-ahead dessert: These eggs store well, making them perfect for prepping before the holiday.
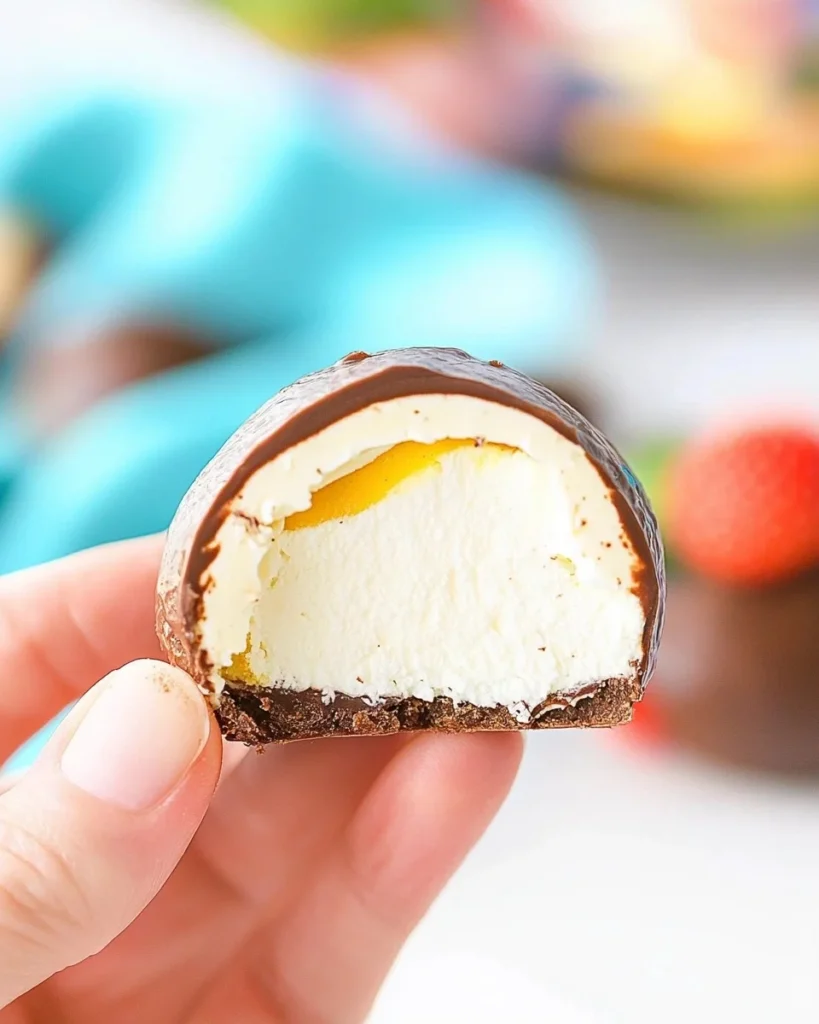
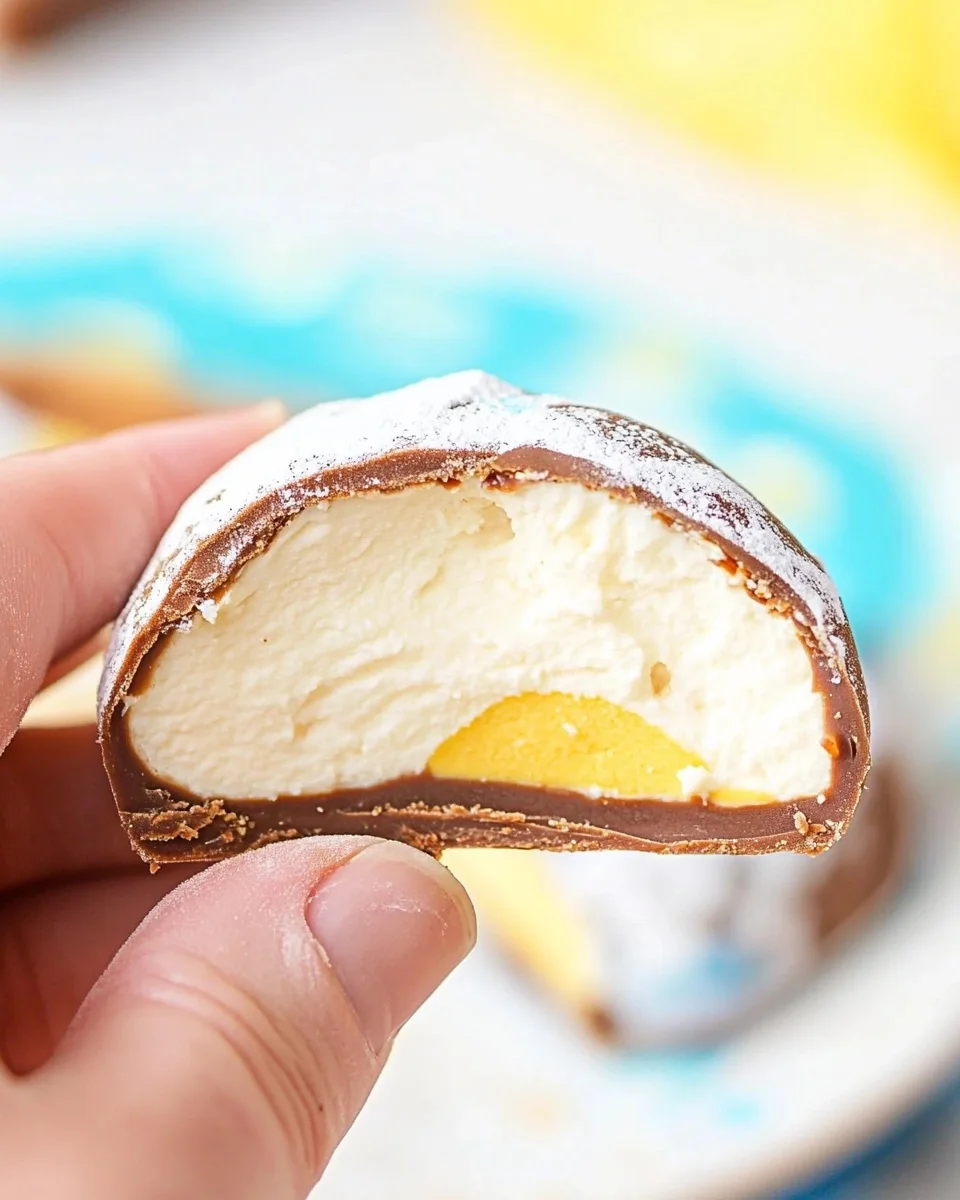
Festive Marshmallow Cream Chocolate Eggs
Ingredients: A Sweet & Colorful Treat
- 1 (7-ounce) jar marshmallow fluff
- 6 tablespoons salted butter, softened
- ¼ teaspoon vanilla extract
- 3 cups powdered sugar
- 1 cup each of colored candy melts (yellow, pink, blue)
- 1 pound chocolate almond bark, divided
- 16-count silicone egg molds
Directions: Creating the Perfect Easter-Inspired Chocolate Eggs
Step 1: Make the Marshmallow Filling
- In a mixing bowl, beat together marshmallow fluff, softened butter, and vanilla until smooth.
- Gradually add powdered sugar, mixing until a thick, creamy filling forms.
- Divide the mixture into three equal portions and color each with yellow, pink, or blue candy melts, stirring until well blended.
Step 2: Prepare the Chocolate Shells
- Melt half of the chocolate almond bark in the microwave in 30-second intervals, stirring in between until smooth.
- Spoon melted chocolate into silicone egg molds, using the back of a spoon to coat the edges.
- Refrigerate for 10 minutes, or until firm.
Step 3: Fill & Seal the Eggs
- Add a small scoop of the marshmallow filling into each chocolate shell, gently smoothing the top.
- Melt the remaining chocolate almond bark and pour over the filled eggs, sealing the edges.
- Chill for 30 minutes, or until set.
Step 4: Decorate & Serve
- Carefully remove chocolate eggs from the molds.
- Drizzle with extra melted colored candy for a festive touch.
- Let set, then serve and enjoy!
Nutritional Breakdown: A Fun & Indulgent Treat
(Per Serving, Approximate Values)
Advertisement
- Calories: 250
- Protein: 2g
- Carbohydrates: 30g
- Fats: 14g
- Sugar: 26g
- Sodium: 70mg
These festive marshmallow cream chocolate eggs are a fun, colorful, and sweet homemade treat, perfect for Easter celebrations or any special occasion!
Secrets to Making the Perfect Chocolate Eggs
While these chocolate-covered marshmallow eggs are easy to make, a few tips will help you get flawless results every time.
1. Use High-Quality Chocolate for the Best Flavor
The chocolate shell is a major part of these treats, so using good-quality chocolate almond bark or couverture chocolate will make a noticeable difference. If using chocolate chips, add a teaspoon of coconut oil to help with smooth melting.
2. Don’t Overfill the Molds
Adding too much marshmallow filling can make it difficult to seal the eggs properly. A small scoop is all you need to keep them perfectly shaped.
3. Work Quickly with Melted Chocolate
Chocolate sets fast, so when sealing the eggs, make sure your melted chocolate is warm and smooth. If it starts to harden, gently reheat in short bursts to keep it workable.
4. Chill Between Steps for Easy Assembly
Letting the chocolate shell firm up before adding the filling prevents it from breaking, and chilling after sealing ensures clean, well-formed eggs.
5. Get Creative with Decorations
For a festive look, drizzle with melted colored candy melts, sprinkle with crushed nuts or coconut, or add pastel sprinkles. You can even use edible gold dust for an extra elegant touch.
Creative Variations to Try
If you want to put your own twist on this recipe, try these fun variations:
- Flavored Fillings: Add coconut extract, almond extract, or a drop of raspberry jam to the marshmallow mixture for a unique flavor.
- Crunchy Coating: Mix in crushed graham crackers or cookie crumbs for added texture.
- Dark Chocolate Shells: Swap milk chocolate for dark chocolate for a rich, sophisticated taste.
- Nutty Surprise: Add a whole almond or peanut butter layer inside the filling for a delightful crunch.
How to Serve & Store These Chocolate Eggs
Serving Suggestions
- Enjoy them as-is for a sweet, festive treat.
- Wrap them in decorative bags for Easter gifts.
- Use them as cupcake toppers for an Easter-themed dessert.
- Add them to an Easter dessert board with cookies, candies, and chocolate bunnies.
Storage Tips
- Refrigerator: Store in an airtight container for up to one week to keep them fresh.
- Freezer: Freeze for up to two months. Let them sit at room temperature for a few minutes before eating.
Frequently Asked Questions (FAQs)
1. Can I make these eggs without a silicone mold?
Yes! If you don’t have a silicone mold, you can shape the filling into small egg-like forms, freeze them, then dip them in melted chocolate using a fork.
2. How do I keep the chocolate from cracking when I remove the eggs from the mold?
To prevent cracking, gently press the mold from underneath rather than pulling on the edges. Also, letting the eggs sit at room temperature for a couple of minutes before removing them helps.
3. Can I use homemade marshmallow fluff instead of store-bought?
Absolutely! If you prefer homemade marshmallow fluff, just make sure it’s thick and stable enough to hold its shape when scooped into the chocolate molds.
4. How do I melt chocolate without burning it?
Melt chocolate in 30-second intervals in the microwave, stirring after each round. You can also use a double boiler for more control over the heat.
5. Can I make these vegan?
Yes! Use dairy-free chocolate and replace butter with vegan butter. You’ll also need a vegan marshmallow fluff substitute, such as aquafaba-based marshmallow cream.
6. Can I make different shapes instead of eggs?
Of course! You can use silicone molds in different shapes (like hearts or stars) to create fun variations for other holidays.
Final Thoughts: The Perfect Homemade Easter Treat
These festive marshmallow cream chocolate eggs are a fun, delicious, and beautifully customizable treat that brings the magic of Easter to your kitchen. Whether you’re making them with your kids, surprising family and friends, or just treating yourself to a homemade indulgence, these chocolate eggs are guaranteed to spread joy and sweetness.
There’s something special about making holiday treats from scratch—the care, the creativity, and the love that goes into each bite. And when you taste the creamy marshmallow filling, wrapped in a rich chocolate shell, you’ll know it was worth every step.
So this Easter, skip the store-bought chocolates and create something homemade, heartfelt, and delicious. Once you make these homemade chocolate eggs, they might just become your new Easter tradition!
Fluffy & Sweet Marshmallow Easter Eggs
Ingredients
Method
- In a bowl, beat together marshmallow fluff, butter, and vanilla until smooth.
- Gradually add powdered sugar, mixing until thick and creamy. Divide into three portions and mix each with yellow, pink, or blue candy melts.
- Melt half of the chocolate almond bark in 30-second intervals, stirring until smooth.
- Spoon melted chocolate into silicone egg molds, coating the sides. Refrigerate for 10 minutes until set.
- Fill each mold with marshmallow mixture, then cover with the remaining melted chocolate to seal.
- Chill for 30 minutes until firm. Carefully remove eggs from molds.
- Drizzle with extra melted colored candy for decoration. Serve and enjoy
Notes
- Work quickly with melted chocolate to avoid hardening before sealing the eggs.
- For a crunchier bite, mix in shredded coconut or crushed cookies into the filling.
- Store in an airtight container in the fridge for up to one week or freeze for up to two months.