Advertisement
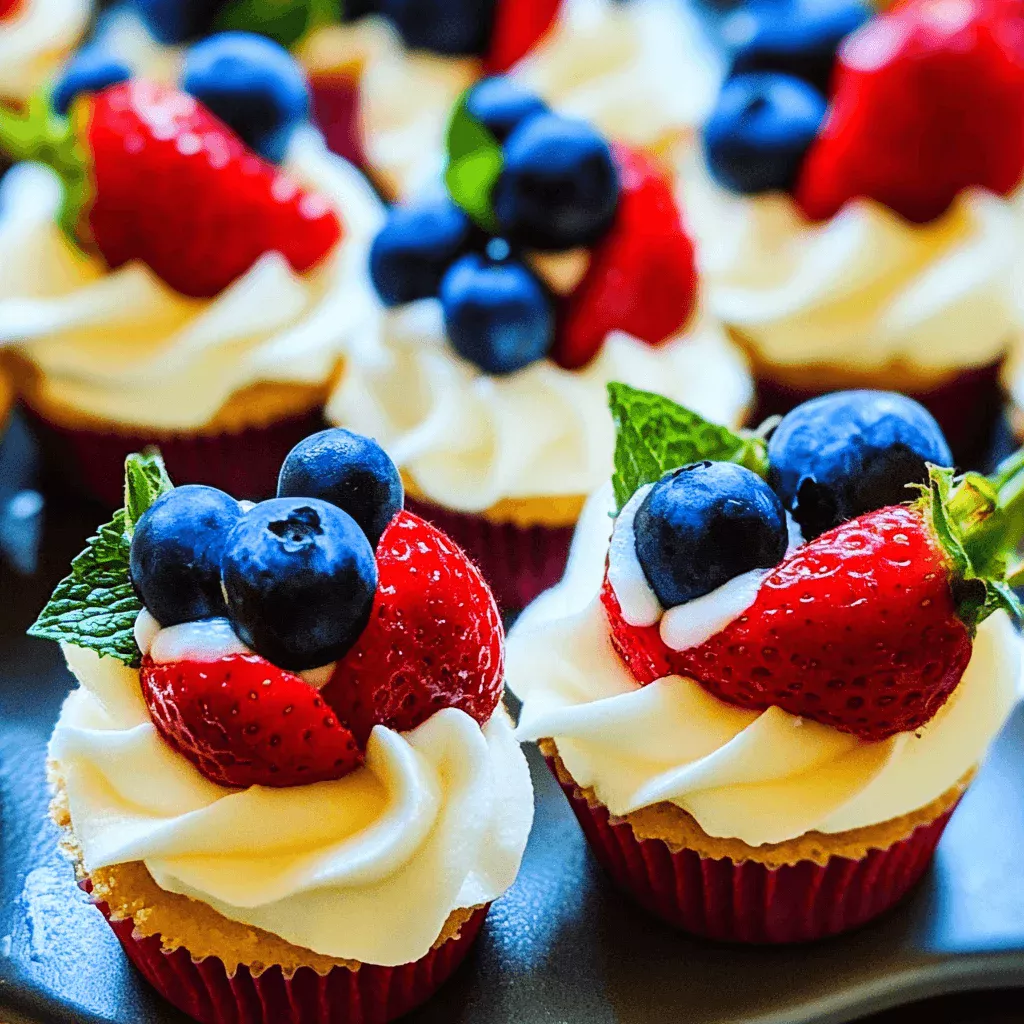
Introduction to Red, White, and Blue Cheesecake Cups
There’s something magical about summer desserts that brings back memories of family barbecues and lazy afternoons. The Red, White, and Blue Cheesecake Cups are not just a treat; they’re a celebration in a cup!
These delightful layers of creamy cheesecake, fresh strawberries, and blueberries are perfect for impressing friends or simply enjoying a sweet moment with your loved ones.
With no baking required, this recipe is a quick solution for those busy days when you want to whip up something special without the fuss. Let’s dive into this deliciousness together!
Why You’ll Love This Red, White, and Blue Cheesecake Cups
These Red, White, and Blue Cheesecake Cups are a breeze to make, perfect for those hot summer days when you want something sweet without the heat of the oven.
Advertisement
The creamy texture paired with the fresh burst of berries creates a flavor explosion that’s hard to resist. Plus, they look stunning on any table, making them a showstopper for gatherings. You’ll love how quickly they come together!
Ingredients for Red, White, and Blue Cheesecake Cups
Creating these Red, White, and Blue Cheesecake Cups is as simple as gathering a few key ingredients. Here’s what you’ll need:
- Cream Cheese: The star of the show! Softened cream cheese gives the cheesecake its rich and creamy texture.
- Powdered Sugar: This sweetener blends seamlessly into the cream cheese, adding just the right amount of sweetness without any graininess.
- Vanilla Extract: A splash of vanilla enhances the flavor, making each bite taste like a slice of summer.
- Whipped Cream: Light and airy, whipped cream adds volume and a fluffy texture to the cheesecake mixture.
- Strawberries: Freshly sliced strawberries not only add a pop of color but also a sweet-tart flavor that balances the richness of the cheesecake.
- Blueberries: These little gems provide a burst of juiciness and a beautiful contrast to the strawberries.
- Graham Cracker Crumbs: A crunchy topping that adds texture and a hint of nostalgia, reminiscent of classic cheesecake crusts.
Feel free to get creative! You can swap out the berries based on what’s in season or even use gluten-free graham crackers for a gluten-free option.
For exact measurements, check the bottom of the article where you can find everything you need for printing. Happy cooking!
How to Make Red, White, and Blue Cheesecake Cups
Making these Red, White, and Blue Cheesecake Cups is a delightful journey that’s as easy as pie—well, no-bake cheesecake, to be precise! Follow these simple steps, and you’ll have a stunning dessert ready to impress.
Step 1: Prepare the Cheesecake Mixture
Start by grabbing a mixing bowl and your softened cream cheese.
Beat it until it’s smooth and creamy, like a cloud on a summer day.
Next, add in the powdered sugar and a splash of vanilla extract.
Mix until everything is well combined, creating a sweet base that’s just begging for more layers.
Step 2: Fold in the Whipped Cream
Now comes the fun part!
Gently fold in the whipped cream.
This step is crucial; you want to keep that light, airy texture.
Use a spatula and a gentle hand, as if you’re cradling a delicate treasure.
The fluffiness is what makes these cheesecake cups so irresistible!
Step 3: Layer the Ingredients
Grab your serving cups and start layering!
Spoon a generous amount of the cheesecake mixture into the bottom of each cup.
Then, add a layer of sliced strawberries, letting their vibrant red color shine through.
Repeat with another layer of cheesecake mixture, creating a beautiful contrast.
Step 4: Add the Final Touches
It’s time to crown your creation!
Top each cup with a handful of fresh blueberries, their deep blue hue adding a pop of color.
Finally, sprinkle some graham cracker crumbs on top for that perfect crunch.
This is where the magic happens!
Step 5: Chill and Serve
Patience is key here.
Place your cheesecake cups in the refrigerator and let them chill for at least two hours.
This step allows the flavors to meld together beautifully.
When you’re ready to serve, just pull them out and watch the smiles appear.
These Red, White, and Blue Cheesecake Cups are not just a dessert; they’re a celebration of summer!
Tips for Success
- Make sure your cream cheese is softened for easy mixing.
- Use a rubber spatula to gently fold in the whipped cream for maximum fluffiness.
- Chill the cups longer if you prefer a firmer texture.
- Experiment with different berries for a unique twist.
- Prepare these cups a day in advance for stress-free entertaining.
Equipment Needed
- Mixing Bowl: A medium-sized bowl works best; a large one can be used if you’re making a double batch.
- Electric Mixer: A hand mixer is perfect, but a whisk can do the job if you’re feeling adventurous.
- Spatula: A rubber spatula is ideal for folding in the whipped cream.
- Serving Cups: Any small cups or jars will do; mason jars add a rustic touch!
Variations
- Berry Medley: Swap out strawberries and blueberries for raspberries or blackberries for a different flavor profile.
- Chocolate Drizzle: Add a drizzle of chocolate sauce on top for a decadent twist that chocolate lovers will adore.
- Nutty Crunch: Mix in some chopped nuts, like pecans or almonds, for an added crunch and flavor depth.
- Vegan Option: Use vegan cream cheese and coconut whipped cream for a dairy-free version that’s just as delicious.
- Flavor Infusion: Experiment with flavored extracts, like almond or lemon, to give your cheesecake a unique twist.
Serving Suggestions
- Pair these cheesecake cups with a refreshing glass of iced tea or lemonade for a perfect summer vibe.
- Serve alongside a light fruit salad to complement the flavors.
- For a festive touch, garnish with mint leaves or edible flowers.
- Present in colorful cups for a vibrant table display.
FAQs about Red, White, and Blue Cheesecake Cups
Can I make these Red, White, and Blue Cheesecake Cups in advance?
Absolutely! These cheesecake cups can be made a day in advance. Just keep them covered in the refrigerator until you’re ready to serve. This actually enhances the flavors!
What can I substitute for cream cheese?
If you’re looking for a lighter option, you can use Greek yogurt or a dairy-free cream cheese alternative. Just keep in mind that the texture and flavor may vary slightly.
How long do these cheesecake cups last in the fridge?
These delightful cups can last up to three days in the refrigerator. Just make sure they’re stored in an airtight container to maintain freshness.
Can I use frozen berries instead of fresh?
Yes, frozen berries can work in a pinch! Just thaw them and drain any excess liquid before layering them in your cheesecake cups. Fresh is always best, but frozen can be a great alternative.
What’s the best way to serve these cheesecake cups?
Serve them chilled, straight from the fridge. For an extra touch, garnish with a sprig of mint or a dusting of powdered sugar right before serving. They’ll look as good as they taste!
Final Thoughts
Creating these Red, White, and Blue Cheesecake Cups is more than just making a dessert; it’s about crafting memories.
Each layer tells a story, from the creamy cheesecake to the vibrant berries that burst with flavor.
Whether you’re celebrating a holiday or simply enjoying a sunny afternoon, these cups bring a touch of joy to any occasion.
They’re easy to make, visually stunning, and oh-so-delicious.
So, gather your loved ones, share a cup, and let the sweet moments unfold.
This summer, let these delightful treats be the highlight of your gatherings!
Red, White, and Blue Cheesecake Cups Make Your Summer Bright!
Ingredients
Method
- In a mixing bowl, beat the softened cream cheese until smooth.
- Add powdered sugar and vanilla extract, mixing until well combined.
- Fold in the whipped cream gently until the mixture is light and fluffy.
- In serving cups, layer the cheesecake mixture, followed by a layer of sliced strawberries, then another layer of cheesecake.
- Top with blueberries and a sprinkle of graham cracker crumbs.
- Chill in the refrigerator for at least 2 hours before serving.
Nutrition
Notes
- For a gluten-free option, use gluten-free graham crackers.
- Can be made a day in advance for convenience.
- Feel free to substitute other berries based on availability.