Advertisement
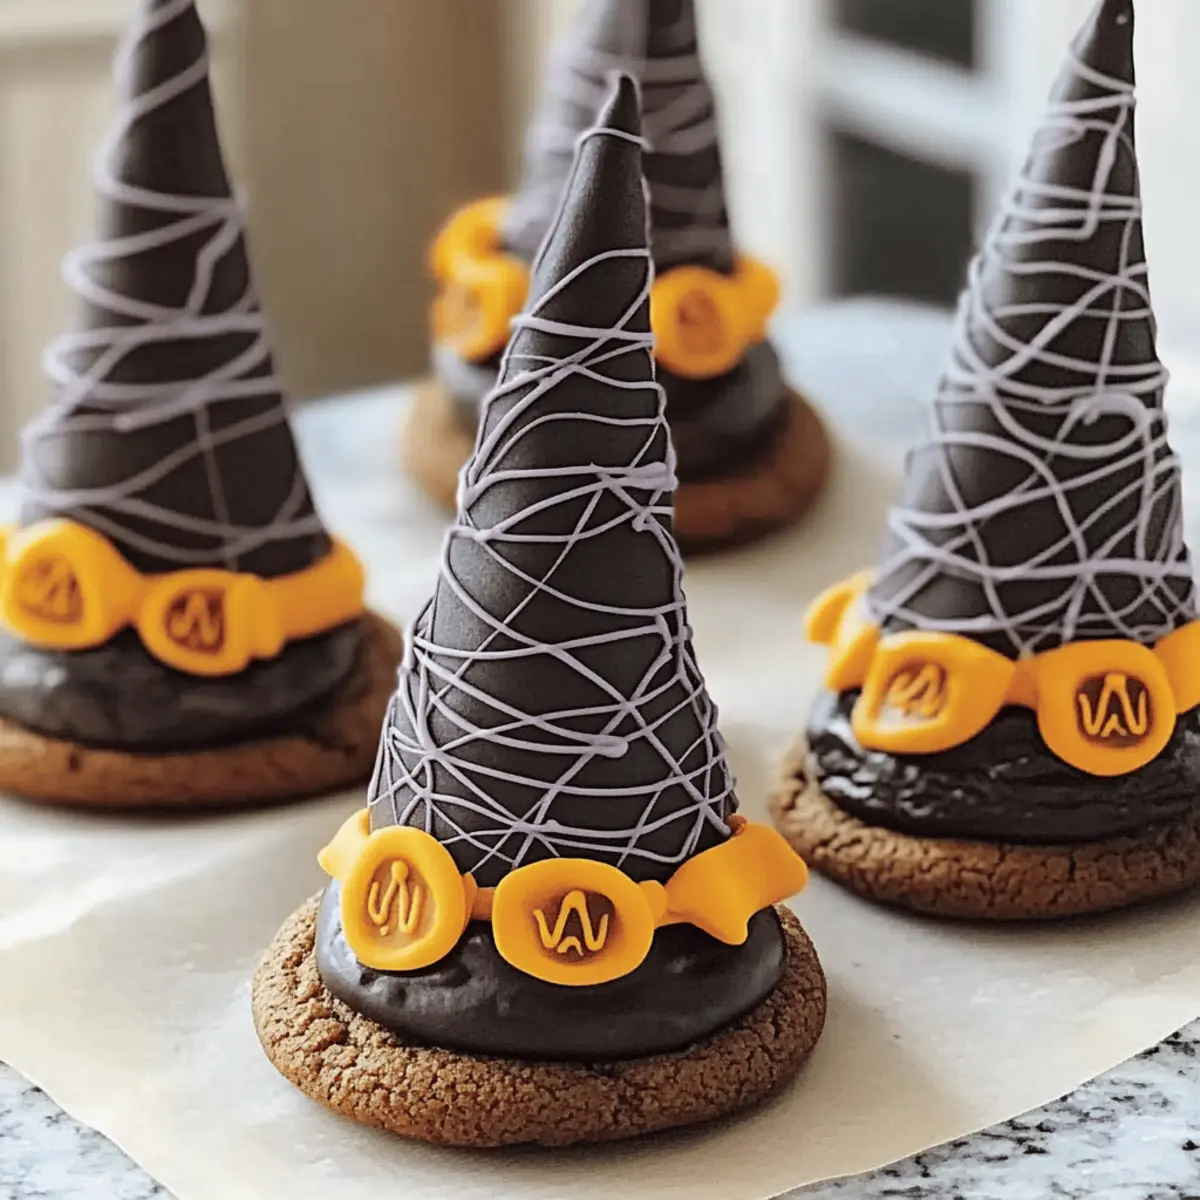
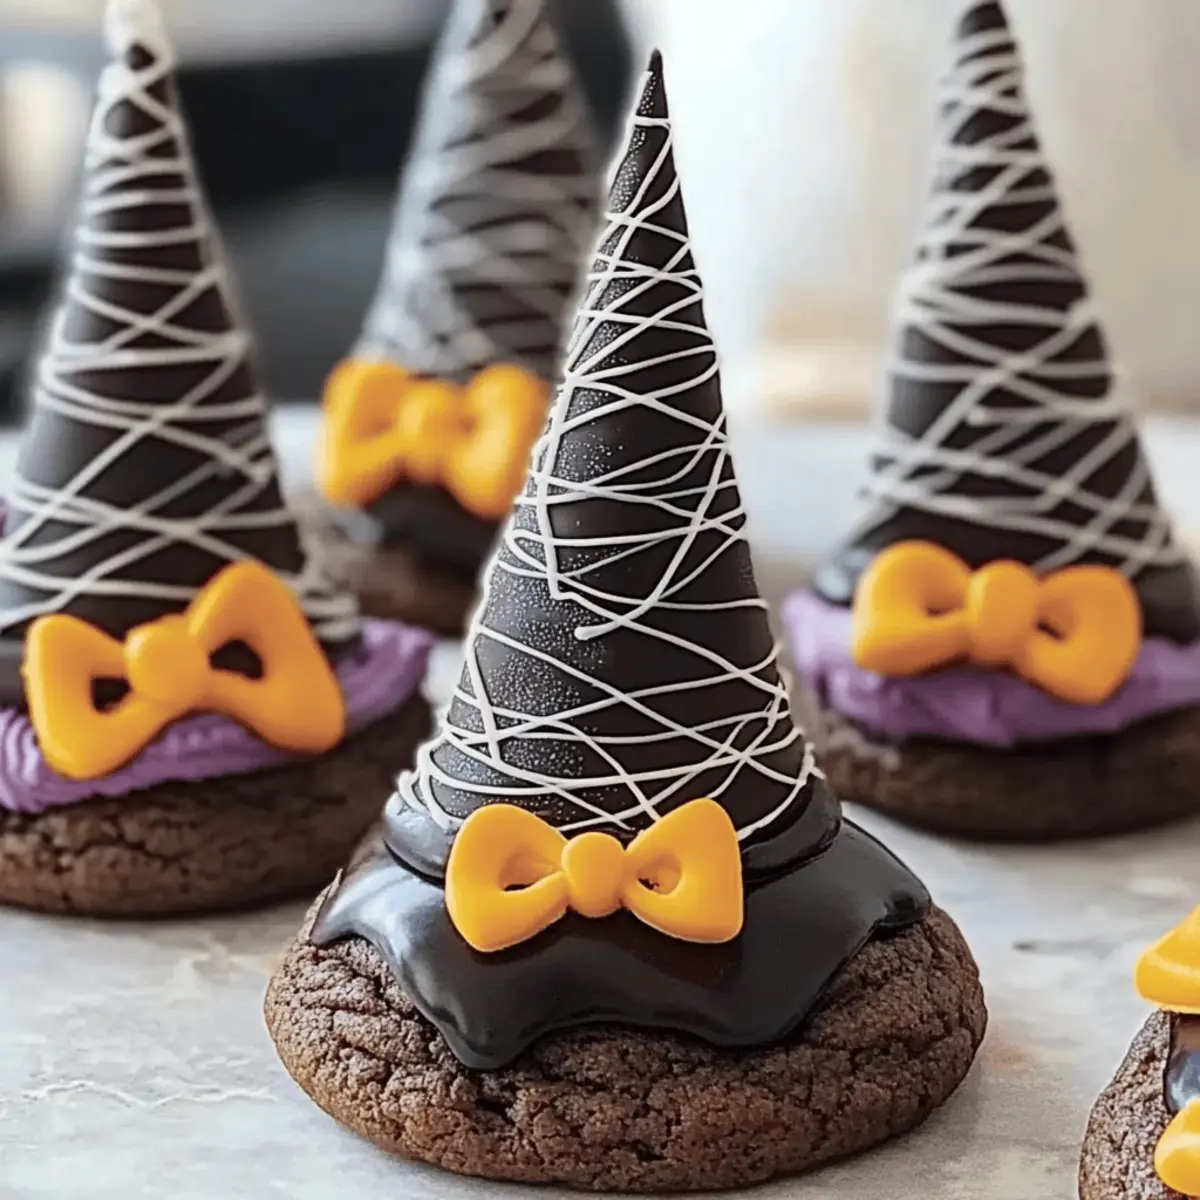
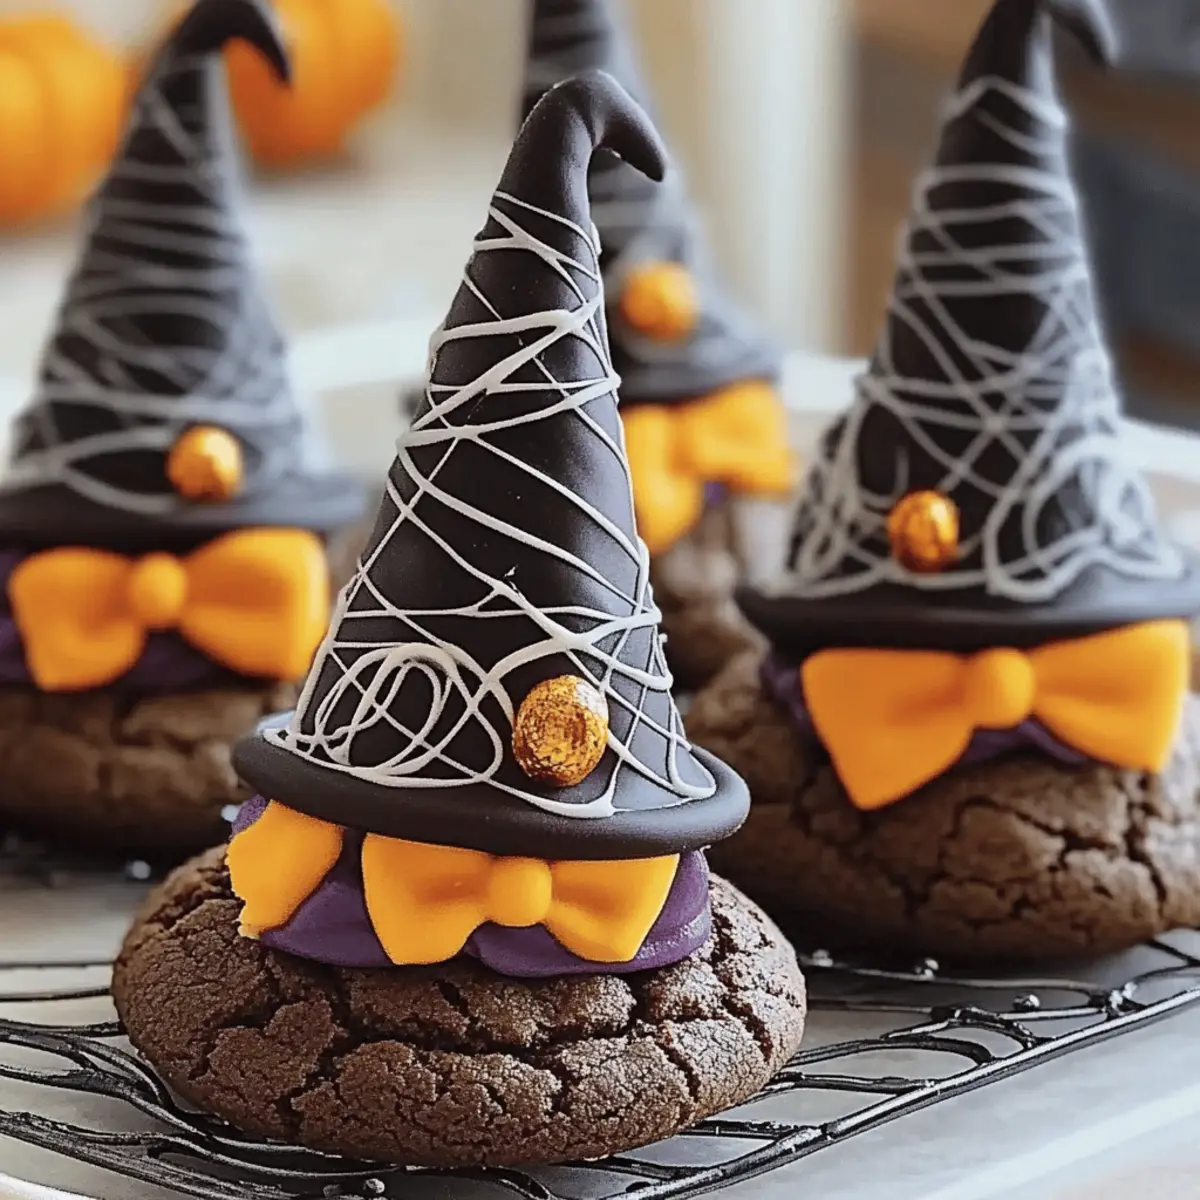
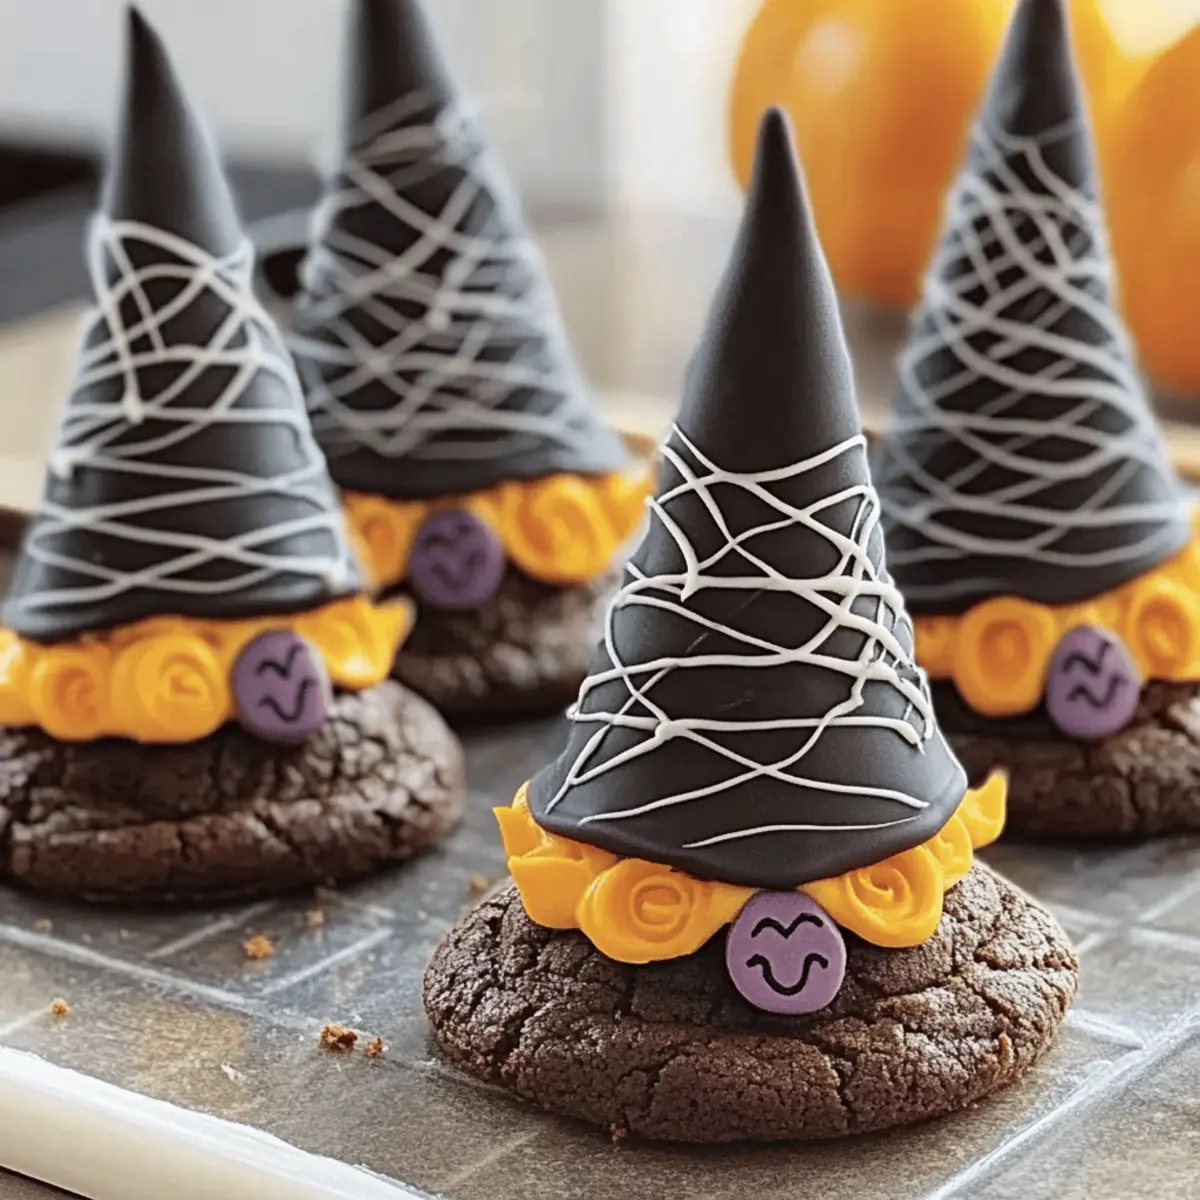
As I rummaged through my baking supplies last week, I stumbled upon a lonely box of cake mix that begged to be transformed. That moment sparked my creativity, leading to the delightful concoction of Fun Halloween Witch Hat Cookies! These whimsical treats combine rich, chocolatey goodness with a playful cone hat that will charm both kids and adults alike. Not only are they super easy to make, but they also allow for a fun twist on traditional Halloween treats—perfect for last-minute gatherings or festive baking with loved ones. With customizable decorations that suit any Halloween theme, you’ll have everyone reaching for these adorable cookies. Ready to cast a sugary spell in your kitchen? Let’s dive into this enchanting recipe!
Why are these cookies so fun?
Festive Fun: These Fun Halloween Witch Hat Cookies bring a sprinkle of spookiness to your holiday gatherings, appealing to kids and adults alike.
Easy to Customize: With a base of cake mix, you can easily modify flavors or colors to match your Halloween theme, making them versatile for any celebration!
Advertisement
Quick Bake Time: In under 30 minutes, you can whip up a batch that’s sure to impress; perfect for those last-minute treats or family baking days!
Creative Activity: Decorating these cookies is a fun project for little hands, allowing imaginative designs that bring joy while creating lasting memories together.
For more delightful treats, check out my Pistachio Shortbread Cookies or my colorful Cookie Monster Cookies!
Fun Halloween Witch Hat Cookies Ingredients
• Dive into this spellbinding recipe with delightful ingredients!
For the Cookie Base
- Cake Mix – A sweet foundation that simplifies baking; consider using a homemade chocolate cake mix for a personalized touch.
- Store Bought Chocolate Cookies – An easy option that delivers delicious flavor; feel free to swap them with homemade cookies if you have the time.
For the Witch Hats
- Sugar Cones – Crucial for crafting the witch hat shape; no substitutes as they provide essential structure.
- Black Color Mist Food Coloring Spray – Transforms your cones into spooky hats; if unavailable, black icing may work in a pinch.
For Decoration
- Creamy White Decorator Icing – The main component for decorating your cookies; royal icing can offer a firmer finish for intricate designs.
- Lemon Yellow Icing Color – Brightens your decorations with a cheerful hue; a substitute is not recommended for its unique vibrancy.
- Rose, Violet, Golden Yellow & Orange Icing Colors – Adds flair to your cookie designs; feel free to swap these for other colors that fit your Halloween theme.
Whether you’re baking for a festive gathering or enjoying some cozy kitchen time, these Fun Halloween Witch Hat Cookies will surely bring joy and delight to everyone who tries them!
Step‑by‑Step Instructions for Fun Halloween Witch Hat Cookies
Step 1: Prepare the Cones
Preheat your oven to 350°F (175°C). In a mixing bowl, prepare the cake mix according to the package instructions. Fill each sugar cone with about 2 tablespoons of the batter, ensuring not to overfill. Place them upright on a baking sheet and bake for 15-18 minutes until a toothpick inserted comes out clean. Allow the cones to cool completely before moving to the next step.
Step 2: Color the Cones
Carefully trim any excess cake batter around the edges of the cooled cones for a neat appearance. Using the black color mist food coloring spray, evenly coat the outside of each cone to create a spooky black hat effect. Allow the cones to dry completely to prevent smudging during assembly.
Step 3: Tint the Icing
While the cones are drying, divide the creamy white decorator icing into several small bowls. Add lemon yellow to one bowl and mix until you achieve your desired shade, reserving other colors like rose or violet for additional decoration. Fit piping bags with fine tips and fill them with your tinted icing for detailed decorating later.
Step 4: Assemble the Hats
To construct your Fun Halloween Witch Hat Cookies, pipe a generous amount of orange icing onto the top of each cookie as adhesive. Carefully place a prepared sugar cone on top of the icing, then use the piping bag filled with icing to pipe around the base of the cone, securing it to the cookie. Allow the icing to set slightly before moving forward.
Step 5: Finish with Details
Once the initial icing has set firm, take your yellow icing and carefully pipe a small buckle around the band of each cone to enhance the witch hat’s charm. Let the decoration dry completely for a polished finish. Once set, your Fun Halloween Witch Hat Cookies are ready to be displayed and enjoyed!
Expert Tips for Fun Halloween Witch Hat Cookies
-
Perfect Consistency: Ensure the cake batter isn’t too thick; if it is, add a tablespoon of milk until smooth, which will help your cookies rise beautifully.
-
Spray Technique: Apply the black color mist evenly for best results. Hold the canister a few inches away and coat all sides for a uniform finish.
-
Set Time: Allow the icing to set completely before stacking or serving the cookies to prevent any smudging or collapse; this keeps your Fun Halloween Witch Hat Cookies looking pristine.
-
Theme It Up: Get creative with colors! Feel free to switch out the icing colors to match your party theme, making your cookies uniquely festive and fun.
-
Storage Tips: Store your cookies in an airtight container at room temperature for up to 5 days. If making in advance, freeze them wrapped for freshness!
What to Serve with Fun Halloween Witch Hat Cookies
The perfect festive meal creates a joyful atmosphere, enticing your taste buds and revamping your kitchen ambiance.
- Chili Soup: A warm, hearty chili provides a savory contrast to sweet witch hat cookies, perfect for cooling autumn nights.
- Spooky Cheese Platter: Create a charcuterie board with seasonal cheeses and orange-colored snacks to enhance your themed dessert display.
- Pumpkin Spice Latte: This beloved fall beverage pairs beautifully, echoing the flavors of the season while providing a cozy drink option.
- Candy Corn Fruit Salad: Enjoy a sweet and vibrant fruit salad with honeydew, cantaloupe, and pineapple, recreating the candy corn colors in a healthier way.
- Ghostly Macarons: These delicate French cookies can be decorated to match your spooky theme, delivering a touch of elegance alongside your whimsical treats.
- Caramel Apple Slices: Crisp, tart apple slices drizzled with caramel create a delightful blend of textures and flavors, perfect for balancing sweet and savory.
- Warm Spiced Cider: Invite warmth into your gathering with a spiced apple cider that complements the enchanting spirit of Halloween.
- Halloween-themed Milkshakes: Treat your guests to creamy milkshakes swirled with festive colors, offering a fun, sweet indulgence alongside the cookies.
These suggestions will elevate your Halloween festivities and delight guests with an array of flavors to explore!
Fun Halloween Witch Hat Cookies Variations
Get ready to sprinkle some creativity into your baking with these delightful variations!
- Flavor Twist: Substitute the regular cake mix for pumpkin spice or vanilla cake mix to give your witch hats a seasonal flair. You’ll whisper sweet nothings as the scent fills your kitchen!
- Texture Crunch: Mix in pretzel or toffee bits into the cake batter for unexpected crunchy surprises that elevate your cookie’s texture. The delightful crunch pairs perfectly with the soft cookie base.
- Gummy Goodies: Top your cookies with gummy worms or colorful candies for an enchanting and playful decoration that screams Halloween excitement! They’ll be a hit with the little goblins!
- Chocolate Dipped Hats: Instead of baking cones, dip sugar cones in melted chocolate for a richer and more decadent treat. Every bite will be a chocolate lover’s dream!
- Mini Versions: Create bite-sized cookies that serve perfectly in goodie bags, or for a fun treat with less guilt! These mini delights are great for parties or quick snack attacks.
- Sp.O.oky Spice: Add a pinch of cayenne or cinnamon into the icing for an unexpected spicy kick; a little heat can enhance the overall flavor and intrigue your guests!
Explore even more delightful creations, like my fun Pistachio Shortbread Cookies or inventively colorful Cookie Monster Cookies for your next baking adventure!
Make Ahead Options
These Fun Halloween Witch Hat Cookies are perfect for busy home cooks looking to save time during the festive season! You can prepare the sugar cones filled with cake batter up to 24 hours in advance; simply bake and cool them before storing them in an airtight container. Additionally, you can tint the decorator icing a day ahead. Just refrigerate the prepared icing, ensuring it’s covered tightly to prevent drying out. When you’re ready to serve, pipe the orange icing onto the cookies, assemble the hats, and add finishing touches with the yellow icing. This way, you can enjoy these delightful treats with minimal effort on the day of your celebration!
Storage Tips for Fun Halloween Witch Hat Cookies
- Room Temperature: Keep your cookies in an airtight container at room temperature for up to 5 days. This helps maintain their delicious softness and prevents them from drying out.
- Freezer: For longer storage, wrap your Fun Halloween Witch Hat Cookies tightly in plastic wrap or aluminum foil, and freeze them for up to 3 months. This preserves their festive charm and taste.
- Thawing: When ready to enjoy, simply transfer the cookies from the freezer to the fridge for a few hours or allow them to thaw at room temperature for about 30 minutes.
- Reheating: If you prefer warm cookies, pop them in the microwave for about 10-15 seconds to gently warm them up, keeping the joy of these treats alive!
Fun Halloween Witch Hat Cookies Recipe FAQs
How do I select the right cake mix for these cookies?
The best choice is to use a chocolate cake mix to complement the witch hat theme. However, feel free to experiment! A pumpkin spice or vanilla mix can also work beautifully, adding a unique flavor twist that pairs well with the festive decorations.
What’s the best way to store leftover cookies?
Absolutely! Store your Fun Halloween Witch Hat Cookies in an airtight container at room temperature for up to 5 days to keep them fresh and soft. If you have extras, wrapping them tightly in plastic wrap and freezing is a smart option to enjoy later—these cookies can last up to 3 months in the freezer!
Can I freeze these cookies? If so, how?
Yes! To freeze your Fun Halloween Witch Hat Cookies, ensure they’re completely cooled after decoration. Wrap each cookie individually in plastic wrap, then place them in an airtight freezer bag. This method helps prevent freezer burn and keeps them tasting delightful. When you’re ready for a spooky treat, thaw them in the fridge for a few hours or let them sit at room temperature for about 30 minutes before enjoying!
What do I do if my icing is too runny?
If your icing is runny, no need to worry! Simply add a bit more powdered sugar, a tablespoon at a time, until you achieve your desired consistency. If it’s still not setting, let it rest for a few minutes. Using a thicker icing will also help with detailed decorations on your Fun Halloween Witch Hat Cookies.
Can I make these cookies without food coloring?
Absolutely! While food coloring adds a festive touch, you can opt for natural alternatives or simply skip it. Instead, use chocolate icing or sprinkles to decorate your cookies. Your Fun Halloween Witch Hat Cookies will still be delightful and delicious without the colors.
Are these cookies safe for pets or individuals with allergies?
Sure! These cookies contain cake mix and icing, which can include allergens like gluten and dairy. Always read the labels of your ingredients carefully. If creating something safe for pets, I recommend sticking to pet-friendly treats instead, as the sugars and artificial coloring may not be safe for them to consume.
Fun Halloween Witch Hat Cookies That Bring Spooky Joy
Ingredients
Equipment
Method
- Preheat your oven to 350°F (175°C). In a mixing bowl, prepare the cake mix according to the package instructions. Fill each sugar cone with about 2 tablespoons of the batter, ensuring not to overfill. Place them upright on a baking sheet and bake for 15-18 minutes until a toothpick inserted comes out clean. Allow the cones to cool completely before moving to the next step.
- Carefully trim any excess cake batter around the edges of the cooled cones for a neat appearance. Using the black color mist food coloring spray, evenly coat the outside of each cone to create a spooky black hat effect. Allow the cones to dry completely to prevent smudging during assembly.
- While the cones are drying, divide the creamy white decorator icing into several small bowls. Add lemon yellow to one bowl and mix until you achieve your desired shade, reserving other colors like rose or violet for additional decoration. Fit piping bags with fine tips and fill them with your tinted icing for detailed decorating later.
- To construct your Fun Halloween Witch Hat Cookies, pipe a generous amount of orange icing onto the top of each cookie as adhesive. Carefully place a prepared sugar cone on top of the icing, then use the piping bag filled with icing to pipe around the base of the cone, securing it to the cookie. Allow the icing to set slightly before moving forward.
- Once the initial icing has set firm, take your yellow icing and carefully pipe a small buckle around the band of each cone to enhance the witch hat’s charm. Let the decoration dry completely for a polished finish.