Advertisement
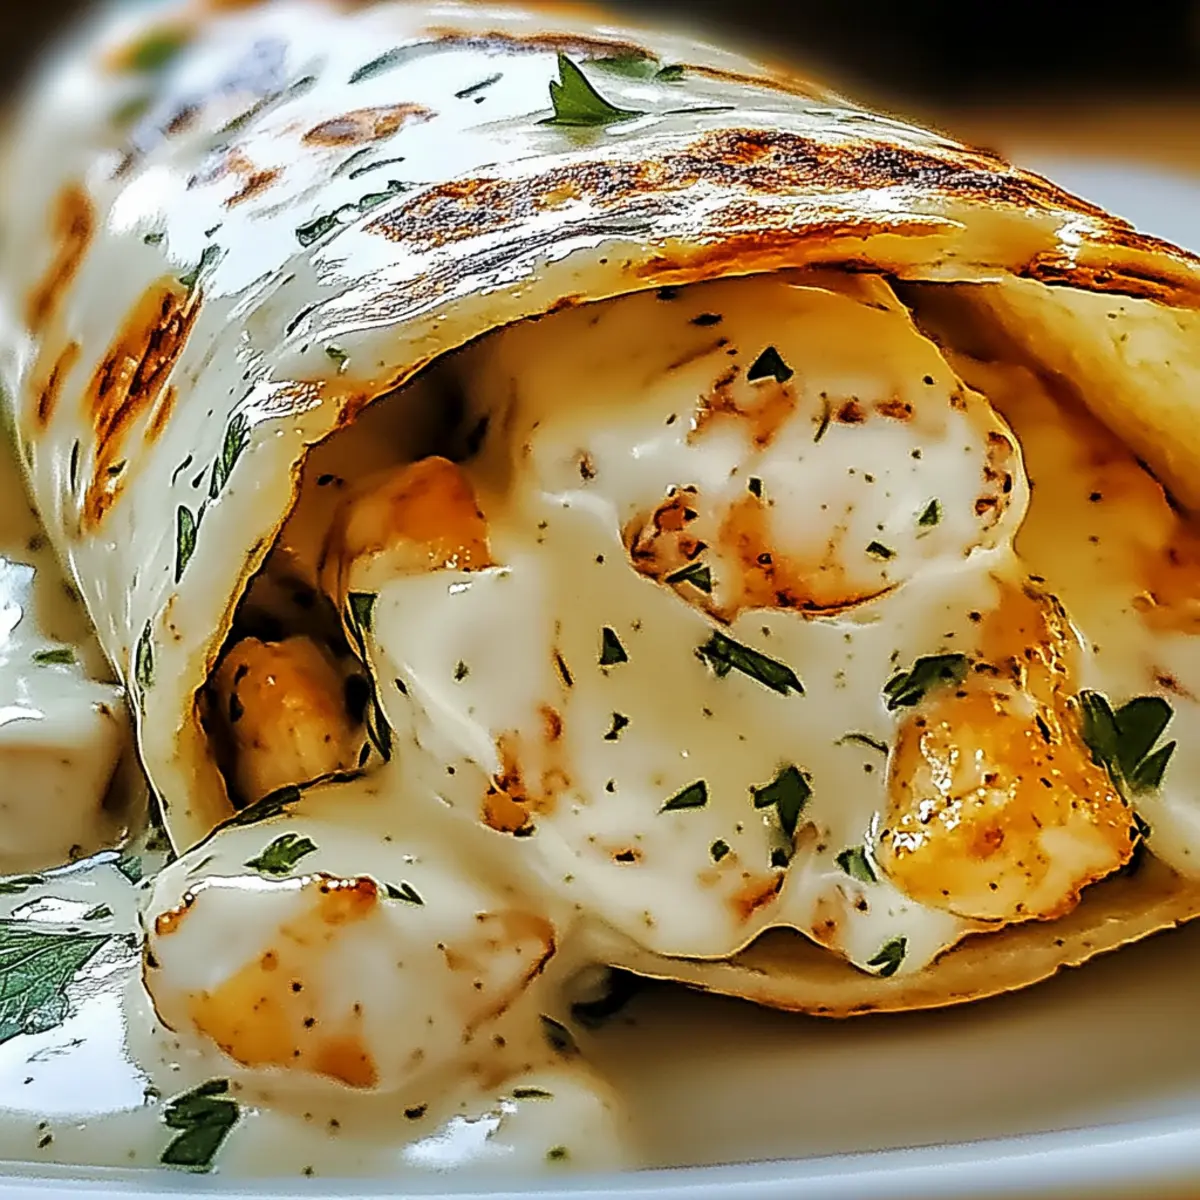
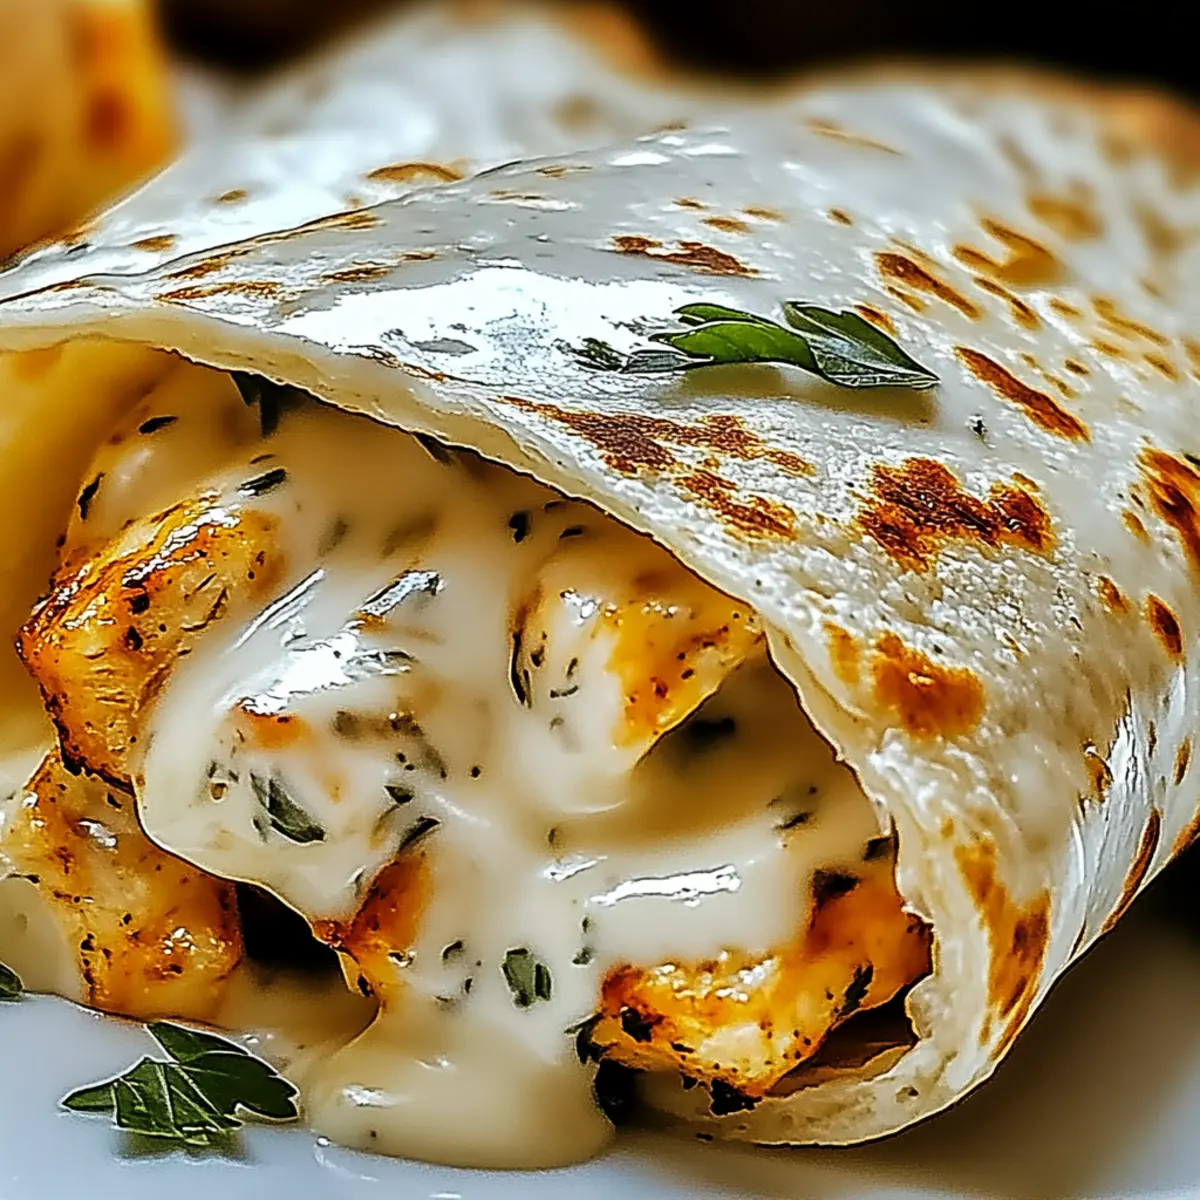
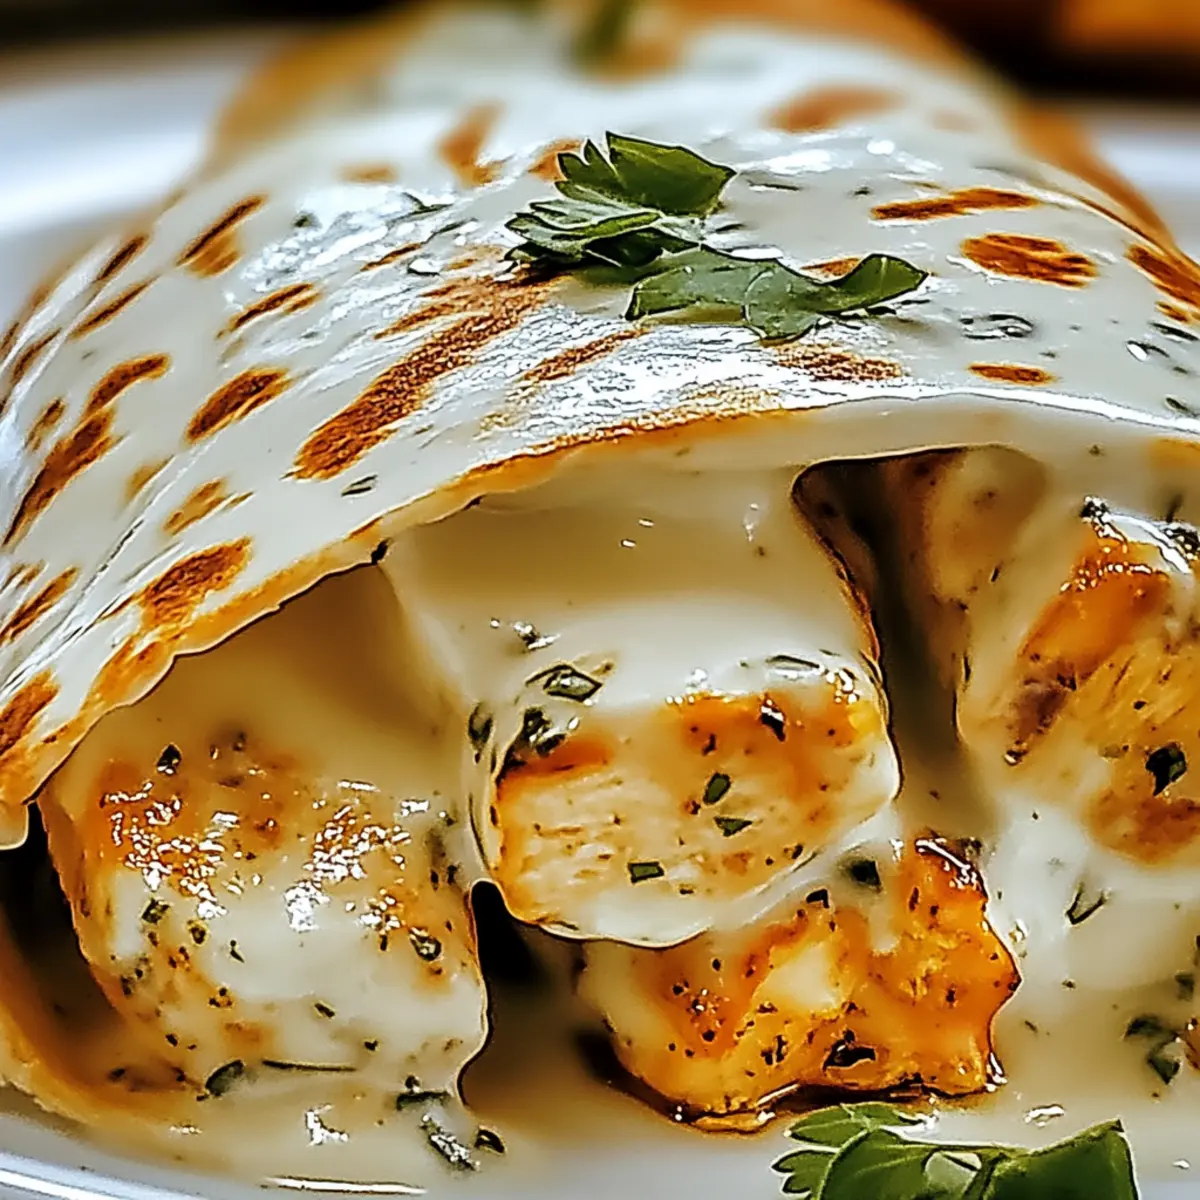
The sizzling sound of garlic meeting a hot skillet instantly transports me back to my childhood kitchen, where the day’s worries melted away with the aromas of home-cooked meals. Enter my latest obsession: Ooey-Gooey Cheesy Garlic Chicken Wraps. This recipe is a lifesaver for those busy weeknights when you crave a comforting yet quick meal. In less than 30 minutes, you can transform simple cooked chicken and tortillas into a cheesy delight that everyone will love. What’s even better? These wraps are entirely customizable! You can switch up the cheese, toss in fresh veggies, and even adapt them to suit gluten-free diets. Ready to elevate your dinner game effortlessly? Let’s dive into this cheesy wonder that your family will keep asking for!
Why You’ll Crave These Wraps
Simplicity: This recipe brings together easy ingredients that transform mundane leftovers into a delicious meal in under 30 minutes. Perfect for anyone, from busy parents to novice cooks.
Flavor Explosion: The delightful combination of sizzling garlic and ooey-gooey cheese creates a mouthwatering experience that elevates your taste buds.
Advertisement
Endless Customization: With options to incorporate your favorite veggies or switch up the cheese, these wraps can cater to any picky eater, making them perfect for family dinners.
Perfect for Meal Prep: Whether you want to prepare ahead of time or whip them up fresh, these wraps hold up beautifully for later, ensuring you never miss out on that cheesy goodness.
Crowd-Pleasing Appeal: Trust me, these wraps will become a favored dish at any gathering; just like my Garlic Parmesan Chicken or Cream Cheese Chicken recipes, they’re destined to impress.
Ooey-Gooey Cheesy Garlic Chicken Wraps Ingredients
• Here’s everything you need to create your Ooey-Gooey Cheesy Garlic Chicken Wraps:
For the Filling
- Cooked Chicken – this provides a protein-rich base; using rotisserie chicken can save you time.
- Minced Garlic – essential for that savory garlic flavor; fresh is best, but garlic powder works in a pinch.
- Cheese (mozzarella, cheddar, or pepper jack) – for that creamy, melt-in-the-mouth goodness; pepper jack adds a flavorful kick if you prefer spice.
For the Wraps
- Tortillas – use this as your wrap base; certified gluten-free options are available for those with dietary restrictions.
- Olive Oil – perfect for sautéing garlic; feel free to swap in any cooking oil of your choice.
- Butter – enhances crispiness when toasting wraps; olive oil is a lighter alternative if you’re watching calories.
For Garnish
- Chopped Parsley – adds freshness and a pop of color; you can skip it if you want a simpler wrap.
Now that you have your ingredients ready, it’s time to dive into creating these delightful wraps that will leave everyone asking for more!
Step‑by‑Step Instructions for Ooey-Gooey Cheesy Garlic Chicken Wraps
Step 1: Prepare the Chicken
Begin by dicing the cooked chicken into bite-sized pieces. Season it lightly with salt and pepper for flavor. This step should take about 5 minutes. If you’re using rotisserie chicken, shred it for a quick prep option. Set aside the seasoned chicken while you get ready to sauté the garlic.
Step 2: Sauté the Garlic
Heat a medium skillet over medium heat and add a splash of olive oil, enough to coat the bottom. Once the oil shimmers, add the minced garlic. Sauté the garlic for about 30 seconds to 1 minute, stirring frequently, until it’s fragrant and golden. Be careful not to let it burn, as burnt garlic can become bitter.
Step 3: Combine Chicken and Garlic
Add the seasoned chicken into the skillet with the sautéed garlic. Toss everything together for about 2-3 minutes, allowing the flavors to meld and the chicken to warm up. As it heats, the aroma will fill your kitchen, making it hard to resist! This step prepares the hearty filling for your Ooey-Gooey Cheesy Garlic Chicken Wraps.
Step 4: Melt the Cheese
Now it’s time to make the mixture extra gooey! Sprinkle your choice of cheese over the chicken and garlic in the skillet. Stir it gently for 1-2 minutes until the cheese melts smoothly and becomes beautifully creamy. You’ll know it’s ready when everything is thoroughly combined and the cheese is stringy and delicious.
Step 5: Assemble the Wraps
Grab your tortillas and lay them on a clean surface. Spoon a generous amount of the cheesy chicken mixture onto the center of each tortilla. Fold in the sides, then roll tightly from the bottom up to secure all the gooey goodness inside. Repeat until all the filling is wrapped snugly into your delicious creation.
Step 6: Toast the Wraps
In the same skillet, melt a little butter over medium heat. Place the wraps seam-side down into the skillet, toasting for about 2-3 minutes per side, or until they are golden brown and crispy. Keep an eye on them to ensure they don’t burn, flipping carefully once the first side is perfectly toasted.
Step 7: Cool and Serve
Once toasted, remove the wraps from the skillet and let them cool slightly on a plate. Cut them in half for easy handling and serve with a sprinkle of chopped parsley for garnish, if desired. The final result will be hot, crispy wraps bursting with cheesy goodness that are ready to delight your family!
Make Ahead Options
These Ooey-Gooey Cheesy Garlic Chicken Wraps are perfect for meal prep, saving you precious time during busy weeknights! You can prepare the chicken filling up to 3 days in advance by mixing diced cooked chicken with sautéed garlic and cheese. Store this mixture in an airtight container in the refrigerator. To maintain quality, ensure it’s cooled completely before refrigerating to prevent excess moisture. When you’re ready to enjoy your wraps, simply warm the filling in a skillet, spoon it onto tortillas, and follow the assembly and toasting instructions as normal. This way, you’ll have delicious, cheesy wraps ready in no time—just as satisfying as when freshly made!
Variations & Substitutions for Ooey-Gooey Cheesy Garlic Chicken Wraps
Feel free to get creative with these Cheesy Garlic Chicken Wraps and make them truly your own!
-
Cheese Swap: Experiment with feta or goat cheese for a tangy twist; pepper jack adds extra spice for those who crave heat.
Mixing cheeses can add depth; try combining mozzarella with gouda for a rich flavor. -
Veggie Boost: Toss in chopped spinach, sautéed mushrooms, or roasted bell peppers for more nutrition and vibrant colors.
Fresh veggies not only elevate the taste but also add valuable nutrients, making these wraps even healthier. -
Protein Alternatives: Replace chicken with turkey, black beans, or chickpeas to cater to your dietary preferences.
This versatility allows you to enjoy the wraps in different styles while still savoring that cheesy goodness. -
Low-Carb Option: Substitute large lettuce leaves instead of tortillas for a refreshing, low-carb wrap.
Wrap it up in crisp lettuce for a crunchy texture that’ll keep you feeling light and satisfied. -
Garlic Lovers: Add garlic sauce or a dollop of aioli for an extra punch of garlicky goodness.
You might just find yourself reaching for those extra flavors to make each bite even more aromatic. -
Crunch Factor: Incorporate shredded carrots or radishes for a satisfying crunch and added texture.
This small addition can completely transform your wraps while adding a pop of color and health. -
Spice It Up: Drizzle some hot sauce or add jalapeños for a fiery kick that’ll satisfy spice enthusiasts.
Tailor the heat level to your liking—heat seekers will appreciate the bold flavors that come through!
Pair these wraps alongside a fresh green salad or some seasoned potato wedges for a complete meal. For more family dinner ideas, why not explore my delicious Garlic Parmesan Chicken or try my comforting Cheesy Loaded Meatloaf? Dive into all the possibilities and enjoy every cheesy, delectable bite!
How to Store and Freeze Ooey-Gooey Cheesy Garlic Chicken Wraps
Fridge: Store leftovers in an airtight container for up to 3 days. Reheat in a skillet for a crispy finish, enhancing the cheesy goodness.
Freezer: Wrap tightly in foil or plastic wrap and freeze for up to 2 months. Thaw overnight in the fridge before reheating to preserve texture.
Make-Ahead: Prepare the cheesy filling in advance and refrigerate. When you’re ready to enjoy, simply reheat and assemble your wraps for a quick meal any night of the week.
What to Serve with Ooey-Gooey Cheesy Garlic Chicken Wraps
Savoring these wraps means enhancing your meal with delightful pairings that complement their cheesy, garlic-infused goodness.
-
Fresh Green Salad: A crisp, vibrant salad adds a refreshing contrast, balancing the richness of the wraps with its lightness.
-
Spicy Potato Wedges: Seasoned and baked, these wedges bring a satisfying crunch and a touch of heat that pairs perfectly with the cheesy filling.
-
Guacamole: Creamy and rich, guacamole adds a luscious texture that echoes the wraps, creating a harmonious bite full of flavor.
-
Roasted Veggies: A medley of seasonal vegetables brings both color and nutrition, providing a textural contrast that enhances the meal’s overall appeal.
-
Coleslaw: This tangy, crunchy side offers a bright flavor that cuts through the ooey-gooey wraps, making each bite exciting and refreshing.
-
Homemade Salsa: Bright and zesty, a homemade salsa elevates each wrap, adding a fresh kick and extra depth of flavor that your taste buds will adore.
-
Lemonade or Iced Tea: Quench your thirst with a chilled glass of lemonade or iced tea; their sweetness balances the savory notes of the wraps wonderfully.
-
Chocolate Chip Cookies: End your meal on a sweet note with warm cookies. Their gooey texture echoes the wraps and gives a comforting finish to your dining experience.
Expert Tips for Ooey-Gooey Cheesy Garlic Chicken Wraps
-
Chicken Choice: Use rotisserie chicken for a quick and flavorful option. Make sure it’s cooked thoroughly for safety and taste.
-
Garlic Care: Don’t overcook the garlic; aim for fragrant and golden. Burnt garlic can ruin the flavor of your wraps.
-
Cheese Tips: Mix different cheeses like mozzarella and cheddar for a creamy variety or use pepper jack for an exciting kick.
-
Tortilla Tricks: When using gluten-free tortillas, ensure they’re fresh for the best texture; slightly warm them before wrapping to prevent cracking.
-
Toasting Perfectly: Avoid overcrowding the skillet while toasting your wraps. This ensures even crispiness, giving you that golden brown finish!
-
Reheat Smartly: If you have leftovers, reheat them in a skillet rather than the microwave to maintain that delightful crispiness.
Ooey-Gooey Cheesy Garlic Chicken Wraps Recipe FAQs
How do I choose the best chicken for the wraps?
When selecting chicken, using cooked rotisserie chicken is not only convenient but also adds incredible flavor to your wraps. If you prefer to cook your chicken, be sure to use boneless, skinless chicken breasts or thighs and cook them until they reach an internal temperature of 165°F. This ensures they’re juicy and safe to eat.
What’s the best way to store leftover wraps?
To keep your Ooey-Gooey Cheesy Garlic Chicken Wraps fresh, store any leftovers in an airtight container in the fridge for up to 3 days. This method prevents them from drying out and helps maintain their delightful cheesy texture. Reheat them in a skillet on medium heat for about 2-3 minutes on each side to restore that crispy goodness!
Can I freeze the wraps?
Absolutely! To freeze your wraps, tightly wrap each one in foil or plastic wrap and place them in a freezer-safe bag. You can store them in the freezer for up to 2 months. When you’re ready to enjoy, thaw them overnight in the fridge and then reheat in a skillet to bring back their crispiness—avoid microwaving as this can make them soggy.
What if my chicken is dry when making the wraps?
If your chicken turns out dry, a great trick is to mix it with a bit of chicken broth or crème fraîche while combining it with the garlic. This will add moisture and prevent the filling from being too crumbly or dry. Also, ensuring you season adequately with salt and pepper can enhance the overall flavor and juiciness.
Can I make these wraps gluten-free?
Certainly! Simply substitute traditional flour tortillas with certified gluten-free tortillas. Make sure to check the package for options that maintain a good texture for wrapping. Additionally, always verify that your other ingredients, like sauces or seasonings, are gluten-free as well.
What are some extra ingredients I can add to the wraps?
Feel free to get creative! You can add any of your favorite veggies—like sautéed onions, bell peppers, or spinach—when combining the chicken and cheese. This not only boosts the nutrition factor but also adds more flavor and color to your wraps. The more, the merrier!

Ooey-Gooey Cheesy Garlic Chicken Wraps You'll Crave Daily
Ingredients
Equipment
Method
- Dice the cooked chicken into bite-sized pieces and season lightly with salt and pepper.
- Heat a medium skillet over medium heat, add a splash of olive oil, and sauté the minced garlic for about 30 seconds to 1 minute.
- Add the seasoned chicken into the skillet with the sautéed garlic and toss for 2-3 minutes.
- Sprinkle your choice of cheese over the chicken and garlic, stir gently for 1-2 minutes until the cheese melts.
- Lay tortillas on a clean surface, spoon the cheesy chicken mixture onto each tortilla, fold in the sides, and roll tightly.
- Melt butter in the skillet, place wraps seam-side down, and toast for 2-3 minutes per side until golden brown.
- Remove from skillet, let cool slightly, cut in half, and serve with chopped parsley if desired.