Advertisement
As I sifted through fluffy glutinous rice flour, my kitchen transformed into a little haven of warmth and sweetness. I was experimenting with an unexpected twist on a beloved classic: Oreo Mochi. This delightful concoction marries the rich, familiar flavor of chocolate cookies with the chewy, playful texture of mochi. It’s astonishingly simple to prepare, making it an ideal recipe for anyone juggling a busy lifestyle. Plus, it’s incredibly versatile—you can swap in your favorite cookies, and even make it dairy-free! Picture this: soft, chewy mochi encrusted with crunchy Oreo crumbs, waiting to be devoured by friends and family. Are you ready to elevate your dessert game to new heights? Let’s dive in!
Why Is Oreo Mochi a Must-Try?
Unique Experience: Oreo Mochi delivers a delightful fusion of flavors and textures that will surprise your taste buds. Simplicity: The recipe is straightforward, perfect for busy cooks wanting a sweet treat without complex techniques. Versatile Options: You can easily swap in different cookies for a personalized touch—think chocolate chip or graham crackers! Dairy-Free Friendly: Adapt this dessert to be dairy-free by using almond milk, making it accessible to various dietary needs. And don’t forget to try it with different toppings; if you’re feeling adventurous, drizzle some caramel or chocolate! This treat is sure to impress at any gathering.
Oreo Mochi Ingredients
• Unlock the secrets of this chewy dessert!
Advertisement
For the Mochi Dough
- Glutinous Rice Flour – Essential for that signature chewy texture; sweet rice flour can be a great substitute if needed.
- Cornstarch – Helps achieve a smooth texture; if unavailable, you can use additional glutinous rice flour.
- Cocoa Powder – Adds that rich chocolate goodness; choose Dutch-processed for a gentler flavor.
- White Sugar – Sweetens the mochi; coconut sugar is a wonderful alternative for a deeper taste.
- Corn Oil – Keeps the dough moist; feel free to swap with vegetable oil or melted butter if desired.
- Milk – Hydrates the dough beautifully; almond milk works as a fantastic dairy-free option.
For the Coating
- Oreo Cookies – The star of this dish for the crunchy coating; try swapping with other chocolate sandwich cookies for a new twist!
Make your Oreo Mochi and enjoy the fun experience of crafting delicious, chewy treats!
Step‑by‑Step Instructions for Oreo Mochi
Step 1: Mix Ingredients
In a mixing bowl, whisk together 1 cup of glutinous rice flour, ¼ cup of cornstarch, ¼ cup of cocoa powder, and ½ cup of white sugar until well combined. Gradually stir in ¾ cup of milk and 2 tablespoons of corn oil, mixing until the batter is smooth and free of lumps. This mixture should have a thick consistency that is easily pourable.
Step 2: Sift Batter
To ensure a velvety texture in your Oreo Mochi, pour the combined mixture through a fine sieve into a non-stick pot. This step removes any lumps and creates a perfectly smooth batter. Use a spatula to press any remaining bits through the sieve, ensuring no dry ingredients go to waste.
Step 3: Cook the Batter
Place the pot over low heat and stir the batter continuously with a spatula for about 10 to 15 minutes. As it heats, the mixture will thicken and become glossy, resembling a sticky dough. Keep a close eye on it to prevent burning, and when it reaches a thick, elastic consistency, you’ll know it’s ready for the next step.
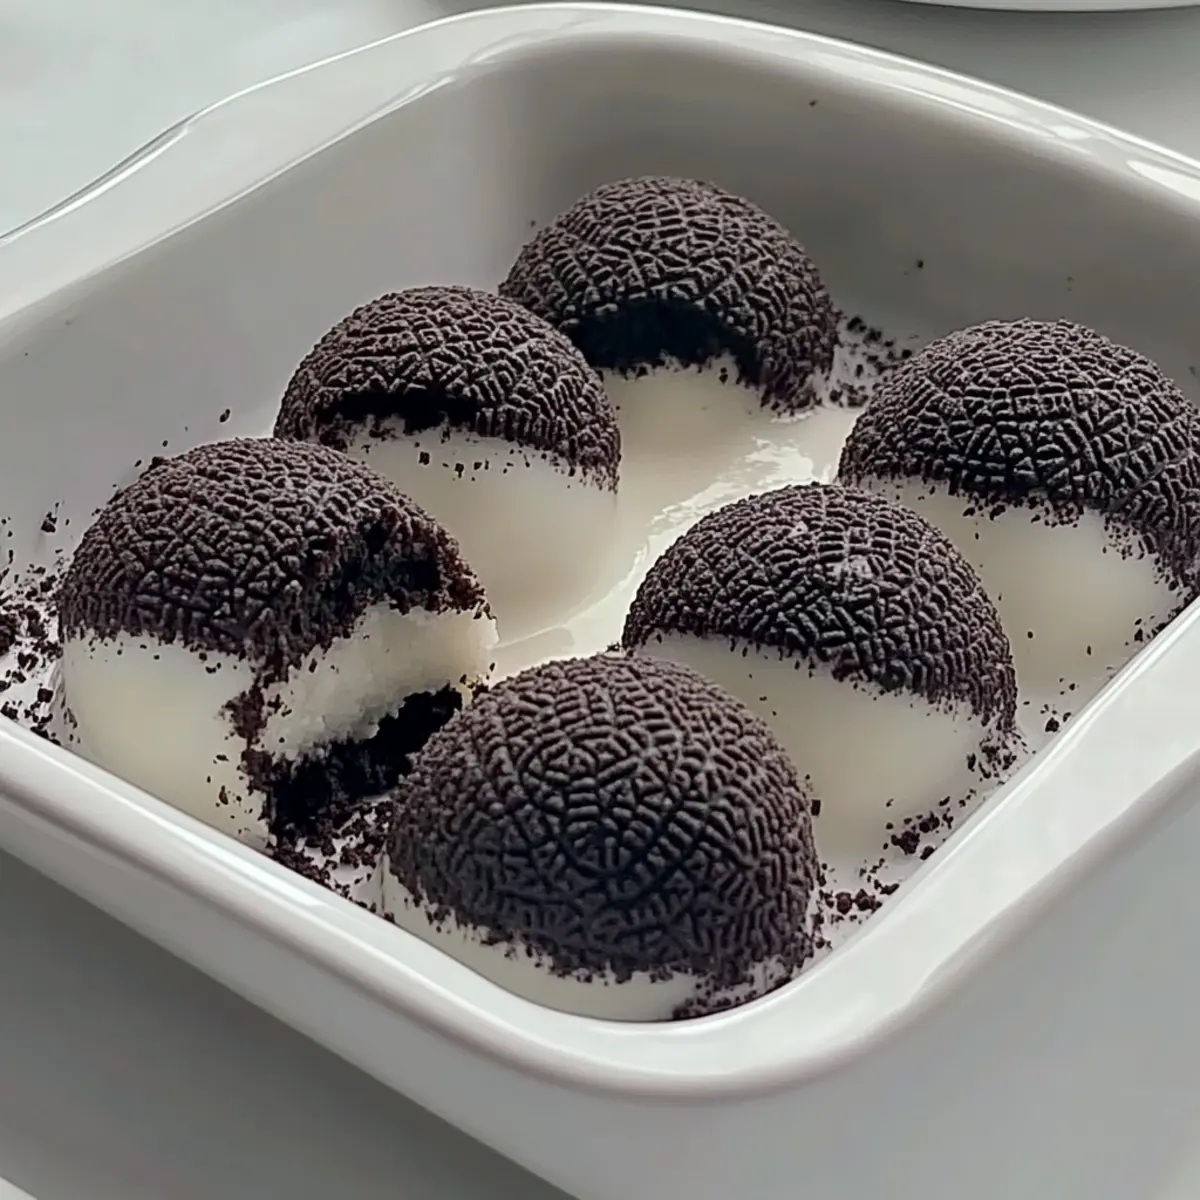
Step 4: Cool and Pull Dough
Once thickened, turn off the heat and transfer the mochi dough onto a cornstarch-dusted surface. Allow it to cool for about 5 minutes, just until it’s comfortable to handle. Knead the dough gently for another minute or two until it becomes elastic and smooth, ensuring it hasn’t hardened too much to mold.
Step 5: Form Mochi Balls
Divide the soft mochi dough into equal portions, about the size of a golf ball. Roll each piece between your palms to create smooth, uniform balls. This step is essential for achieving the classic chewy texture of Oreo Mochi—ensure they are all roughly the same size for even cooking in the next phase.
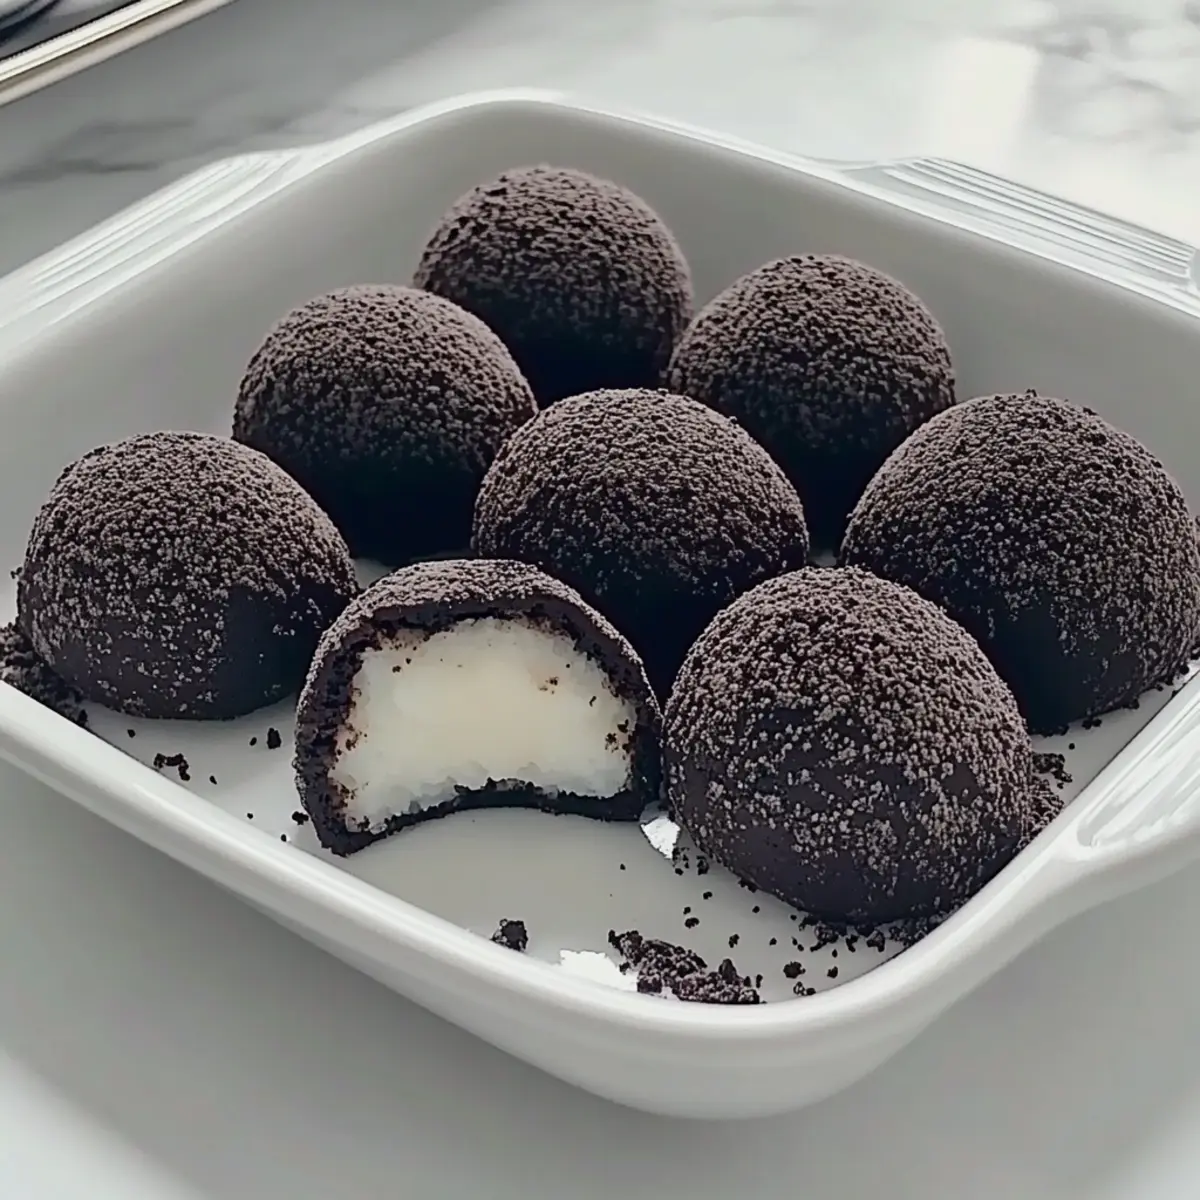
Step 6: Coat with Oreo Crumbs
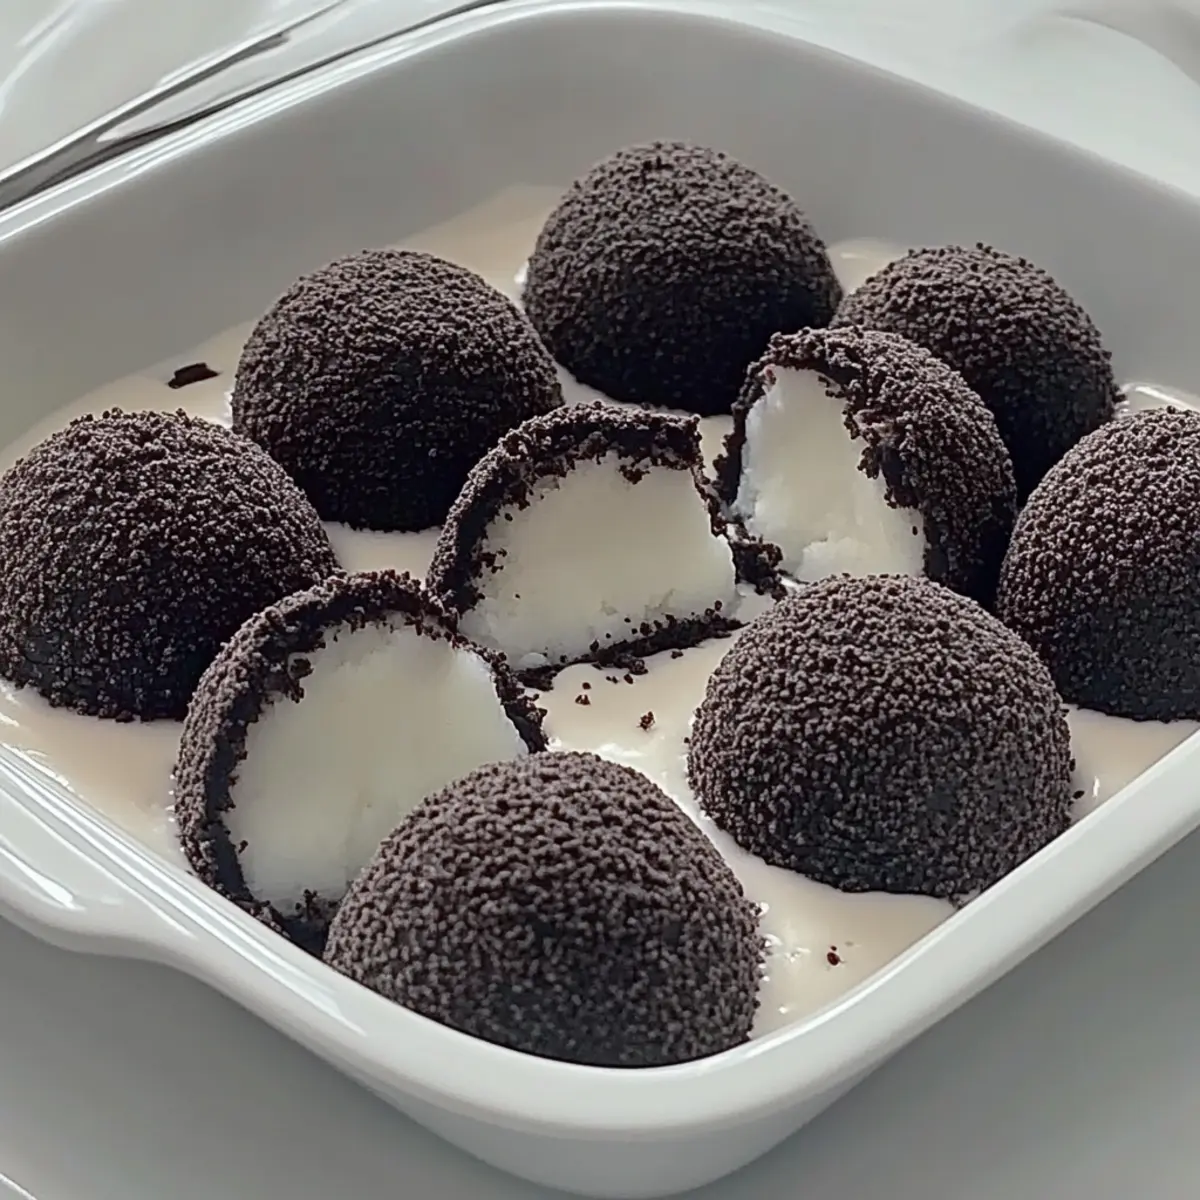
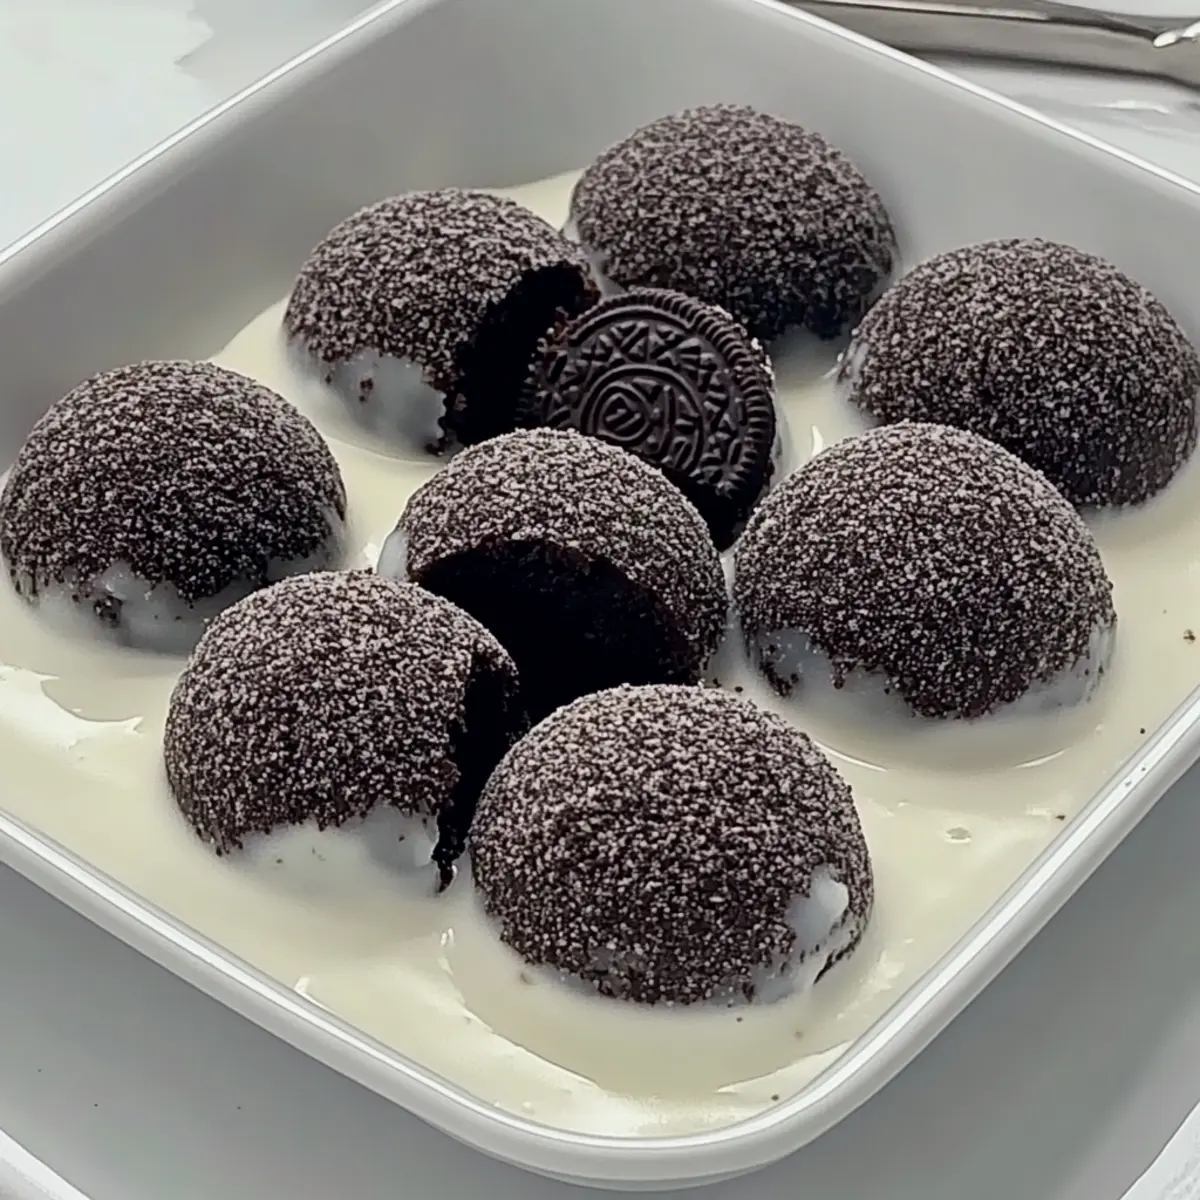
Crush several Oreo cookies into fine crumbs using a resealable bag and a rolling pin or food processor. Roll the mochi balls in the Oreo crumbs until they are thoroughly coated. This adds an irresistible crunchy texture and delicious chocolate flavor to each Oreo Mochi.
Step 7: Chill and Serve
Place the coated Oreo Mochi on a serving platter or a lined baking sheet and refrigerate for about 30 minutes. Chilling helps the mochi set, making them easier to handle and enhancing their chewy texture. Once ready, serve these delightful treats chilled and enjoy a burst of flavor with every bite!
What to Serve with Chewy Oreo Mochi
Experience the magic of pairing these delightful chewy treats with the perfect accompaniments for a memorable dessert spread.
- Fresh Berries: Juicy strawberries or raspberries add a burst of tartness that beautifully contrasts the sweet chocolate flavor of the mochi.
- Whipped Cream: Light and airy, a dollop of whipped cream elevates the dessert’s richness and adds a creamy texture—perfect for scooping!
- Chocolate Drizzle: A warm drizzle of chocolate sauce enhances the indulgence, amplifying the chocolate notes and creating a decadent presentation.
- Green Tea: The earthy bitterness of green tea balances the sweetness, creating a delightful flavor contrast that’s refreshing and sophisticated.
- Coconut Ice Cream: The creamy coconut flavor introduces a tropical element, while its cold temperature contrasts with the chewy mochi for a delightful experience.
- Almond Milk: Serve with a chilled glass of almond milk for a dairy-free option that complements the dessert’s flavors without overwhelming it.
- Mango Sorbet: Bright and fruity, mango sorbet offers a light palate cleanser, making it a refreshing counterpart to the rich Oreo Mochi.
- Chocolate-Covered Almonds: The crunch and rich flavor of chocolate-covered almonds provide an extra textural layer, perfectly complementing the soft mochi experience.
- Matcha Dust: A sprinkle of matcha powder on top creates a beautiful visual and a slightly bitter taste that balances the overall sweetness.
Storage Tips for Oreo Mochi
-
Room Temperature: Keep your Oreo Mochi in an airtight container at room temperature for up to 2-3 days to maintain their chewy texture.
-
Fridge: If you want to store them longer, refrigerate for up to a week, ensuring they are well-wrapped to retain moisture.
-
Freezer: For long-term storage, tightly wrap the mochi in plastic wrap and place them in a freezer bag. They can last in the freezer for up to one month without losing their delightful chewiness.
-
Reheating: To enjoy your frozen Oreo Mochi, simply thaw them at room temperature. If desired, lightly dust with extra Oreo crumbs before serving for added crunch!
Expert Tips for Perfect Oreo Mochi
-
Use Non-Stick Cookware: This prevents the mochi batter from sticking and ensures smooth cooking for your Oreo Mochi.
-
Cool Before Handling: Allow the dough to cool for at least 5 minutes before kneading to avoid burns and make handling easier.
-
Thick Consistency: If your batter ends up too runny, add extra glutinous rice flour until you achieve the right thick, pourable texture.
-
Generous Coating: Make sure to coat your mochi balls thoroughly with Oreo crumbs for maximum flavor and texture contrast.
-
Watch the Heat: Stir continuously over low heat to prevent burning. If it thickens too quickly, reduce the heat and keep stirring!
Make Ahead Options
These Oreo Mochi are perfect for meal prep enthusiasts looking to save time! You can prepare the mochi dough up to 24 hours in advance—simply follow the initial steps and allow the dough to cool before wrapping it tightly in plastic wrap and refrigerating. When you’re ready to enjoy your treats, let the dough come to room temperature, then form the mochi balls and coat them with Oreo crumbs. For optimal freshness, serve the mochi within a few hours after coating, as they taste just as delicious when fresh. This way, you can easily have a delightful dessert ready for any busy weeknight or surprise gathering!
Oreo Mochi Variations & Substitutions
Feel free to explore and personalize your Oreo Mochi experience with these fun twists and substitutions!
- Dairy-Free: Use almond or oat milk instead of regular milk to make the recipe fully dairy-free without sacrificing flavor.
- Cookie Swap: Replace Oreos with chocolate chip cookies or peanut butter cookies for a unique take that adds your favorite flavors.
- Crunchy Coating: Try coating the mochi in crushed pretzels or graham crackers for a delightful crunch and a sweet-and-salty contrast.
- Spicy Kick: Add a pinch of cayenne pepper or cinnamon to the mochi dough for a surprising spicy twist that will get your tastebuds dancing!
- Nutty Flavor: Incorporate finely ground nuts like almonds or hazelnuts into the mochi dough for a richer, nuttier taste and texture.
- Decadent Drizzle: Drizzle melted chocolate or caramel over your mochi for an extra layer of sweetness and elegance at gatherings.
- Toasted Coconut: Roll your mochi in toasted coconut flakes instead of Oreos for a tropical vibe that adds a chewy texture twist.
- Layered Experience: For an exciting treat, make a layered mochi by alternating chocolate and vanilla dough before forming the balls.
As you experiment, consider pairing it with a touch of whipped cream or homemade Bake Peppermint Oreo dessert for an extra indulgence! Enjoy the creative journey!
Oreo Mochi Recipe FAQs
What type of glutinous rice flour should I use for Oreo Mochi?
Absolutely! Glutinous rice flour, also known as sweet rice flour, is essential for achieving that chewy texture in Oreo Mochi. Make sure to choose a fine, high-quality flour to get the best results. If you can’t find glutinous rice flour, you can use sweet rice flour as a perfect substitute.
How should I store my Oreo Mochi?
Keep your Oreo Mochi in an airtight container at room temperature for 2-3 days to enjoy their chewy goodness. If you want to keep them fresh for longer, you can refrigerate them for up to a week. Just remember to wrap them well to maintain moisture!
Can I freeze Oreo Mochi?
Very! Freezing your Oreo Mochis is a great option for long-term storage. Simply wrap them tightly in plastic wrap and place them in a freezer bag. They can be frozen for up to one month. When you’re ready to enjoy them, just let them thaw at room temperature. You might even want to roll them in some extra Oreo crumbs before serving for added crunch!
What should I do if my mochi dough is too sticky?
If your dough is too sticky to handle, don’t worry—it happens to the best of us! Simply dust your hands with cornstarch or glutinous rice flour while kneading. Also, make sure your cooking pot is non-stick or grease it slightly before cooking the batter. If it remains too runny, you can gradually incorporate more glutinous rice flour until you achieve the desired consistency.
Is Oreo Mochi suitable for dairy-free diets?
Definitely! You can easily make Oreo Mochi dairy-free by using almond milk or any other non-dairy milk alternative. It’s a wonderful way to share this delicious treat with friends or family who have dietary restrictions, ensuring everyone can indulge in the pleasure of this chewy dessert!
Delicious Oreo Mochi: A Fun Twist on a Classic Dessert
Ingredients
Equipment
Method
- In a mixing bowl, whisk together glutinous rice flour, cornstarch, cocoa powder, and white sugar until well combined. Gradually stir in milk and corn oil, mixing until the batter is smooth and free of lumps.
- Pour the combined mixture through a fine sieve into a non-stick pot. Use a spatula to press any remaining bits through the sieve.
- Place the pot over low heat and stir the batter continuously with a spatula for about 10 to 15 minutes until it thickens and becomes glossy.
- Once thickened, transfer the mochi dough onto a cornstarch-dusted surface. Allow it to cool for about 5 minutes.
- Divide the soft mochi dough into equal portions and roll each piece to create smooth balls.
- Crush the Oreo cookies into fine crumbs and roll the mochi balls in the Oreo crumbs until thoroughly coated.
- Refrigerate the coated Oreo Mochi for about 30 minutes before serving.