Advertisement
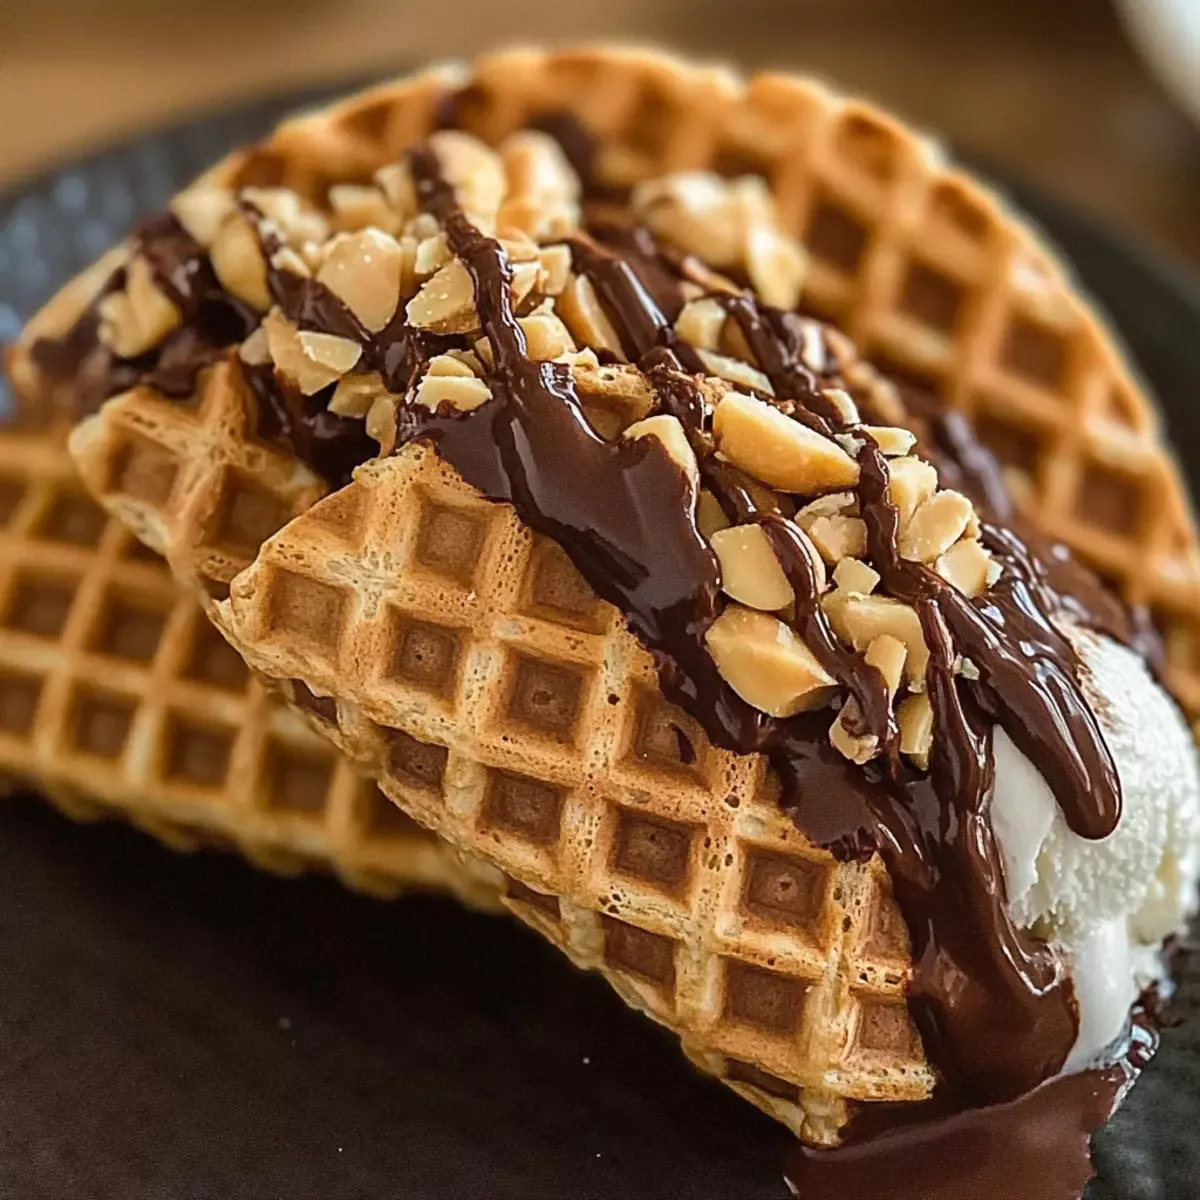
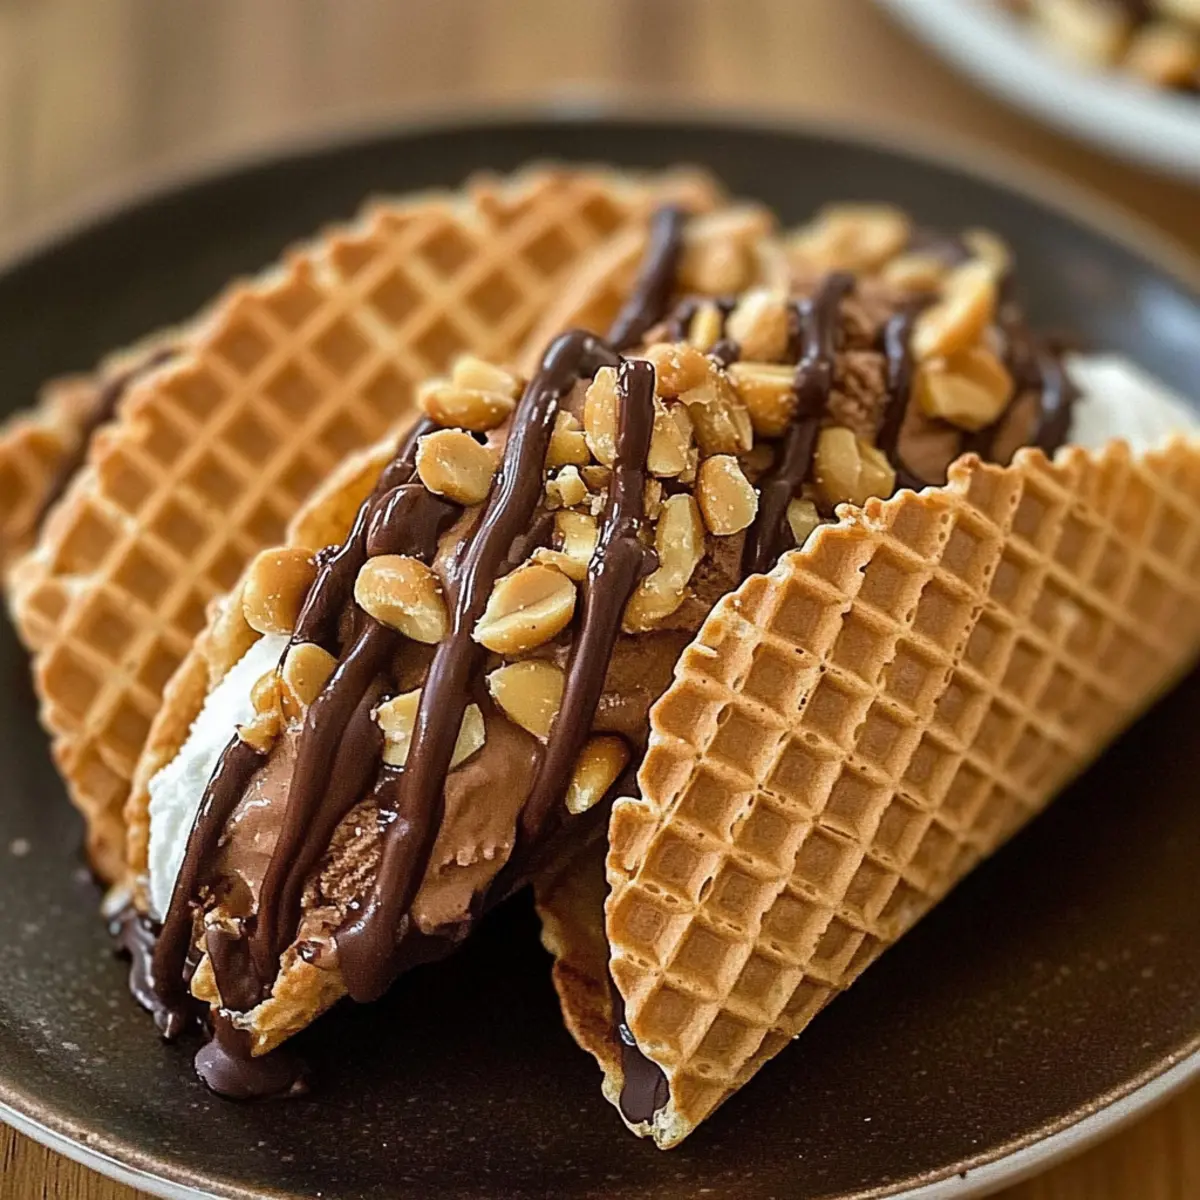
On a sun-drenched afternoon, I stumbled upon an old ice cream truck jingle that reminded me of carefree childhood days, where every stop turned into a mini celebration. This inspired me to recreate those sweet memories with homemade Choco Tacos—an irresistible, nostalgic treat. These delightful frozen creations combine a crispy waffle cone shell with smooth vanilla ice cream, all enveloped in a luscious chocolate coating and topped with your choice of crunchy peanuts or colorful sprinkles. What truly excites me about this recipe is its simplicity, making it a perfect weekend project that’s both fun and budget-friendly. Plus, you can easily customize your toppings, ensuring there’s something for everyone. Ready to take a delicious trip down memory lane with me? Let’s dive into making these scrumptious Homemade Choco Tacos!
Why are Homemade Choco Tacos a Must-Try?
Nostalgic Delight: These homemade Choco Tacos bring back sweet memories from childhood, transforming a simple treat into a delightful experience everyone will love.
Easy to Make: With straightforward steps, you don’t need to be a pro in the kitchen to impress friends and family!
Customizable: From sprinkles to crushed Oreos, the topping variations are endless, promising to tickle every palate.
Perfect for Sharing: Ideal for summer gatherings or family movie nights, these tacos inspire smiles and laughter with each bite.
Gluten-Free Option: You can enjoy this nostalgic treat without the gluten worry by using gluten-free waffle cones!
Check out my Homemade Chocolate Chip cookies for another easy, crowd-pleasing dessert that brings joy to any occasion!
Advertisement
Homemade Choco Tacos Ingredients
• Let’s gather our ingredients for these delightful homemade Choco Tacos!
For the Waffle Shell
- Waffle Cones – Make sure they are slightly damp to allow for easier shaping into taco shells.
For the Filling
- Vanilla Ice Cream – Opt for high-quality vanilla for the best flavor; homemade ice cream can also add a personal touch.
For the Coating
- Chocolate Chips – Choose from dark, milk, or white chocolate based on your taste preference for coating the tacos.
For the Topping
- Peanuts – Sprinkle them on for extra crunch; feel free to substitute with colorful sprinkles for an exciting variation!
Now that we have everything ready, let’s create these delicious homemade Choco Tacos!
Step‑by‑Step Instructions for Homemade Choco Tacos
Step 1: Prepare Your Workspace
Start by clearing and sanitizing your kitchen counter to create a clean workspace. Gather all your ingredients, including waffle cones, vanilla ice cream, chocolate chips, and peanuts. Place a baking sheet lined with parchment paper nearby; this will be crucial for setting your assembled Homemade Choco Tacos later.
Step 2: Dampen the Waffle Cones
Gently dampen your waffle cones with a few drops of water using your fingers or a light spray. This step is vital as it makes the cones more pliable and easier to shape. Set them aside for a few minutes to ensure they soften slightly, which will help maintain their form when shaping into taco shells.
Step 3: Shape the Taco Shells
Carefully shape each soft waffle cone into a taco shape by pressing the bottom edges together while stabilizing the top. Hold the cone in that position for a few seconds to help it maintain the taco form. Once shaped, arrange the cones standing upright on your prepared baking sheet, ready for filling.
Step 4: Fill with Ice Cream
Using a scoop or spoon, generously fill each taco shell with soft vanilla ice cream. Press the ice cream down gently to avoid overflowing and create smooth tops. Make sure to fill them to the brim, allowing for a creamy, delicious experience when you take a bite of your homemade Choco Tacos.
Step 5: Melt the Chocolate Chips
In a microwave-safe bowl, add your choice of chocolate chips. Microwave in 20-second intervals, stirring well after each interval until the chocolate is fully melted and smooth, which usually takes about 1 minute. Ensure the chocolate is warm but not too hot to prevent the ice cream from melting once you coat your tacos.
Step 6: Dip the Ends in Chocolate
Once the chocolate is ready, quickly dip the open end of each filled taco shell into the melted chocolate. Rotate the taco to ensure an even coating, then allow the excess chocolate to drip off back into the bowl. This step not only adds flavor but also creates a beautiful finish on your Homemade Choco Tacos.
Step 7: Add Toppings
While the melted chocolate is still warm and wet, sprinkle a few chopped peanuts or your choice of toppings over the chocolate-covered ends of each taco. This will allow the toppings to stick perfectly. Get creative with your toppings—crushed Oreos or colorful sprinkles can bring even more joy to your delicious treat.
Step 8: Freeze to Set
Carefully place the assembled Homemade Choco Tacos back on the parchment-lined baking sheet. Transfer them to the freezer and let them sit for about 30 minutes, or until the chocolate coating hardens. This step is essential as it ensures the tacos are firm and ready for indulgence on a sunny day.

Homemade Choco Tacos Variations
Feel free to unleash your creativity and customize these delightful treats with unique twists and additions!
-
Chocolate Waffle Cones: Try using chocolate waffle cones for an even richer flavor and a delightful visual appeal.
-
Flavorful Ice Creams: Swap the vanilla ice cream for fun flavors like strawberry or mint to cater to your taste buds and make each taco a new adventure!
-
Mini M&M’s: Instead of peanuts, add mini M&M’s on top for a pop of color and extra sweetness that will thrill kids and adults alike.
-
Toasted Coconut: For a tropical touch, sprinkle toasted coconut flakes over the chocolate after dipping, creating an irresistible coconut-chocolate combination.
-
Spicy Twist: Add a sprinkle of cayenne pepper or chili powder to the chocolate for a surprising kick that will tantalize your senses and elevate your homemade dessert.
-
Nut Butter Drizzle: After dipping in chocolate, drizzle warm almond or peanut butter over each taco for an added layer of creamy goodness.
-
Crushed Cookies: Replace peanuts with crushed Oreo or graham cracker crumbs for a delicious crunch that enhances the nostalgic aspect of the Choco Tacos.
-
Fruit Toppings: Fresh berries or banana slices can be added inside the tacos for a fruity burst that beautifully contrasts with the sweet ice cream.
While you’re at it, why not explore my delightful Homemade Black Forest cake for another twist on classic flavors? Or dip your toes into the world of indulgence with my Creamy White Chocolate and Biscoff Swirl Cheesecake that will have everyone asking for seconds!
How to Store and Freeze Homemade Choco Tacos
Fridge: Store any leftovers in an airtight container in the fridge for up to 2 days. This helps maintain their flavor, though best enjoyed when fresh.
Freezer: To keep your Homemade Choco Tacos firm and delicious, place them in an airtight container in the freezer. They will last for up to 2 weeks, perfect for spur-of-the-moment cravings!
Reheating: There’s no need to reheat these frozen delights. Simply take them out of the freezer and enjoy them straight away for the best texture and taste.
Make-Ahead Tip: Assemble your tacos a day ahead, individually wrap them in plastic wrap, and keep them in the freezer to save time during special occasions or summer gatherings.
Make Ahead Options
These Homemade Choco Tacos are a fantastic treat to prepare ahead of time, saving precious moments on busy days! You can assemble the tacos up to 24 hours in advance; just wrap each one individually in plastic wrap and store them in the freezer to maintain that delightful crunch. For best results, ensure the chocolate coating is completely set before wrapping to prevent smudging. When you’re ready to serve, simply take them out of the freezer and enjoy straight away—no need for further preparation! With these make ahead tips, you can indulge in these nostalgic delights with minimal effort, making it a breeze to treat your family!
Expert Tips for the Best Homemade Choco Tacos
-
Dampen Wisely: Ensure the waffle cones are only slightly damp, as too much moisture can cause them to tear when shaping into taco shells.
-
Quality Counts: Use premium vanilla ice cream for a richer flavor. Homemade ice cream elevates your Homemade Choco Tacos to a whole new level!
-
Speed is Key: Dip the cone in warm chocolate quickly to prevent the ice cream from melting. Have toppings ready to go for a seamless process.
-
Chill Out: Don’t skip freezing! Allow the tacos to set for at least 30 minutes to ensure a firm chocolate coating and maintain the integrity of your treat.
-
Variety is Fun: Experiment with various chocolate types and toppings, like crushed nuts or colorful sprinkles, to keep each batch of Homemade Choco Tacos exciting!
What to Serve with Homemade Choco Tacos?
Enhance your summer get-togethers with delightful pairings that complement these sweet, nostalgic frozen treats.
- Fresh Berries: The juiciness of strawberries, blueberries, or raspberries balances the sweetness of Choco Tacos, offering a refreshing burst of flavor.
- Chocolate Sauce: A silky drizzle of chocolate sauce adds an extra layer of indulgence, perfect for those who crave more chocolate with their tacos.
- Whipped Cream: Light and airy, a dollop of whipped cream adds a creamy texture that harmonizes beautifully with the crispy and crunchy elements.
- Root Beer Floats: The fizzy sweetness of a classic root beer float pairs perfectly with Choco Tacos for a nostalgic feel, reminiscent of childhood summers.
- Ice Cream Sundaes: For those seeking variety, serving an ice cream sundae alongside offers a playful way to enjoy different flavors and toppings.
- Salted Caramel Drizzle: A bit of salted caramel drizzled over the tacos adds a salty-sweet contrast that elevates their deliciousness to new heights.
- Lemonade Spritzers: The bright, tart flavor of lemonade spritzers invigorates the palate, providing a refreshing contrast to the creamy Choco Tacos.
- Mini Fruit Skewers: Colorful skewers of seasonal fruits lend a vibrant and healthy touch to your dessert table while keeping the mood light and fun.

Homemade Choco Tacos Recipe FAQs
How do I select the best waffle cones for my Choco Tacos?
Absolutely! When choosing waffle cones, look for ones that are sturdy and free from cracks. They should be slightly damp and pliable for easy shaping. Ensure there are no dark spots all over, which can indicate stale cones that may not hold up well.
How should I store leftover Homemade Choco Tacos?
For the freshest taste, store your leftover Homemade Choco Tacos in an airtight container in the fridge for up to 2 days, or freeze them for up to 2 weeks. This keeps them firm and ready for a quick treat! Just make sure they are wrapped individually if freezing, to maintain their shape and quality.
Can I freeze the assembled Choco Tacos?
Yes! After assembling your Choco Tacos, wrap each one in plastic wrap and place them in an airtight container. You can freeze them for up to 2 weeks. When ready to enjoy, simply remove them from the freezer and indulge in their delightful crunch without thawing!
What if my chocolate coating doesn’t stick properly to the cones?
Very! If your chocolate doesn’t adhere well, it might be due to the chocolate being too cool. Make sure the chocolate is warm but not hot when dipping—this ensures a smoother coating. You can also press the toppings slightly into the chocolate right after dipping for better adhesion.
Are there any dietary considerations for my Homemade Choco Tacos?
Certainly! To make these Choco Tacos gluten-free, choose gluten-free waffle cones and check that all other ingredients, like chocolate chips, are gluten-free. If you have nut allergies, substitute peanuts with seeds or colorful sprinkles. Always double-check labels for any potential allergens when preparing.
How do I make my Homemade Choco Tacos extra special?
To amplify the flavors, consider using flavored ice creams or different chocolate types, like dark or white chocolate. You could also mix in fun toppings like crushed candy bars or a drizzle of caramel for a gourmet twist. Enjoy experimenting to suit your taste!
Delightful Homemade Choco Tacos for a Nostalgic Treat
Ingredients
Equipment
Method
- Prepare Your Workspace: Clear and sanitize your kitchen counter. Gather ingredients and line a baking sheet with parchment paper.
- Dampen the Waffle Cones: Lightly dampen the waffle cones to make them pliable.
- Shape the Taco Shells: Form the dampened waffle cones into taco shapes and place them upright on the baking sheet.
- Fill with Ice Cream: Generously fill each taco shell with vanilla ice cream.
- Melt the Chocolate Chips: Melt chocolate chips in a microwave-safe bowl, stirring until smooth.
- Dip the Ends in Chocolate: Dip the open end of each taco shell into the melted chocolate.
- Add Toppings: While the chocolate is warm, sprinkle chopped peanuts or your choice of toppings onto the chocolate-covered ends.
- Freeze to Set: Place assembled tacos on the baking sheet and freeze for about 30 minutes until chocolate hardens.