Advertisement
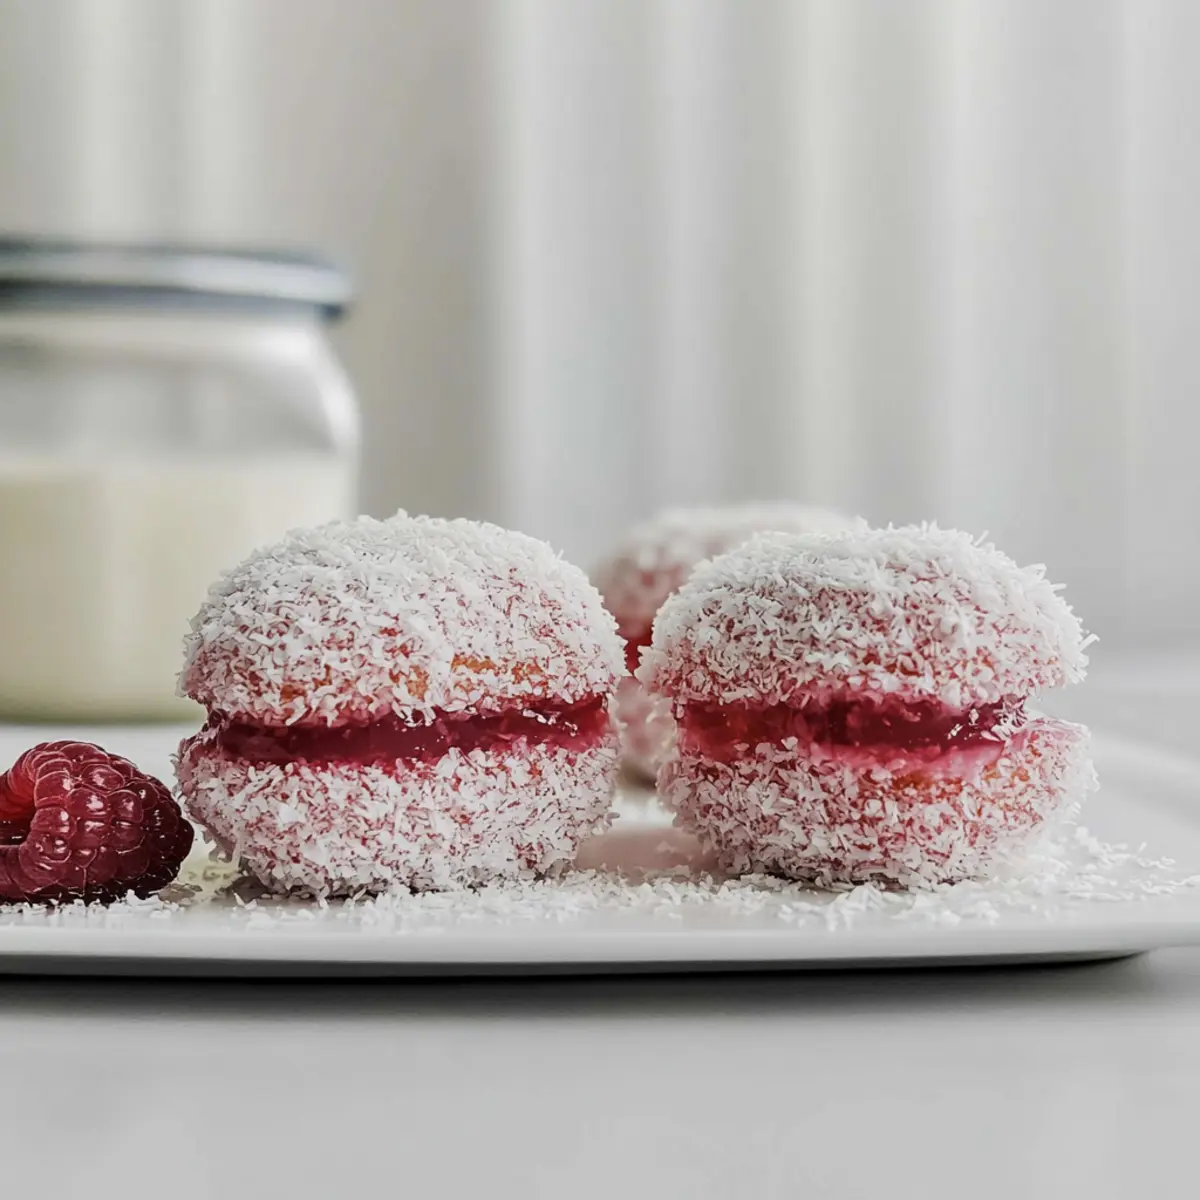
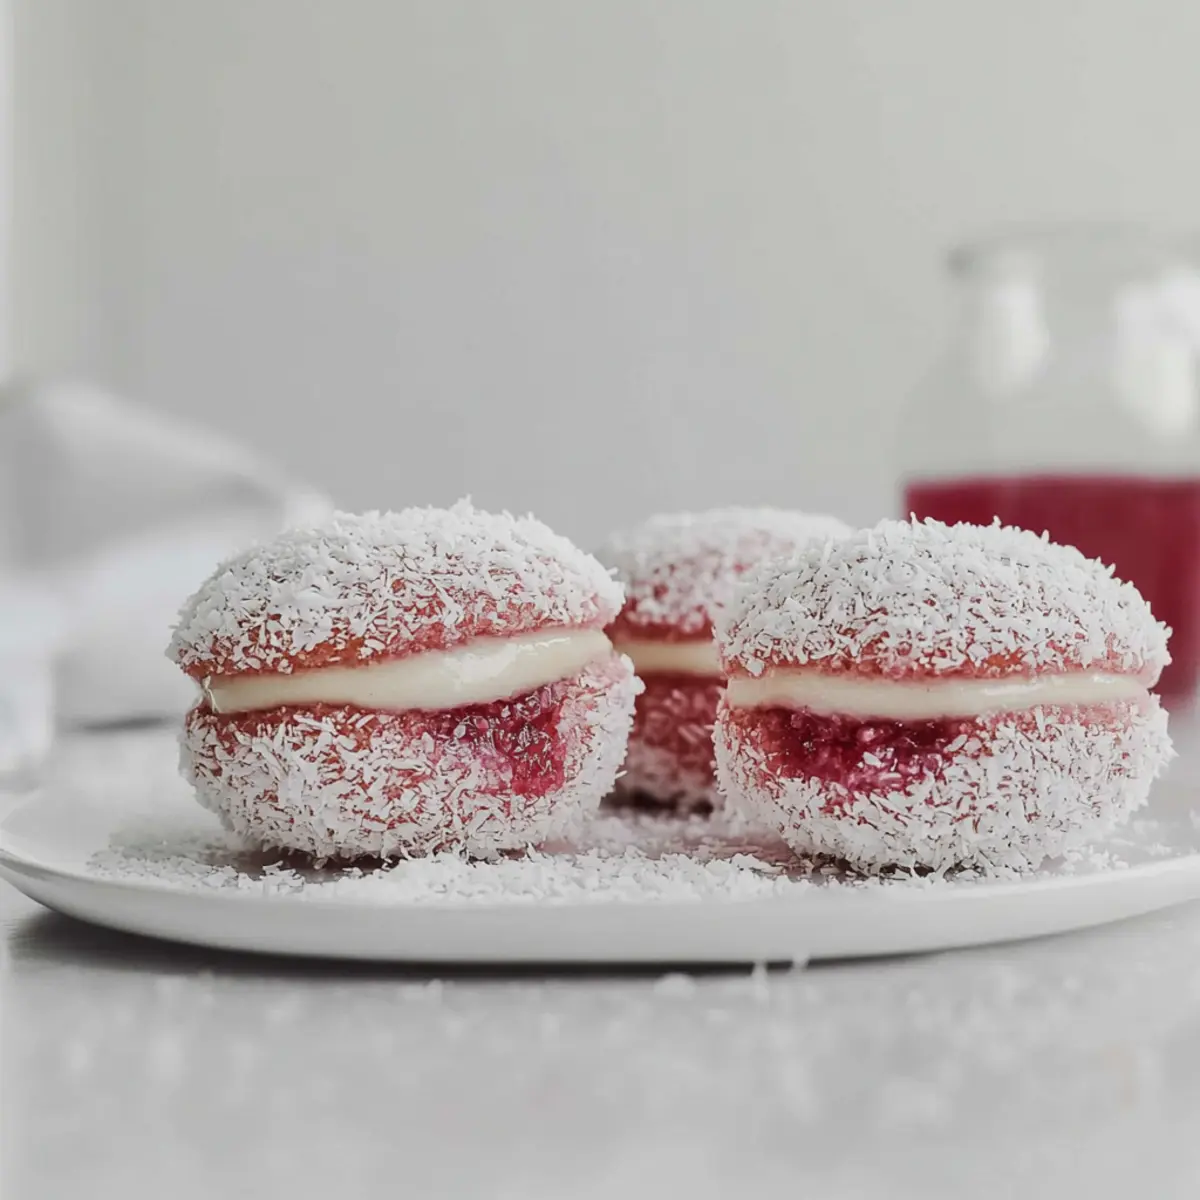
As I stood in my kitchen, a beautiful memory danced through my mind—the joy of indulging in light, spongy Australian Jelly Cakes at birthday parties as a child. These stunning mini treats, with their fluffy sponge and creamy filling, are the perfect antidote to any craving for quick, homemade desserts. The classic Australian Jelly Cakes not only bring back a wave of nostalgia but also make for a charming centerpiece at any gathering. With their quick prep time and visually appealing presentation, they’re an easy bake that brings a smile to everyone’s face. Whether you’re hosting an afternoon tea or simply looking to impress your family, these delightful cakes are sure to elevate any occasion. Curious to uncover the magic behind these nostalgic beauties? Let’s dive into the recipe!

Why Are Jelly Cakes So Irresistible?
Nostalgia shines through with every bite of these delightful Jelly Cakes, transporting you back to joyful childhood gatherings. Easy baking means that even novice chefs can tackle this recipe with confidence. Impressive presentation makes them perfect for parties or afternoon tea, captivating guests with their vibrant colors and fluffy texture. Versatility allows for flavor swaps with various jelly options, catering to your personal taste. Light and fluffy, these cakes offer a delightful combination that’s both comforting and crowd-pleasing, guaranteeing smiles all around. If you’re also looking to try more delightful treats, consider making Buttermilk Pancakes Breakfast or Creamsicle Mini Cheesecakes for your next gathering!
Jelly Cakes Ingredients
• Get ready to bake these delightful jelly treats with the following ingredients:
Advertisement
For the Sponge Cakes
- Butter – This provides richness and moisture; remember to use it at room temperature for easy creaming.
- Caster Sugar – Adds sweetness and helps create a fine texture; you can substitute granulated sugar if needed.
- Eggs – Acts as a binder for structure; use large, lightly beaten eggs for best results.
- Vanilla Extract – Enhances the richness of flavor; feel free to substitute with almond extract for a unique twist.
- Self-Raising Flour – For structure and leavening; you can also use all-purpose flour mixed with baking powder (1 cup flour + 1.5 tsp baking powder).
- Milk – Adds moisture and aids in making a tender crumb; opt for room temperature milk for optimal results.
For the Jelly Coating
- Raspberry Jelly Crystals – The signature ingredient giving Jelly Cakes their flavor and color; ensure it’s raspberry-flavored, not jam.
- Boiling Water – Necessary for dissolving jelly crystals.
- Cold Water – Used to adjust the temperature for setting the jelly.
For the Filling and Topping
- Chantilly Cream – Provides a rich and creamy filling; use heavy whipping cream for best whipping results.
- Desiccated Coconut – Adds texture and visual appeal; can be swapped with finely chopped nuts if you prefer.
Embrace these ingredients and enjoy the process of creating your very own nostalgic jelly cakes!
Step‑by‑Step Instructions for Jelly Cakes
Step 1: Prepare Jelly Coating
Begin by dissolving raspberry jelly crystals in 1 cup of boiling water, stirring well until completely dissolved. Then, combine with ½ cup of cold water to cool the mixture slightly. Pour the jelly into a bowl and refrigerate for 1 to 2 hours. It should thicken to a syrupy consistency but remain runny, ready for dipping your finished cakes.
Step 2: Make Patty Cakes
Preheat your oven to 180°C (350°F) and lightly spray patty pans with non-stick cooking spray to prevent sticking. In a mixing bowl, cream together 125g of room-temperature butter and 150g of caster sugar until the mixture appears light and fluffy, about 3 to 4 minutes. Gradually add in 2 lightly beaten eggs and 1 teaspoon of vanilla extract, mixing smoothly.
Step 3: Combine Ingredients
Next, alternate adding 1 cup of self-raising flour and ¼ cup of milk to the butter mixture, folding gently until just combined. Be careful not to overmix, as we want our sponge cakes to remain light and airy. Scoop spoonfuls of the batter into your prepared patty pans, filling them about two-thirds full to allow for rising.
Step 4: Bake the Cakes
Place the filled patty pans in the preheated oven and bake for around 15 minutes. Keep an eye on them; they should turn a lovely golden color and spring back when lightly pressed. Once baked, remove the pans from the oven, allowing them to cool in the pans for about 5 to 10 minutes before transferring to a wire rack to cool completely.
Step 5: Cool and Assemble
Once the cakes are cool, check if the dome tops need leveling for an even sandwich. You can gently trim them if necessary. Meanwhile, prepare the Chantilly cream by whipping 1 cup of heavy whipping cream, 2 tablespoons of caster sugar, and 1 teaspoon of vanilla extract until stiff peaks form, resulting in a luscious filling for our Jelly Cakes.
Step 6: Coat and Fill
Dip each sponge cake into the prepared jelly, ensuring they are completely coated, and then roll them in desiccated coconut for a delightful finish. On the flat side of half of the cakes, pipe a generous amount of the whipped Chantilly cream, creating a charming layer of creamy goodness, before sandwiching them with the remaining sponges.
Step 7: Final Chill Before Serving
After assembling your delicious Jelly Cakes, refrigerate them for about 30 minutes. This allows the jelly coating to set perfectly and the flavors to meld together. Once chilled, these charming mini desserts are ready to serve, bringing a wave of nostalgia to your table, perfect for any gathering or afternoon tea!
What to Serve with Classic Australian Jelly Cakes?
Treat your guests to a full experience around these delightful mini sponge cakes that are perfect for any gathering.
-
Fresh Berries: A vibrant mix of strawberries, blueberries, and raspberries adds a refreshing tang that balances the sweetness of the jelly cakes beautifully. Their juiciness enhances each bite, making it an irresistible combination.
-
Vanilla Ice Cream: An indulgent scoop of vanilla ice cream melts effortlessly into the delicate sponge, creating a heavenly contrast of textures—a true delight for dessert lovers.
-
Sparkling Lemonade: The zesty fizz of sparkling lemonade complements the sweetness of the jelly cakes, offering a refreshing burst that’s perfect for warm days or celebratory occasions.
-
Chocolate Mousse: A rich chocolate mousse can create a delightful contrast with the fluffy sponge, elevating the dessert experience to another level of indulgence.
-
Lemon Curd Tart: This tart’s tangy notes pair wonderfully with the sweet jelly, providing a lovely balance of flavors that will leave your guests wanting more.
-
Creamy Hot Chocolate: For cozy get-togethers, serve the jelly cakes with a cup of creamy hot chocolate. The warm, rich drink perfectly complements the sponge’s lightness.
-
Coffee or Tea: A classic choice, serving cafe-style espresso or a fragrant chai tea alongside the jelly cakes encourages a leisurely, enjoyable experience as you reminisce over childhood memories.
-
Fruit Salad: Combine seasonal fruits for a fresh salad that brightens the plate and enhances the nostalgic vibe of the jelly cakes, making the whole meal feel light and cheerful.
Make Ahead Options
These classic Australian Jelly Cakes are perfect for meal prep enthusiasts looking for a delightful dessert that saves time! You can prepare the sponge cakes up to 24 hours in advance; simply bake them and let them cool completely, then store them in an airtight container in the refrigerator. Additionally, the raspberry jelly can be made and set up to 3 days ahead—just refrigerate it after mixing and before dipping the cakes. When you’re ready to serve, coat the chilled cakes with the jelly, roll them in coconut, pipe in the Chantilly cream, and assemble them for that fresh, delightful finish. With these simple preparations, your Jelly Cakes will still be just as delicious, bringing joy to any gathering without last-minute stress!
Expert Tips for Jelly Cakes
-
Room Temperature Butter: Ensure your butter is at room temperature for easier creaming, which will result in a lighter sponge texture for your Jelly Cakes.
-
Gentle Mixing: Fold in the flour and milk carefully to avoid overmixing the batter. This step is crucial to maintain the light and fluffy quality of your cakes.
-
Jelly Consistency: Allow the jelly to thicken but remain syrupy before dipping your cakes. If it’s too set, it won’t adhere properly.
-
Cooling Time: Let the cakes cool in the pans before transferring them to a wire rack. This prevents them from breaking and maintains their structure.
-
Chill Before Serving: Refrigerate your assembled Jelly Cakes for at least 30 minutes. This helps the flavors meld and ensures the jelly coating sets perfectly, making for a delightful presentation.
Jelly Cakes Variations & Substitutions
Feel free to get creative and adapt these classic Jelly Cakes to your taste, making each bite uniquely yours!
- Fruit Flavors: Swap raspberry jelly with strawberry, passionfruit, or even mango for a vibrant twist on the traditional flavors. Each fruit adds a delightful new note!
- Gluten-Free: Substitute self-raising flour with a gluten-free blend to enjoy these cakes without gluten. They’ll be just as fluffy and delicious!
- Dairy-Free: Use coconut cream instead of Chantilly cream for a rich, dairy-free filling that complements the sweet jelly perfectly.
- Nuts Galore: Add finely chopped nuts to the cake batter for an extra crunch or swap desiccated coconut with nuts for added texture and flavor.
- Berries Between: For a berry boost, layer fresh berries like strawberries or blueberries between the sponge cakes and the cream; this adds a refreshing seasonal touch!
- Chocolate Drizzle: Drizzle melted chocolate over the set jelly for a beautifully indulgent finish. The sweetness of chocolate blends splendidly with the fruit jelly!
- Zesty Twist: Add a teaspoon of lemon or orange zest to the cake batter to awaken the flavors and create a fresh aroma that complements the jelly beautifully.
- Spiced Version: Incorporate a dash of cinnamon or nutmeg into the sponge mixture for a warm, nostalgic flavor that’ll surprise your taste buds!
These variations not only make the recipe more versatile but can also tantalize your taste buds in different ways. Don’t forget to check out my delightful Chocolate Chip Cupcakes for another sweet option to share with your loved ones!
How to Store and Freeze Jelly Cakes
-
Fridge: Store your assembled jelly cakes in an airtight container in the refrigerator for up to 2 days. This will keep them fresh while retaining the delightful jelly coating and creamy filling.
-
Freezer: For longer storage, you can freeze unassembled sponge cakes. Wrap them individually in plastic wrap and place them in an airtight container for up to 3 months. Thaw at room temperature before assembling.
-
Reheating: If you’ve frozen the cakes, avoid reheating them, as this may alter their texture. Instead, allow them to thaw, and then coat with jelly and cream for the best results.
-
Make-Ahead Tips: To enjoy fresh jelly cakes without hassle, bake and store the sponge cakes ahead of time. Simply assemble with jelly and cream on the day of serving for optimal taste and presentation.
Classic Australian Jelly Cakes Recipe FAQs
What type of butter should I use for the sponge cakes?
Absolutely! It’s best to use unsalted butter at room temperature for easy creaming. This will help achieve a light and fluffy texture in your sponge cakes, making them all the more delightful.
How should I store my assembled Jelly Cakes?
To maintain peak freshness, store your assembled jelly cakes in an airtight container in the refrigerator for up to 2 days. This keeps the jelly coating and creamy filling intact while preserving their charming texture.
Can I freeze Jelly Cakes?
Yes! You can freeze the unassembled sponge cakes by wrapping them individually in plastic wrap and placing them in an airtight container. They’ll stay fresh for up to 3 months. When you’re ready to enjoy them, simply thaw at room temperature and then coat with jelly and cream.
My jelly coating didn’t set properly. What went wrong?
No worries! If your jelly isn’t thickening, ensure that you allow it to chill for the recommended time (1-2 hours) in the refrigerator. It should be thick enough to coat the cakes but still runny. If it hardens too much, just reheat briefly until it’s at the right consistency.
Are there any allergens in the Jelly Cakes?
Yes, the Jelly Cakes contain common allergens like eggs and dairy (butter and cream). If you’re serving guests with allergies, consider using egg substitutes and dairy-free alternatives like coconut cream or almond milk for a delicious variation.
Delightful Jelly Cakes: A Nostalgic Treat for Every Occasion
Ingredients
Equipment
Method
- Dissolve raspberry jelly crystals in 1 cup of boiling water. Stir until dissolved and mix with ½ cup of cold water. Refrigerate for 1 to 2 hours.
- Preheat oven to 180°C (350°F). Lightly spray patty pans with non-stick spray. Cream butter and sugar until light and fluffy (3-4 minutes).
- Gradually add in eggs and vanilla extract, mixing well. Alternately add self-raising flour and milk until just combined, careful not to overmix.
- Scoop batter into prepared patty pans, filling two-thirds full. Bake for around 15 minutes until golden and springy.
- Remove from oven and let cool in pans for 5-10 minutes. Transfer to wire rack to cool completely.
- Level the tops of the cooled cakes if necessary. Whip cream with sugar and vanilla until stiff peaks form.
- Dip each cake into the jelly, then roll in coconut. Pipe cream on flat sides of half the cakes and sandwich with remaining halves.
- Refrigerate assembled cakes for 30 minutes to set jelly and meld flavors. Serve and enjoy!