Advertisement
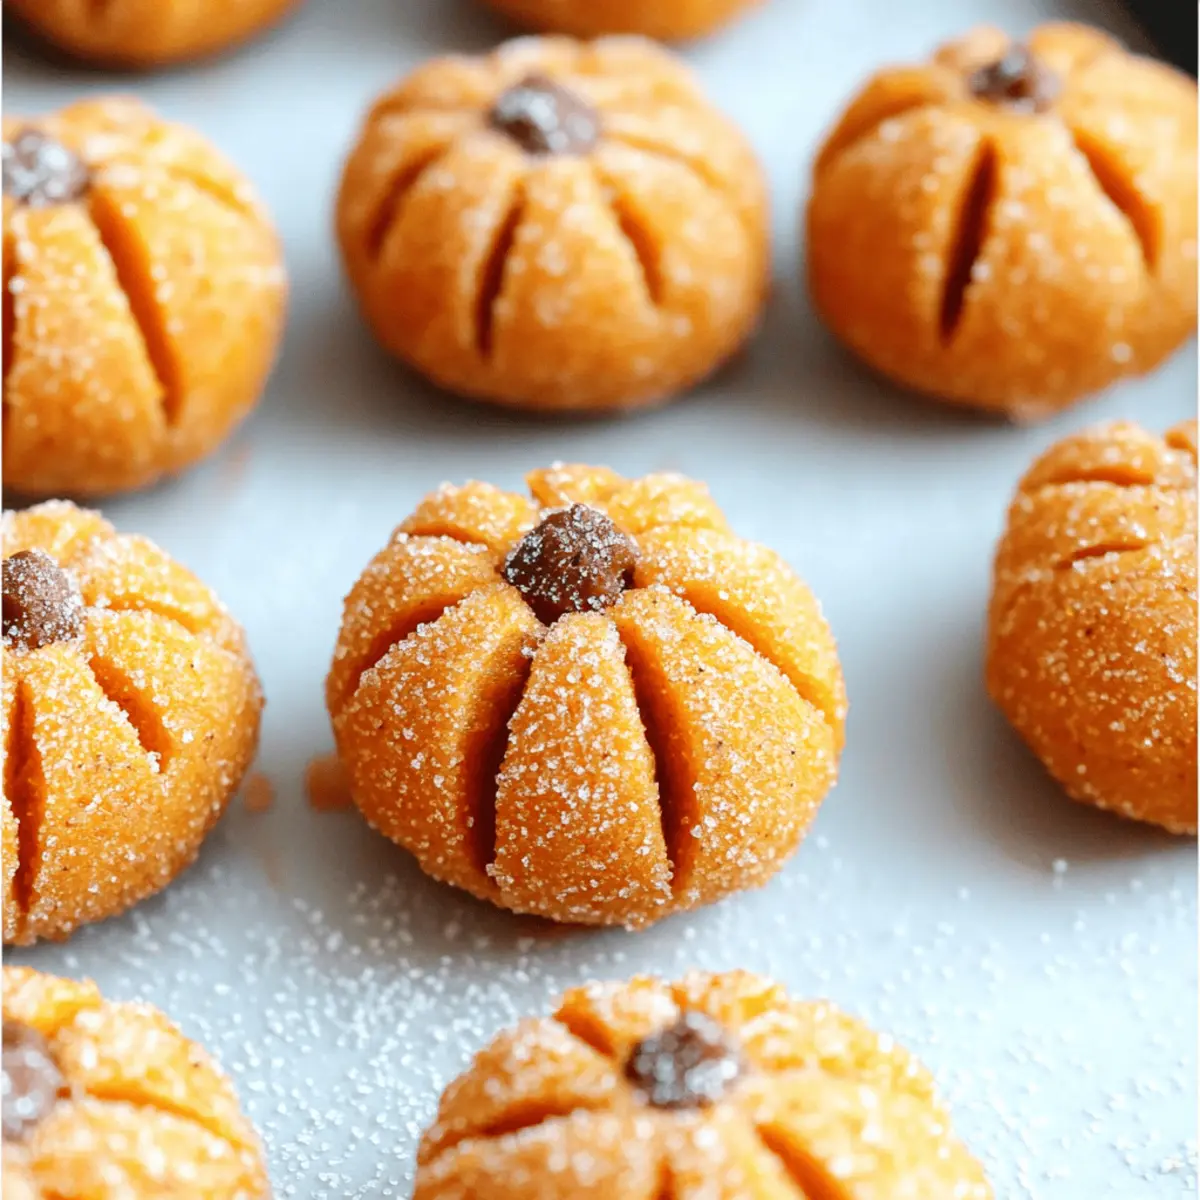
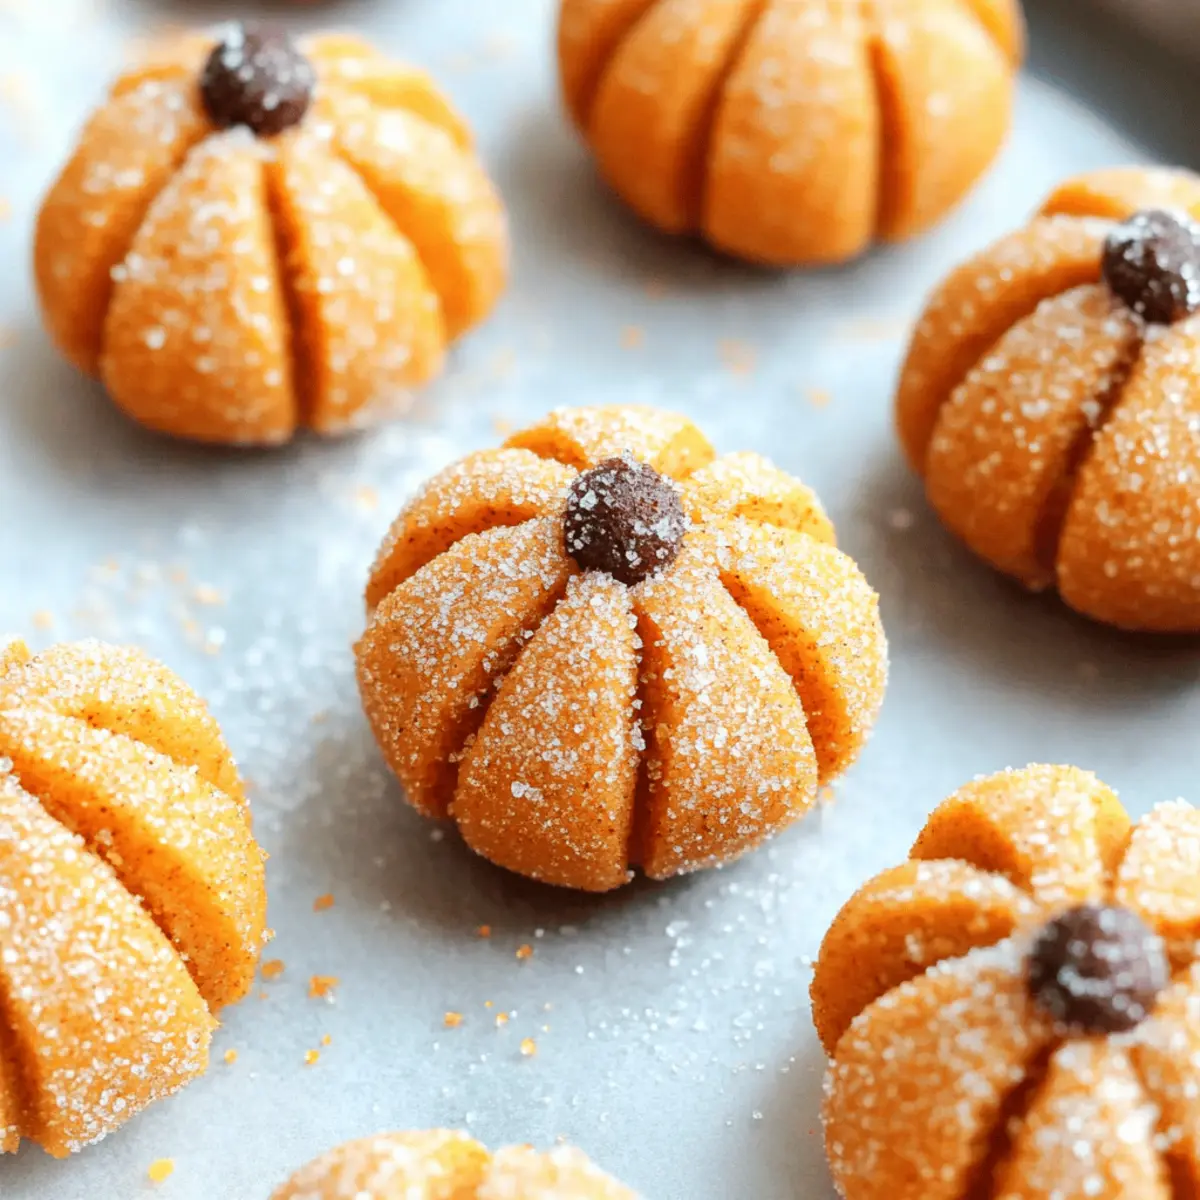
As the leaves turn and the scent of cinnamon fills the air, my kitchen transforms into a cozy autumn retreat. This year, I decided to capture the essence of fall in a treat that’s as delightful to look at as it is to eat: Pumpkin Cheesecake Truffles. These no-bake wonders not only bring together rich, creamy flavors but also offer a festive touch perfect for any fall gathering. With their charming pumpkin shape and the lovely crunch of graham cracker crumbs, they’re sure to impress friends and family, making them a go-to for Halloween parties and Thanksgiving feasts alike. So, why wait? Let’s dive into this easy, gluten-free recipe that will make dessert feel like a warm hug. Are you ready to roll up your sleeves and get started?
Why Are Pumpkin Cheesecake Truffles Perfect?
Indulgent, these Pumpkin Cheesecake Truffles deliver that rich, creamy flavor of pumpkin cheesecake in a fun, bite-sized format! No-Bake Convenience: You can whip them up quickly without turning on the oven—ideal for those hectic fall days. Festively Appealing: Their adorable pumpkin shapes make them a hit at any autumn gathering. Customizable Options: With simple swaps like dark chocolate or nuts, you can personalize them to match your taste. For more fall vibes, check out my Cinnamon Sugar Pumpkin treat for a lovely pairing!
Pumpkin Cheesecake Truffle Ingredients
-
For the Truffles
-
Cream Cheese – Provides a creamy base and richness; can be substituted with vegan cream cheese for a dairy-free option.
-
Canned Pumpkin Puree – Adds moisture and the signature pumpkin flavor; ensure it’s pure pumpkin without added spices for best results.
-
Graham Cracker Crumbs – Adds structure and a pleasant crunch; opt for gluten-free crackers to make this a gluten-free dessert.
-
White Chocolate Chips – Acts as a binder and adds sweetness; can be swapped with dark or almond chocolate for a different taste profile.
-
Pumpkin Pie Spice – Infuses aromatic flavors of fall into the truffles; substitute with cinnamon, nutmeg, and ginger mix if needed.
-
Sweetened Condensed Milk – Essential for sweetness and creaminess; can be replaced with coconut condensed milk for a dairy-free version.
-
Butter – Enhances flavor and texture; use unsalted for better seasoning control.
-
For the Coating
-
Granulated Sugar – Adds sweetness and sparkle to the truffles; roll in just before serving to prevent them from getting “sweaty.”
These delightful pumpkin cheesecake truffles will be the highlight of any fall gathering, combining flavor and festivity in every luscious bite!
Advertisement
Step‑by‑Step Instructions for Pumpkin Cheesecake Truffles
Step 1: Heat the Mixture
In a medium saucepan over medium-low heat, combine the cream cheese, canned pumpkin puree, butter, pumpkin pie spice, and sweetened condensed milk. Stir continuously for about 5–7 minutes until the mixture becomes smooth and thickened, resembling a creamy sauce. Keep an eye on it to avoid sticking to the pan, as you want a rich consistency.
Step 2: Fold in the Ingredients
Once the mixture is smooth, remove it from heat and gently fold in the white chocolate chips and graham cracker crumbs. Continue stirring for another 2–3 minutes until the mixture pulls away from the edges of the pan, taking on a dough-like texture. This is crucial for forming your delightful pumpkin cheesecake truffles later.
Step 3: Chill and Firm Up
Transfer the mixture to a buttered baking sheet, spreading it out evenly. Allow it to chill in the refrigerator for at least 2 hours, or until firm enough to handle. This step is essential to ensure the truffles hold their shape when rolled into balls, creating that perfect bite-sized treat everyone will love.
Step 4: Shape the Truffles
After chilling, take small portions of the mixture and roll them between your hands to form small balls, about 1 inch in diameter. The mixture should be firm but malleable. If it feels sticky, lightly butter your hands to make shaping easier. This is where your pumpkin cheesecake truffles begin to take their form.
Step 5: Coat with Sugar
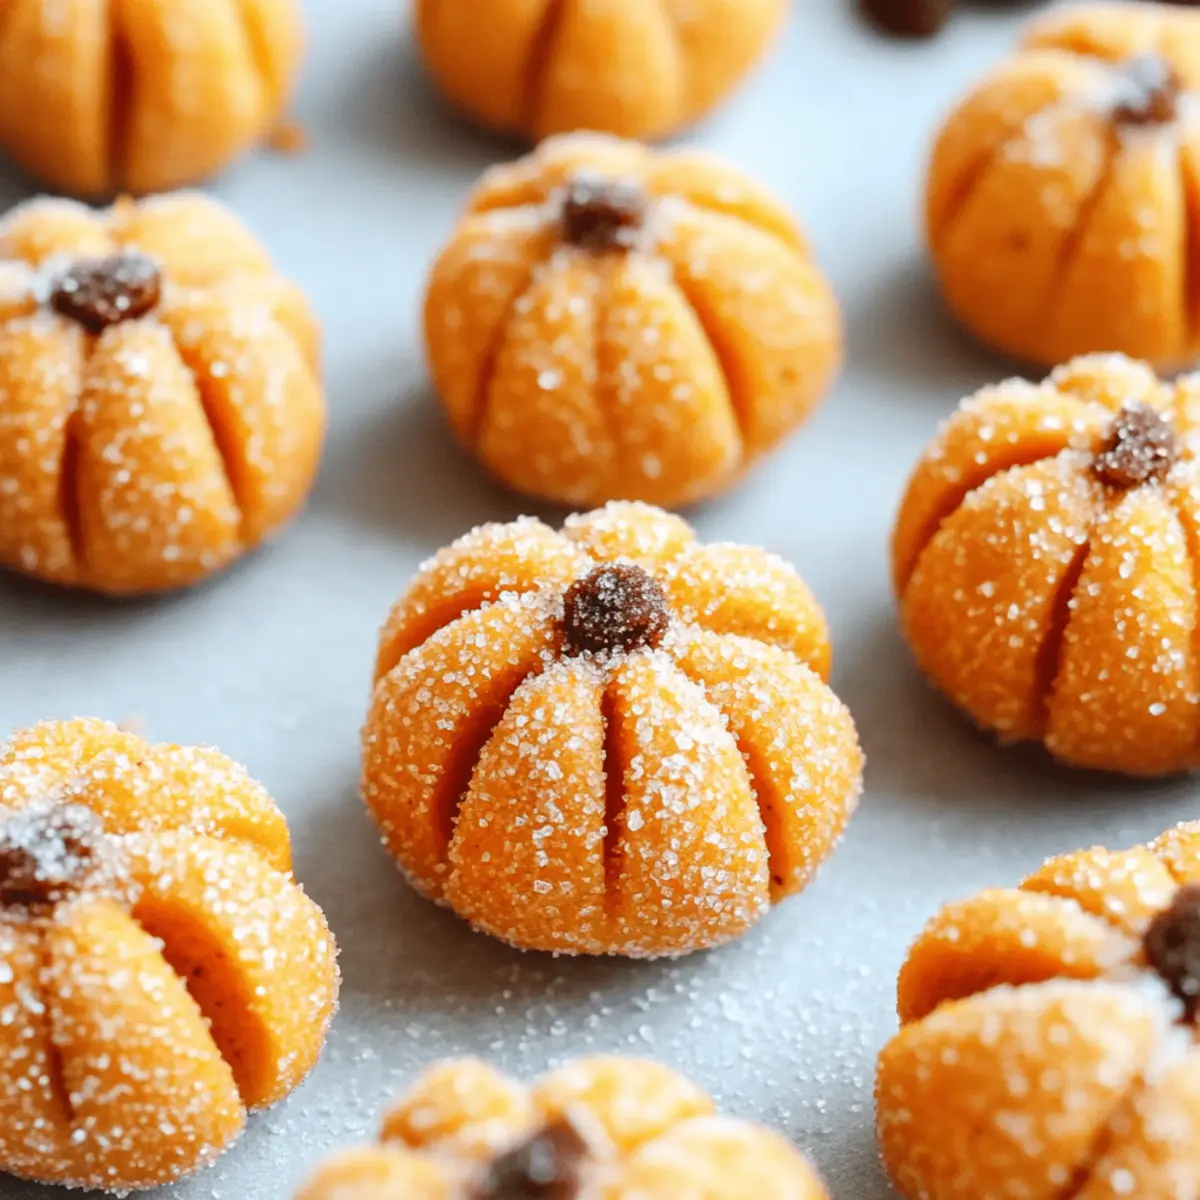
Prepare a small bowl of granulated sugar, and roll each truffle in the sugar for a sweet finish and a lovely sparkly appearance. Make sure to coat them just before serving to keep them from getting “sweaty.” The sugar not only adds sweetness but also enhances the festive look of your pumpkin cheesecake truffles.
Step 6: Add Decorative Touches
For a fun pumpkin-like appearance, use a toothpick to gently create lines on each truffle. To finish, top with a chocolate chip, pressing it lightly into the center of the truffle to resemble a pumpkin stem. This decorative step transforms your truffles into adorable little fall treats that are sure to impress guests.
Step 7: Serve or Store
You can serve the pumpkin cheesecake truffles immediately for a fresh treat or place them back in the fridge to chill further until needed. These delightful bites can be stored in an airtight container in the refrigerator for up to 3 days or frozen for up to 2 weeks, allowing you to make ahead for gatherings while maintaining their wonderful texture.
How to Store and Freeze Pumpkin Cheesecake Truffles
Fridge: Store truffles in an airtight container in the refrigerator for up to 3 days. This keeps them fresh and ready to enjoy whenever you need a sweet treat!
Freezer: For longer storage, freeze the truffles in a single layer on a baking sheet, then place them in a freezer-safe container or bag for up to 2 weeks. Just remember to coat them in sugar right before serving to maintain their delightful texture.
Thawing: When ready to enjoy, transfer the desired amount from the freezer to the fridge and allow them to thaw overnight for the best results.
Reheating: These pumpkin cheesecake truffles are best served chilled, so avoid any reheating. Just go straight from the fridge or freezer to your plate for a refreshing dessert experience!
Pumpkin Cheesecake Truffles Variations
Get creative with your Pumpkin Cheesecake Truffles and tailor them to your taste buds!
- Dairy-Free: Substitute cream cheese and sweetened condensed milk with vegan alternatives for a dairy-free version.
- Gluten-Free: Swap traditional graham cracker crumbs for gluten-free options to ensure everyone can enjoy these delightful treats.
- Dark Chocolate: For a richer flavor, replace white chocolate chips with dark chocolate or even a mix of both.
- Nutty Crunch: Incorporate chopped nuts like walnuts or pecans into the mixture for added texture and a delightful crunch.
- Spicy Kick: Infuse your truffles with an extra dash of cinnamon or a pinch of cayenne pepper for a surprising heat that pairs beautifully with pumpkin.
- Boozy Twist: For an adult-approved treat, add a splash of bourbon or rum to the mixture to elevate the flavors.
- Mini Pumpkin Pies: Press the truffle mixture into mini tart shells for an adorable no-bake mini pie option that’s sure to impress.
- Pumpkin Spice Cheer: Whenever you’re feeling festive, check out my secret touch in the Sparkling Pumpkin Spice truffles for an effervescent twist!
Let your imagination run wild with these variations, and remember to share your creations—after all, the joy of cooking is best when shared!
Expert Tips for Pumpkin Cheesecake Truffles
-
Stir Constantly: Always stir the mixture continuously while cooking to prevent burning, ensuring a smooth, creamy truffle base.
-
Cool Down First: Allow the mixture to cool to room temperature before refrigerating it. This step helps avoid condensation, which can make your pumpkin cheesecake truffles “sweaty.”
-
Butter Your Hands: If the mixture is too sticky, lightly butter your hands before rolling to make shaping the truffles easier and mess-free.
-
Roll Before Serving: To prevent the truffles from getting sticky in the refrigerator, roll them in sugar just before serving. This keeps them sparkly and delightful.
-
Decorative Details: Use a toothpick to create lines on each truffle and press a chocolate chip on top for a cute pumpkin look—this little detail makes all the difference!
Make Ahead Options
These Pumpkin Cheesecake Truffles are perfect for meal prep enthusiasts! You can make the truffle mixture up to 3 days in advance by following the initial steps and chilling it until firm. Once shaped into balls, store them in an airtight container in the refrigerator to maintain their creamy texture and flavor. Just before serving, roll the truffles in sugar to prevent them from getting “sweaty,” keeping them as delightful as when freshly made. If you want to prepare further ahead, these truffles can also be frozen for up to 2 weeks; simply coat them in sugar right before serving for that perfect sweet finish.
What to Serve with Pumpkin Cheesecake Truffles?
These delightful bites deserve a cozy spread alongside your favorite fall flavors.
-
Warm Apple Cider: This spiced drink complements the creamy, sweet nature of the truffles and embraces the essence of autumn. Sip it with friends as you share stories around the table.
-
Ginger Snap Cookies: The crisp, spiced crunch of these cookies offers a delightful contrast to the smooth truffle texture. Their bold flavors enhance the festive spirit of any gathering.
-
Chocolate Pumpkin Cake: A rich, moist cake layered with creamy frosting mirrors the pumpkin theme and provides a sophisticated finish to your dessert table. Plus, it appeals to chocolate lovers!
-
Whipped Cream: A dollop of lightly sweetened cream adds a light, airy touch that balances the richness of the truffles perfectly. This simple addition elevates your dessert experience.
-
Pecan Pie: This classic fall dessert boasts a crunchy texture with its sweet, nutty filling, making it an irresistible pairing. The contrasting flavors create a well-rounded finale to your meal.
-
Spiced Cranberry Sauce: The tartness of cranberry sauce adds brightness and pairs beautifully with the sweetness of the truffles. It’s a refreshing touch that brings vibrant color to your dessert platter.
Consider serving any of these delightful options alongside your pumpkin cheesecake truffles for a truly memorable fall feast!

Pumpkin Cheesecake Truffles Recipe FAQs
What kind of pumpkin puree should I use?
It’s best to use 100% canned pumpkin puree without any added spices. This ensures you retain control over the flavors in your Pumpkin Cheesecake Truffles, allowing you to customize the taste to your liking. Brands may vary, so look for pure pumpkin on the label.
How can I store Pumpkin Cheesecake Truffles?
Store the truffles in an airtight container in the refrigerator for up to 3 days. Make sure to place parchment paper between layers if stacking them to avoid sticking. For longer storage, they can be frozen for up to 2 weeks! Just remember to coat them in sugar just before serving to keep them looking fresh.
Can I freeze these truffles? If so, how?
Absolutely! To freeze your Pumpkin Cheesecake Truffles, follow these steps:
- Roll them into balls and lay them in a single layer on a baking sheet to freeze for about 1 hour.
- Once they are firm, transfer them to a freezer-safe bag or container.
- Label it with the date for reference and store it in the freezer for up to 2 weeks.
When you’re ready to enjoy, simply transfer them to the refrigerator overnight to thaw before serving.
What if my mixture is too sticky to roll into balls?
No worries! If the truffle mixture feels sticky, just butter your hands lightly before rolling. This simple trick makes shaping the truffles much easier and keeps them from sticking to your skin. If it’s still too sticky, you may also chill the mixture for about 30 minutes to firm it up further.
Are these truffles suitable for those with gluten allergies?
Yes! To make your Pumpkin Cheesecake Truffles gluten-free, use gluten-free graham cracker crumbs when mixing. Make sure to double-check that all your ingredients, especially chocolates and condense milk, are certified gluten-free.
How can I enhance the pumpkin spice flavor?
If you want to amp up the pumpkin spice flavor in your truffles, consider adding an extra pinch of pumpkin pie spice or making your own mix with cinnamon, nutmeg, and ginger. You can even infuse a bit of extra spice into the melted chocolate before coating for added depth. Enjoy experimenting!
Pumpkin Spice Truffles for Cozy Fall Indulgence
Ingredients
Equipment
Method
- In a medium saucepan over medium-low heat, combine the cream cheese, canned pumpkin puree, butter, pumpkin pie spice, and sweetened condensed milk. Stir continuously for about 5–7 minutes until the mixture becomes smooth and thickened, resembling a creamy sauce.
- Once the mixture is smooth, remove it from heat and gently fold in the white chocolate chips and graham cracker crumbs. Continue stirring for another 2–3 minutes until the mixture pulls away from the edges of the pan, taking on a dough-like texture.
- Transfer the mixture to a buttered baking sheet, spreading it out evenly. Allow it to chill in the refrigerator for at least 2 hours, or until firm enough to handle.
- After chilling, take small portions of the mixture and roll them between your hands to form small balls, about 1 inch in diameter.
- Prepare a small bowl of granulated sugar, and roll each truffle in the sugar for a sweet finish and a lovely sparkly appearance.
- For a fun pumpkin-like appearance, use a toothpick to gently create lines on each truffle and top with a chocolate chip, pressing it lightly into the center.
- You can serve the truffles immediately or store in an airtight container in the refrigerator for up to 3 days.