Advertisement
As I stared at the bowl of ripe fruit, memories of sunny afternoons spent enjoying homemade snacks flooded my mind. That’s when it hit me—why not recreate the joy of those childhood treats with my own twist? Enter my 3-Ingredient Homemade Fruit Roll-Ups, a delightful fusion of nostalgia and nutrition. This easy, customizable recipe is perfect for satisfying cravings without the guilt, whether you’re packing school lunches or looking for a late-night treat. Using only fresh or frozen fruit, honey, and lemon juice, these chewy delights are not only vegan and keto-friendly, but they also come in endless flavor combinations—from berry bliss to tropical sunshine! Ready to transform your pantry into a healthy snacking haven? Let’s dive into the world of homemade fruit roll-ups and discover just how fun and tasty these can be!
Why are homemade fruit roll-ups amazing?
Nostalgic, these homemade fruit roll-ups bring back the sweet memories of carefree childhood days, making snack-time feel like a treat. Easy to Customize, mix and match your favorite fruits to create unique flavors for everyone in the family. Guilt-Free Indulgence: With just three ingredients, they’re a healthier alternative to processed snacks. Versatile Treats: Enjoy them as a stand-alone snack or use them to elevate yogurt parfaits or ice cream. Vegan and Keto-Friendly, these roll-ups fit various dietary needs, ensuring everyone can enjoy this wholesome delight. If you’re also looking for more fun dessert ideas, check out these Homemade Chocolate Chip cookies or Homemade Caramel Apple treats for a perfect sweet fix!
Delicious Homemade Fruit Roll-Ups Ingredients
• Dive into the simplicity of Homemade Fruit Roll-Ups with these essential ingredients!
Advertisement
For the Fruit Base
• Fresh or Frozen Fruit (4-6 cups, 600-700 g) – Choose your favorite fruit like berries, mango, or peaches for a vibrant flavor.
For Sweetness
• Honey (4-6 Tbsp) – This natural sweetener brings a delightful taste, but feel free to swap it with sugar or a substitute based on your needs.
For Balance
• Lemon Juice (4 Tbsp, 60 mL) – A splash of lemon juice not only balances the sweetness but also prevents browning; lime juice is a great alternative!
Step‑by‑Step Instructions for Homemade Fruit Roll-Ups
Step 1: Prepare the Fruit
Start by washing your fresh or frozen fruits, ensuring they’re clean. If using fruits like peaches or mangos, peel and chop them into smaller pieces. Then, place the prepared fruit in a blender or food processor, blending until smooth and creamy, which should take about 1-2 minutes. This smooth purée is the flavorful base for your Homemade Fruit Roll-Ups.
Step 2: Mix Ingredients
Once your fruit is puréed, transfer it back into the blender. Add the honey and lemon juice, combining all ingredients until thoroughly blended—this step should only take about 30 seconds. The lemon adds brightness and helps keep the color vibrant. Ensure the mixture is well-combined for a balanced sweetness in your Homemade Fruit Roll-Ups.
Step 3: Simmer the Mixture
Pour the fruit mixture into a saucepan over low heat. Let it simmer gently for 15-20 minutes, stirring occasionally, until the mixture thickens slightly and coats the back of a spoon. You’ll know it’s ready when it has a glossy appearance and a sweet aroma fills your kitchen. This concentrated flavor is key to achieving delicious Homemade Fruit Roll-Ups.
Step 4: Spread the Mixture
While your fruit mixture is still warm, line baking sheets with parchment paper or silicone mats. Carefully pour the thickened fruit mixture onto the sheets, using a spatula to spread it evenly to about 1/8-inch thickness. Aim for a smooth, even layer to ensure consistent drying. This will help your Homemade Fruit Roll-Ups achieve that perfect chewy texture.
Step 5: Bake in the Oven
Preheat your oven to 170°F (75°C). Place the baking sheets in the oven and let the fruit spread dry out for 4-6 hours. Check on them periodically; they should feel dry to the touch and not sticky when done. Baking low and slow helps enhance the flavors, resulting in tasty Homemade Fruit Roll-Ups that are chewy and vibrant.
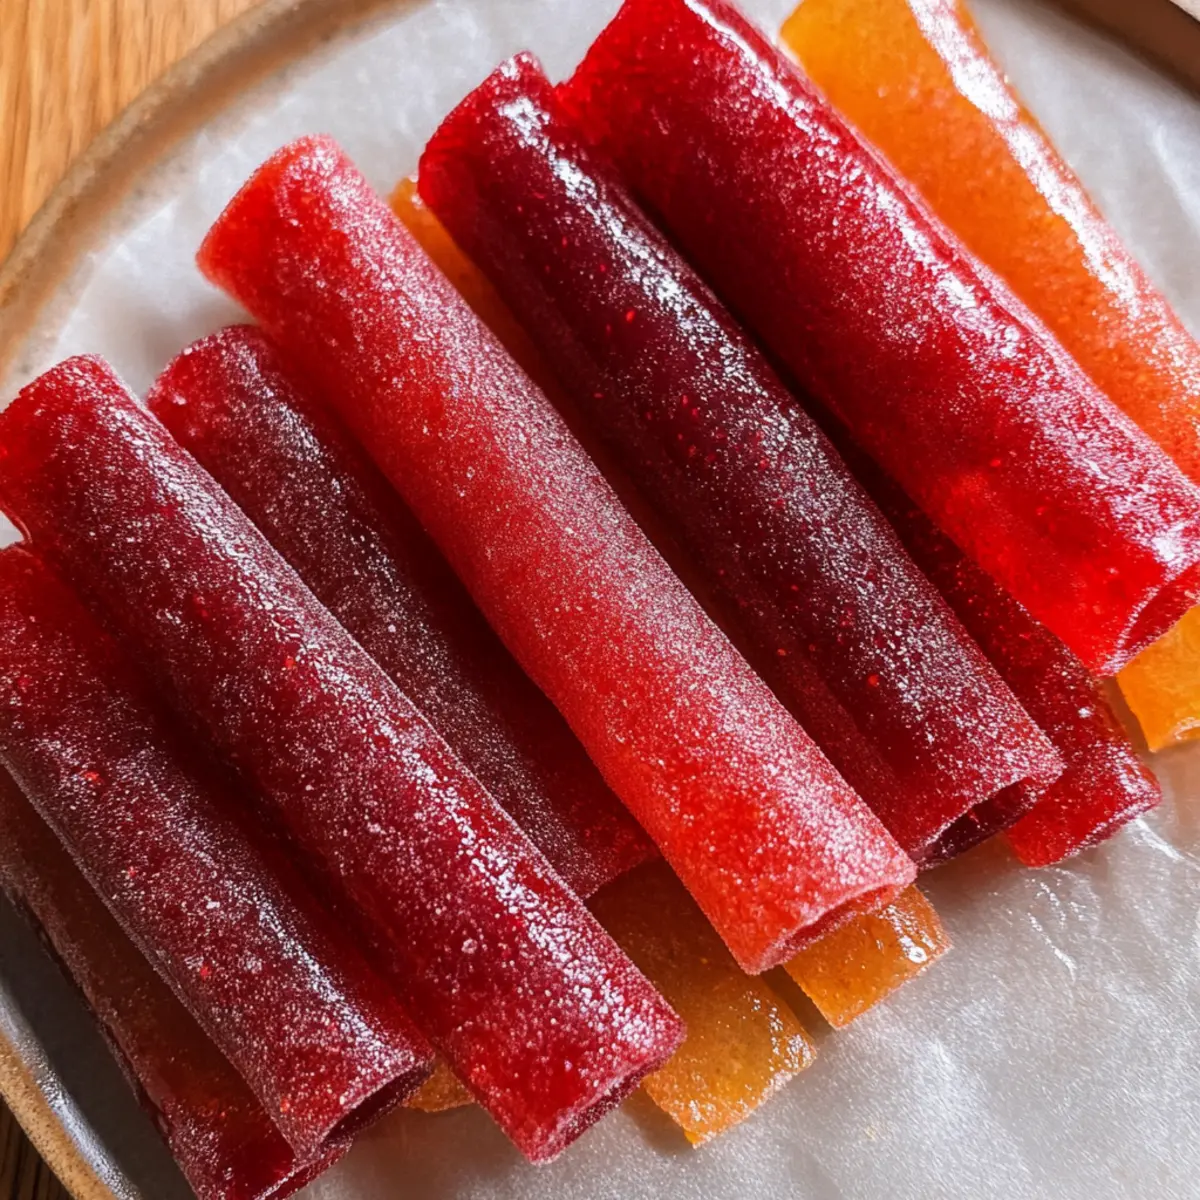
Step 6: Cool and Cut
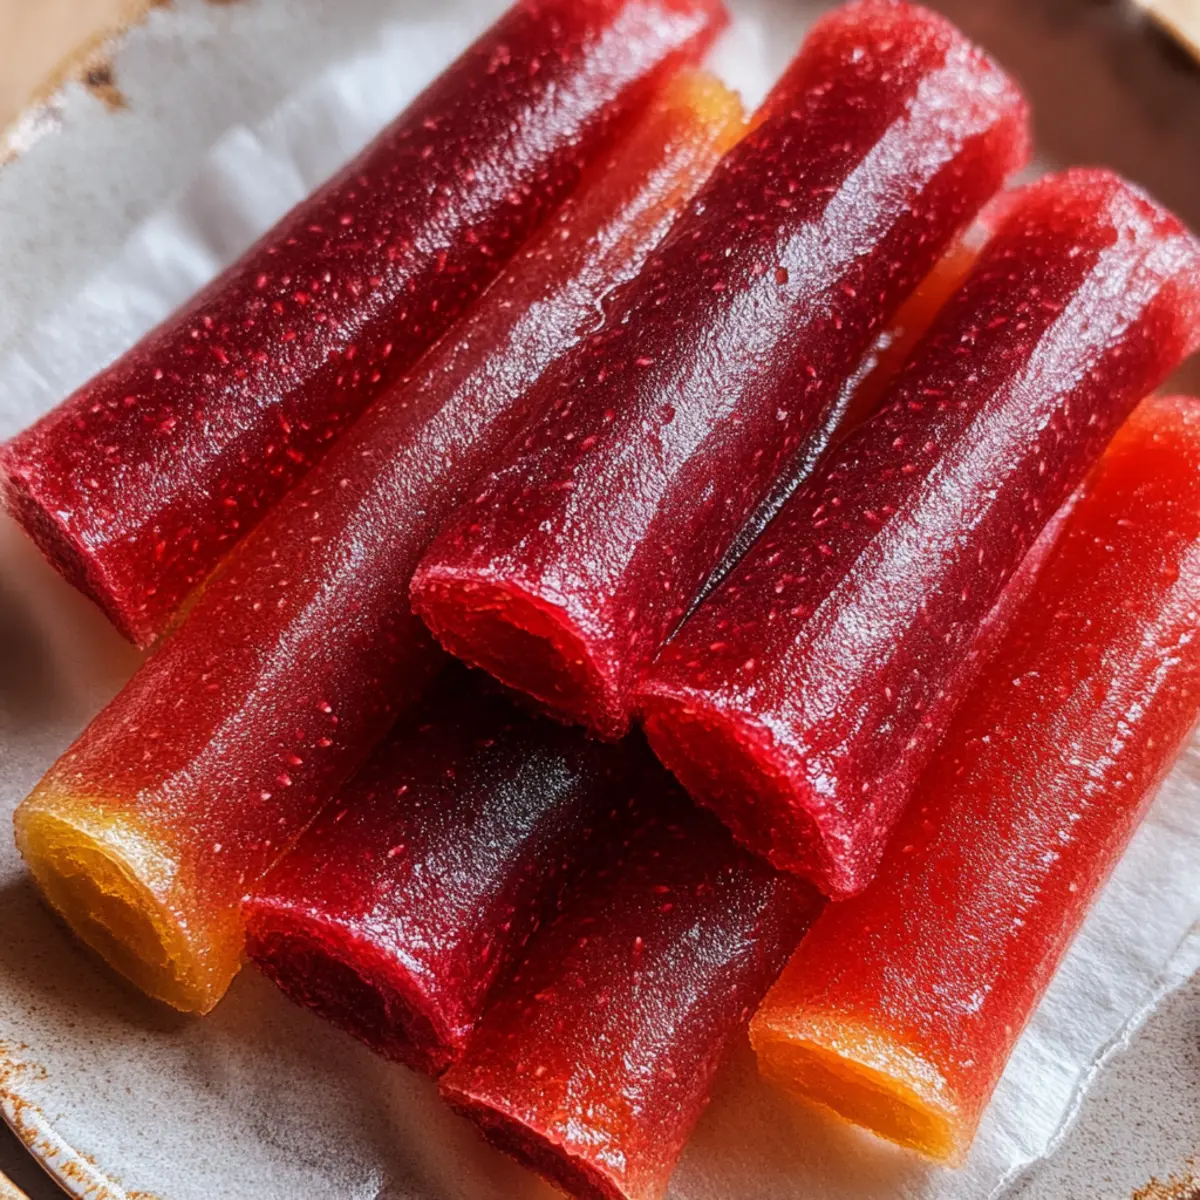
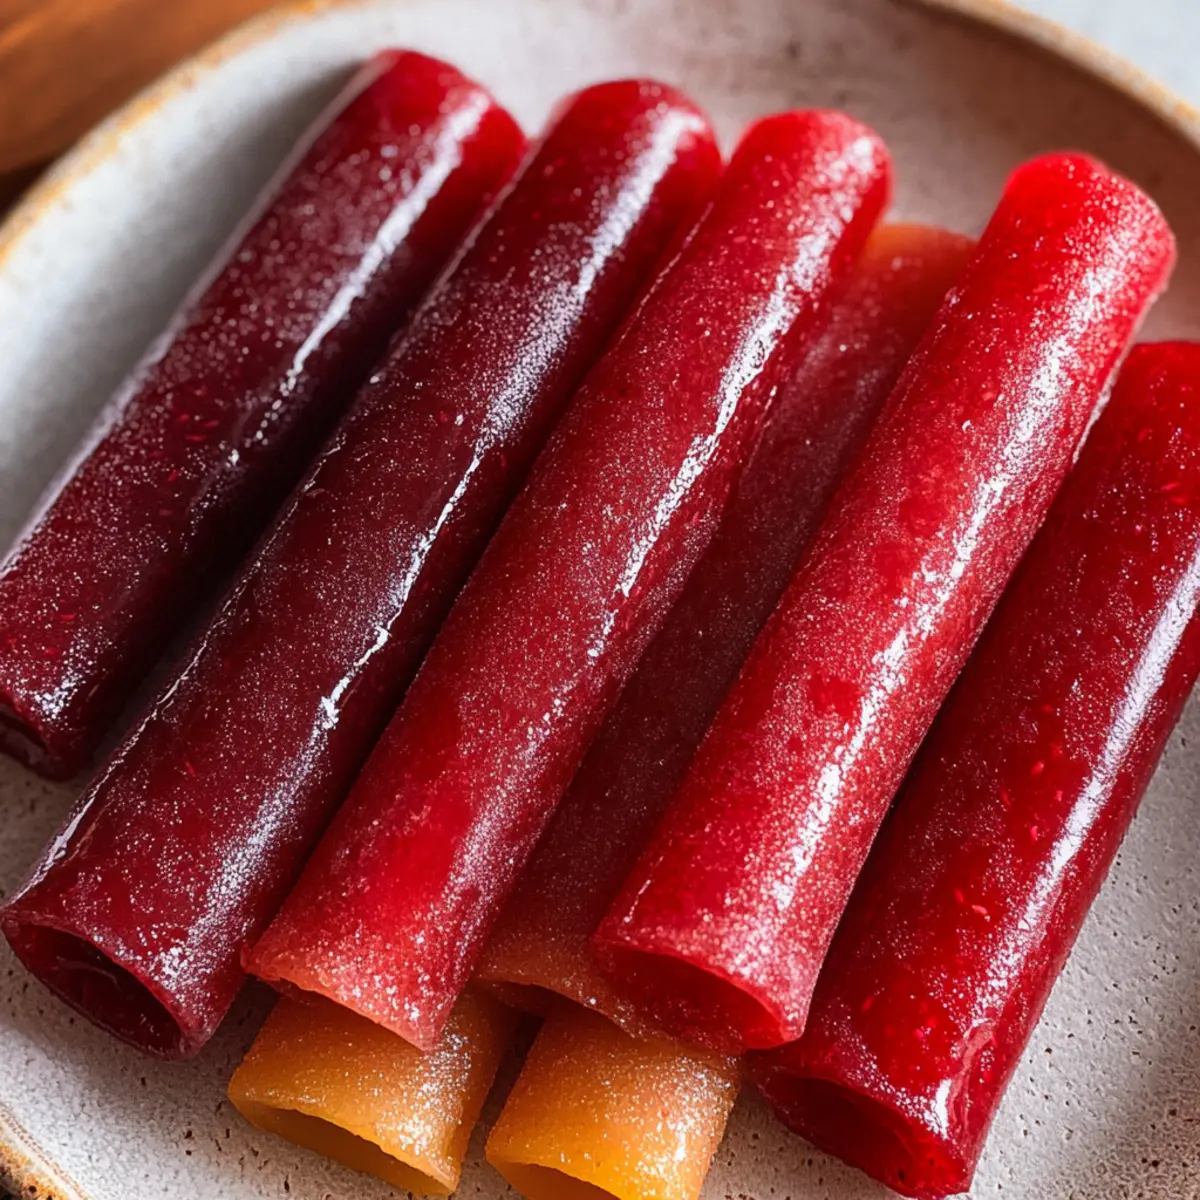
Once the roll-ups are ready, remove them from the oven and allow them to cool completely on the baking sheets. Once cooled, use kitchen scissors to cut the fruit leather into strips. Roll each strip tightly with parchment paper for easy storage and a delightful presentation. Your Homemade Fruit Roll-Ups are now ready to be enjoyed or packed for snacks!

Homemade Fruit Roll-Ups Variations
Feel free to make these delicious fruit roll-ups your own with fun and exciting variations that cater to your taste buds!
-
Spicy Bayou Berry: Blend strawberries with a pinch of cayenne for a subtle, spicy kick that adds an unexpected twist to your fruit roll-ups!
-
Tropical Hurricane: Use a combination of mango and pineapple with grated ginger for an exotic flavor explosion that’s reminiscent of tropical vacations.
-
Creole Creamsicle: Combine juicy oranges with vanilla extract to recreate that nostalgic creamsicle taste, perfect for both kids and adults alike.
-
Green Goddess: Toss in a handful of fresh spinach for added nutrition! The sweet fruit flavors will mask any earthy notes, making a surprisingly delicious treat.
-
Mardi Gras Swirl: Layer different fruit purées on the baking sheet before drying for a colorful presentation that’s sure to impress at gatherings.
-
Berry Blast: Mix in a variety of berries for a medley of flavors. Blueberries, raspberries, and strawberries come together beautifully in this tart and sweet combo.
-
Coconut Lime Delight: Add shredded coconut and lime juice to the fruit base for a tropical vibe that will remind you of sunny beach days.
-
Nutty Crunch: After cutting the roll-ups, sprinkle some crushed nuts like almonds or walnuts before rolling for added crunch and health benefits.
For more delightful treats, consider trying my Homemade Black Forest cake recipe or my creamy Cheesy Chicken Sauce recipe for a delicious twist on mealtime!
What to Serve with 3-Ingredient Homemade Fruit Roll-Ups
Elevate your snacking experience with delightful pairings that enhance the fruity goodness of your roll-ups.
- Yogurt Parfaits: Layer with yogurt and granola for a balanced and satisfying breakfast or snack.
- Nut Butter Dipping Sauce: A creamy peanut or almond butter dip adds richness and healthy fats, perfect for a satisfying treat.
For a refreshing twist, try pairing these roll-ups with a crisp green salad. The sweet-and-tart flavors of your fruit will complement the greens beautifully.
- Cheese Platter: Serve alongside a cheese platter for a sweet-and-savory contrast that will indulge your taste buds.
- Smoothie Bowls: Top smoothie bowls with sliced roll-ups for texture and flavor, making each bite invigorating.
To quench your thirst, pair with Herbal Iced Tea: This light, refreshing drink balances out the sweetness of the fruit roll-ups perfectly.
How to Store and Freeze Homemade Fruit Roll-Ups
Room Temperature: Keep your homemade fruit roll-ups in an airtight jar at room temperature for up to 1 week. This way, they’re ready to grab and enjoy whenever the snack itch hits!
Fridge: If you want to extend their freshness, store them in the fridge for up to 2 weeks. Just ensure they’re in a well-sealed container to prevent moisture.
Freezer: For longer storage, freeze the fruit roll-ups for up to 3 months. Layer them between pieces of parchment paper in freezer bags to prevent sticking and make them easy to separate.
Reheating: When ready to enjoy, simply thaw them in the fridge overnight or at room temperature for a few hours. They retain their chewy texture perfectly!
Expert Tips for Homemade Fruit Roll-Ups
-
Ensure Smooth Purée: Blend the fruit until silky smooth before cooking. If you see any chunks, strain it to improve the texture of your Homemade Fruit Roll-Ups.
-
Check Your Oven Temperature: Using a thermometer can help you avoid over-drying or under-drying. It’s crucial to maintain 170°F (75°C) for perfect results.
-
Humidity Solutions: If you live in a humid area that makes the roll-ups sticky, consider leaving them in the oven for an extra hour or using a dehydrator to finish.
-
Easy Release: Use silicone mats when spreading the mixture to prevent sticking. If using parchment paper, lightly grease it with coconut oil to make removal easier.
-
Creative Variations: Don’t hesitate to mix different fruit combinations. Try flavors like Tropical Hurricane or Green Goddess for added nutrition and vibrant colors!
Make Ahead Options
These 3-Ingredient Homemade Fruit Roll-Ups are perfect for meal prep enthusiasts! You can prepare the fruit purée and mix it with honey and lemon juice up to 24 hours in advance, storing it in an airtight container in the refrigerator to maintain its vibrant flavor. Once ready to finish the roll-ups, simply simmer the mixture as directed and spread it on baking sheets. If you’re looking to save even more time, you can also dry the roll-ups in the oven up to 3 days ahead of serving. Just make sure to store the finished roll-ups in an airtight container to keep them chewy and fresh. Enjoy the convenience of wholesome, homemade snacks with minimal effort!
3-Ingredient Homemade Fruit Roll-Ups Recipe FAQs
What kind of fruit should I use for these Homemade Fruit Roll-Ups?
Absolutely! Fresh or frozen fruits both work wonderfully. You can use 4-6 cups of any fruit you love, such as strawberries, mangoes, or peaches. Just remember, the riper the fruit, the sweeter and more flavorful your roll-ups will be!
How should I store my Homemade Fruit Roll-Ups?
To keep your delicious fruit roll-ups fresh, store them in an airtight jar at room temperature for up to one week. If you want to prolong their shelf life, you can keep them in the fridge for up to two weeks. Just make sure they are well-sealed to avoid moisture!
Can I freeze my fruit roll-ups, and how?
Certainly! You can freeze your Homemade Fruit Roll-Ups for up to three months. To do this, layer them with parchment paper in a freezer bag to prevent them from sticking together. When you’re ready to enjoy a roll-up, simply thaw it in the fridge overnight or at room temperature for a few hours.
What should I do if my fruit roll-ups are too sticky?
Very! If your roll-ups turn out sticky, it may be due to humidity. You can place them back in the oven for an additional hour at 170°F (75°C) or use a dehydrator if you have one. This extra drying will help achieve that perfect chewy texture you’re aiming for.
Are these fruit roll-ups suitable for those with dietary restrictions?
Absolutely! My Homemade Fruit Roll-Ups are vegan and can be made keto-friendly by substituting honey for a sugar-free sweetener. If you have allergies, always check the ingredient list, especially for fruits that might cause reactions, and tailor the recipe to fit your dietary needs.
Can I make different flavor combinations with these fruit roll-ups?
Very much so! The beauty of these Homemade Fruit Roll-Ups lies in their versatility. Feel free to mix and match fruits for unique flavors like Spicy Bayou Berry or Tropical Hurricane. You can even layer different purées for a fun presentation, making your snacking experience even more delightful!
Delicious Homemade Fruit Roll-Ups: Guilt-Free Flavor Fun
Ingredients
Equipment
Method
- Start by washing your fresh or frozen fruits, ensuring they’re clean. Peel and chop fruits like peaches or mangos, then blend until smooth, about 1-2 minutes.
- Transfer the puréed fruit back to the blender. Add honey and lemon juice, blending until thoroughly combined—about 30 seconds.
- Pour the mixture into a saucepan over low heat. Simmer gently for 15-20 minutes, stirring until thickened and glossy.
- While warm, line baking sheets with parchment. Pour the mixture onto the sheets, spreading evenly to about 1/8-inch thickness.
- Preheat oven to 170°F (75°C) and place sheets inside, drying the fruit spread for 4-6 hours until dry and non-sticky.
- Cool completely on the baking sheets, then cut into strips and roll with parchment for storage.