Advertisement
As the cool autumn breeze sweeps in, I can’t help but crave the warm, comforting flavors of seasonal treats. Enter my Tasty Cheesecake-Stuffed Baked Apples—a cozy fall dessert that transforms a simple apple into a heartwarming delight. Imagine biting into a tender apple, bursting with a luscious cheesecake filling spiced with cinnamon and nutmeg. This gluten-free, beginner-friendly recipe is not only easy to whip up but also versatile enough to adapt to your tastes. Whether you’re preparing for Thanksgiving gatherings or enjoying a quiet evening at home, these baked apples will surely impress. Curious about how to make this delightful dish? Let’s dive into the recipe!

Why are cheesecake-stuffed apples a must-try?
Unforgettable Flavor: The sweet-tart apple pairs perfectly with a creamy cheesecake filling, creating a deliciously unique dessert that’s sure to impress.
Gluten-Free Goodness: Enjoy without worry! This recipe caters to gluten-sensitive diets while still delivering on taste.
Beginner-Friendly: Easy to follow, even novice bakers can make these stunning treats with confidence.
Versatile Customizations: Feel free to adjust spices or add toppings; transform your apples to suit any occasion!
Perfect for Fall: Embrace the coziness of autumn—perfect for gatherings or quiet evenings—these apples capture the essence of the season. Treat your friends and family with these tasty creations, and be sure to check out Oven Baked Chicken for a complete fall meal!
Tasty Cheesecake-Stuffed Baked Apples Ingredients
Get ready to create the perfect fall dessert with these delightful ingredients!
Advertisement
For the Apples
- Honeycrisp or Gala Apples – Choose firm varieties that hold their shape while baking for the best texture.
- Lemon Juice – Prevents browning of apple interiors and adds a refreshing brightness to the dish.
For the Cheesecake Filling
- Cream Cheese – Softened for a creamy base that will make your filling smooth and luscious.
- Granulated Sugar – Essential for sweetening and balancing the flavors of the cheesecake filling.
- Vanilla Extract – Adds warmth and depth to the filling, enhancing the overall taste.
- Ground Cinnamon – Infuses a classic fall spice; feel free to increase or decrease according to your preference.
- Ground Nutmeg – Complements the cinnamon with its sweet, earthy notes for a cozy flavor.
For Texture and Crunch
- Graham Cracker Crumbs – Provides a crunchy texture reminiscent of a cheesecake crust; gluten-free crumbs work well too!
- Chopped Nuts (optional, walnuts or pecans) – Adds extra crunch; simply omit for a nut-free version.
For Baking Enhancements
- Melted Butter – Drizzled on top before baking; promotes browning and richness that makes each bite luxurious.
- Whipped Cream (optional for serving) – Adds a delightful creamy topping that elevates the indulgent experience of the apples.
Dive into these Tasty Cheesecake-Stuffed Baked Apples and let your kitchen fill with the heartwarming aroma of fall!
Step‑by‑Step Instructions for Tasty Cheesecake-Stuffed Baked Apples
Step 1: Preheat the Oven
Begin by preheating your oven to 350°F (175°C). This ensures the perfect baking environment for your Tasty Cheesecake-Stuffed Baked Apples. While the oven heats, gather your baking dish and arrange it nearby; this will streamline the process as you prepare the apples.
Step 2: Prepare the Apples
Next, select firm Honeycrisp or Gala apples and carefully cut off the tops, creating a small cap. Using a melon baller or small spoon, core the apples to create a cozy cavity, leaving the bottoms intact. Brush the insides of the apples with lemon juice to prevent browning and enhance their vibrant flavor.
Step 3: Make the Cheesecake Filling
In a mixing bowl, use a hand mixer to blend softened cream cheese, granulated sugar, and vanilla extract until smooth and creamy. Add ground cinnamon and nutmeg to infuse a warm, fall-inspired flavor into the mixture. Whip until well combined and set aside the luscious cheesecake filling.
Step 4: Add Texture
Gently fold in the graham cracker crumbs into your cheesecake filling, incorporating them evenly for a delightful crunch. If you enjoy a bit of extra texture, feel free to add chopped walnuts or pecans at this stage. This step elevates your filling, making the Tasty Cheesecake-Stuffed Baked Apples even more indulgent.
Step 5: Stuff the Apples
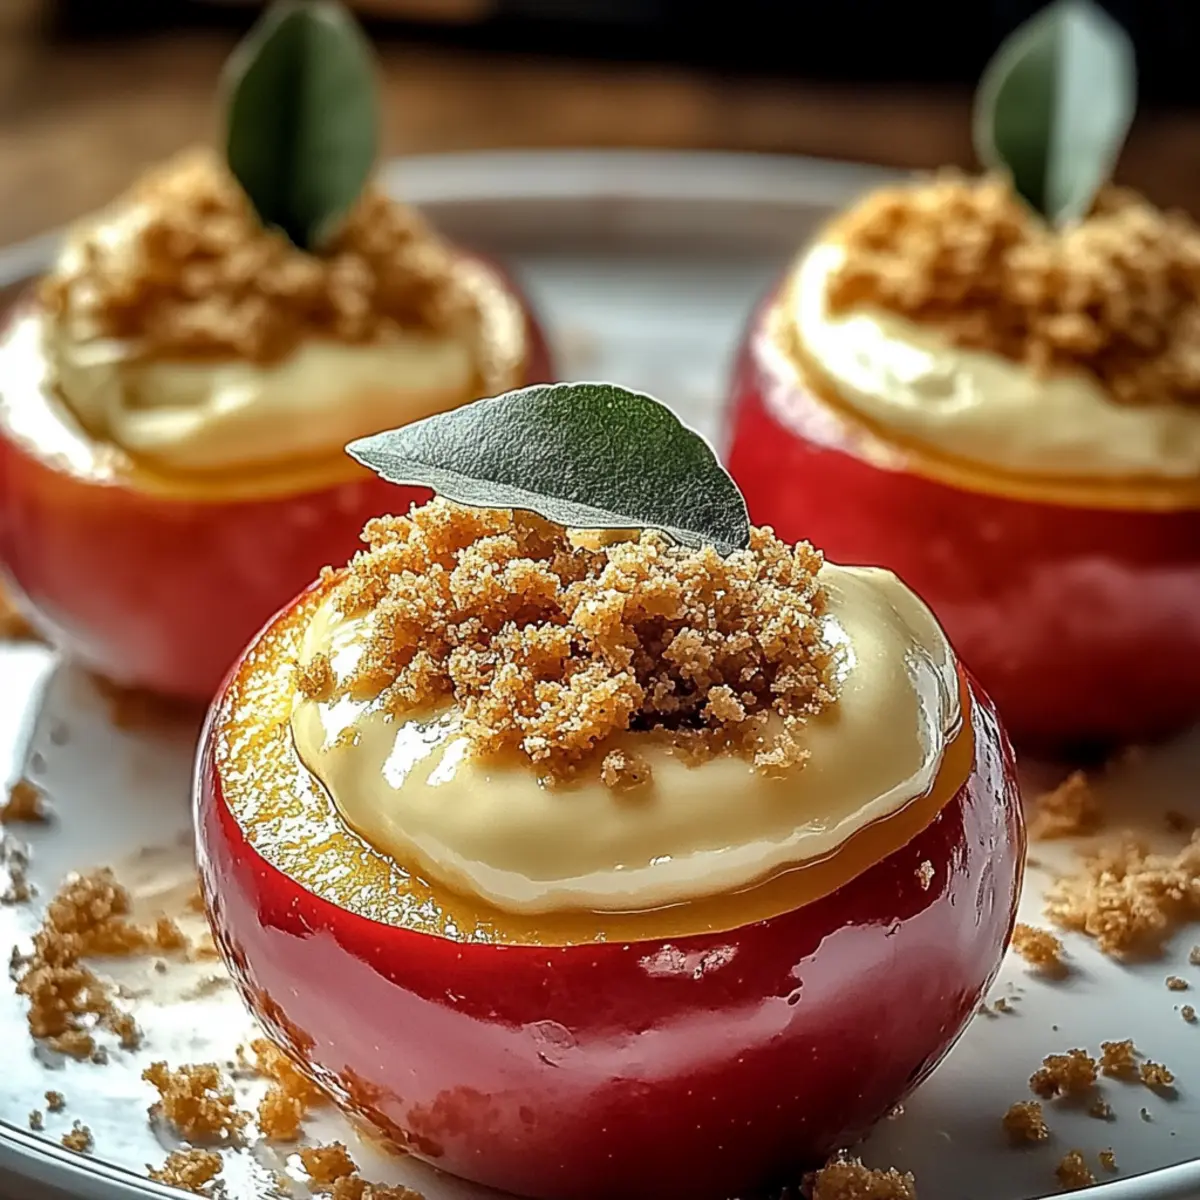
Now it’s time to fill your prepared apples! Generously spoon the cheesecake mixture into each apple cavity, mounding it slightly above the rim. This ensures a delightful burst of cheesecake goodness with every bite. Place the filled apples upright in your baking dish, setting yourself up for a beautiful presentation.
Step 6: Arrange and Bake
Drizzle melted butter over the stuffed apples, allowing it to pool slightly around them in the dish. Cover the baking dish tightly with foil to retain moisture, then place it in your preheated oven. Bake for 25-30 minutes, or until the apples become tender yet firm, infusing your kitchen with irresistible aromas.
Step 7: Brown the Tops
After the initial baking time, carefully remove the foil to allow the tops of the apples to brown. Return the baking dish to the oven and bake for an additional 10 minutes. Watch closely as the tops become golden and bubbly, a sign that your Tasty Cheesecake-Stuffed Baked Apples are nearly ready to delight.
Step 8: Cool and Serve
Once baked, remove the apples from the oven and let them cool slightly for about 5-10 minutes. This brief cooling time allows the cheesecake filling to set up a little more. Serve the warm apples as they are or with a dollop of whipped cream for an extra touch of luxury.

Make Ahead Options
These Tasty Cheesecake-Stuffed Baked Apples are perfect for busy weeknights and can save you valuable time! You can prepare the cheesecake filling and stuff the apples up to 24 hours in advance. To keep the apples from browning, brush the insides with lemon juice before filling. Cover them tightly with plastic wrap and refrigerate until you’re ready to bake. When it’s time to enjoy this cozy dessert, simply pop the stuffed apples into your preheated oven and follow the baking instructions. This way, you’ll have a delicious homemade treat ready in no time, making dinner gatherings or quiet evenings at home a breeze!
Tasty Cheesecake-Stuffed Baked Apples Variations
Embrace your creativity and personalize these delightful apples with flavors and ingredients that excite your palate!
-
Dairy-Free: Substitute cream cheese with a dairy-free alternative, like cashew cream or coconut cream, for a vegan twist.
Add a hint of vanilla bean to enhance the flavor—your guests won’t even miss the dairy! -
Apple Varieties: Experiment with different apple types, such as Granny Smith for a tart kick or Fuji for extra sweetness.
This simple change can dramatically alter the taste profile and make your dessert truly your own. -
Flavor Infusions: Boost the flavor by adding almond extract or a splash of orange zest to the cheesecake filling.
These subtle notes elevate the experience, making each bite more vibrant and refreshing. -
Caramel Drizzle: Top your baked apples with a rich caramel sauce or chocolate drizzle for a decadently sweet finish.
The gooey-ness adds a delightful contrast to the creamy filling, creating a dessert that feels indulgent. -
Dried Fruits: Incorporate chopped dried fruits like cranberries, raisins, or apricots into your filling for a fruity surprise.
This variation not only adds sweetness but also a pop of color and texture to your beautiful baked apples. -
Nut Variations: Use different nuts such as almonds or pecans in place of walnuts to change up the crunch factor.
Each nut brings its own unique flavor, offering another layer of deliciousness to this already amazing dessert. -
Spicy Kick: For those who enjoy a little heat, sprinkle some cayenne pepper into the filling—just a pinch can go a long way!
This unexpected addition complements the sweetness beautifully and will intrigue adventurous eaters. -
Frozen Treat: Transform your leftovers into a frozen dessert; blend stuffed apples with milk or yogurt to create a creamy smoothie.
You’ll have a refreshing treat, reminiscent of fall but perfect for warm days!
Feel free to let your imagination run wild, just like I do when I prepare my comforting sweets! You might just discover your new favorite way to enjoy these Tasty Cheesecake-Stuffed Baked Apples. And speaking of delicious dishes, check out these ideas for Healthy Baked Lemon to complement your fall feast!
What to Serve with Cheesecake-Stuffed Baked Apples
The delightful warmth of these baked apples complements a variety of side dishes and drinks, making your fall meal truly special.
- Creamy Vanilla Ice Cream: This classic pairing adds a melty richness, creating an indulgent contrast with the warm apples.
- Caramel Sauce Drizzle: The sweet notes of caramel enhance the dessert, making each bite a heavenly experience.
- Chai Tea: The spiced flavors of chai harmonize beautifully with the cinnamon and nutmeg, perfect for cozy evenings.
- Roasted Sweet Potatoes: Their natural sweetness and slight crispness add texture and balance to your meal.
- Pumpkin Spice Latte: A seasonal drink that echoes fall flavors, enhancing the festive atmosphere of your gathering.
- Mixed Green Salad: A light salad with vinaigrette provides a refreshing contrast, cutting through the richness of the dessert.
- Coffee or Espresso: A warm cup of coffee complements the sweet and creamy elements of the baked apples, creating a satisfying finish.
- Pecan Pie: For dessert lovers, this classic pie adds a different texture and flavor while maintaining that cozy feel.
- Cheese Board: A selection of cheeses pairs wonderfully, mixing savory elements to create a balanced spread.
- Healthier Yogurt Topping: A dollop of Greek yogurt adds creaminess without the guilt, enhancing the dessert’s appeal.
Expert Tips for Tasty Cheesecake-Stuffed Baked Apples
- Apple Selection: Choose firm apples like Honeycrisp or Gala to ensure they hold their shape; avoid softer varieties which may become mushy.
- Room Temperature Cream Cheese: Soften cream cheese beforehand to avoid lumps in your filling; this helps achieve a creamy consistency for your tasty cheesecake-stuffed baked apples.
- Watch the Baking Time: Keep an eye on your apples; they should be tender but not falling apart. Overbaking can lead to mushiness—aim for that perfect bite!
- Customize the Filling: Feel free to switch up spices and add-ins, like dried fruits or chocolate chips, for a personalized twist that suits your taste preferences.
- Presentation Matters: Mound the cheesecake filling slightly above the rim of the apples for an appealing look; it adds to the dessert’s allure!
How to Store and Freeze Tasty Cheesecake-Stuffed Baked Apples
- Fridge: Store leftover baked apples in an airtight container for up to 3 days. This helps maintain their delightful flavor and texture for a short period.
- Freezer: Wrap individual apples in plastic wrap and place in a freezer-safe container for up to 2 months. Thaw in the fridge before reheating to ensure even warming.
- Reheating: To reheat, place thawed apples in a preheated oven at 350°F (175°C) for about 15-20 minutes or until warmed through, preserving the integrity of the dessert.
- Make-Ahead: Prepare the cheesecake filling and stuff the apples a day in advance; cover and refrigerate overnight for easy baking when you’re ready.
Tasty Cheesecake-Stuffed Baked Apples Recipe FAQs
What type of apples are best for this recipe?
Choosing the right apple is crucial for achieving the perfect baked texture. I recommend using firm varieties such as Honeycrisp or Gala. These apples hold their shape well during baking, providing a delightful contrast between the tender fruit and creamy filling.
How can I store leftover cheesecake-stuffed baked apples?
Absolutely! To keep your delicious leftovers fresh, store them in an airtight container in the refrigerator for up to 3 days. This method helps maintain the flavor and texture, ensuring that you can enjoy your Tasty Cheesecake-Stuffed Baked Apples a bit longer!
Can I freeze cheesecake-stuffed baked apples?
Yes, you can freeze these delightful treats! Wrap each stuffed apple in plastic wrap, then place them in a freezer-safe container. They’ll keep well for up to 2 months. When you’re ready to enjoy them, simply thaw in the fridge overnight, and reheat in a preheated oven at 350°F (175°C) for about 15-20 minutes until warmed through.
What should I do if my cheesecake filling has lumps?
If you find your cheesecake filling has lumps, don’t worry! To achieve a smooth mixture, ensure your cream cheese is at room temperature before mixing. If you still encounter lumps, a hand mixer can help blend everything until smooth. Just mix gently, and your filling will be ready for stuffing!
Are there any dietary considerations for this recipe?
Certainly! This recipe is naturally gluten-free, especially if you use gluten-free graham cracker crumbs. For those with nut allergies, the chopped nuts are optional and can easily be omitted. You can also swap the cream cheese with a dairy-free alternative to cater to vegan diets. Feel free to customize it as needed!

Tasty Cheesecake-Stuffed Baked Apples for Cozy Fall Nights
Ingredients
Equipment
Method
- Preheat your oven to 350°F (175°C).
- Cut off the tops of the apples and core them, then brush with lemon juice.
- Blend cream cheese, sugar, and vanilla until smooth; add spices and mix well.
- Fold in graham cracker crumbs and optional nuts into the cheesecake mixture.
- Stuff the apples with the cheesecake mixture, mounding slightly above the rim.
- Drizzle melted butter over the stuffed apples and cover with foil.
- Bake for 25-30 minutes until apples are tender, then uncover and bake for an additional 10 minutes.
- Let cool for 5-10 minutes before serving warm, optionally with whipped cream.