Advertisement
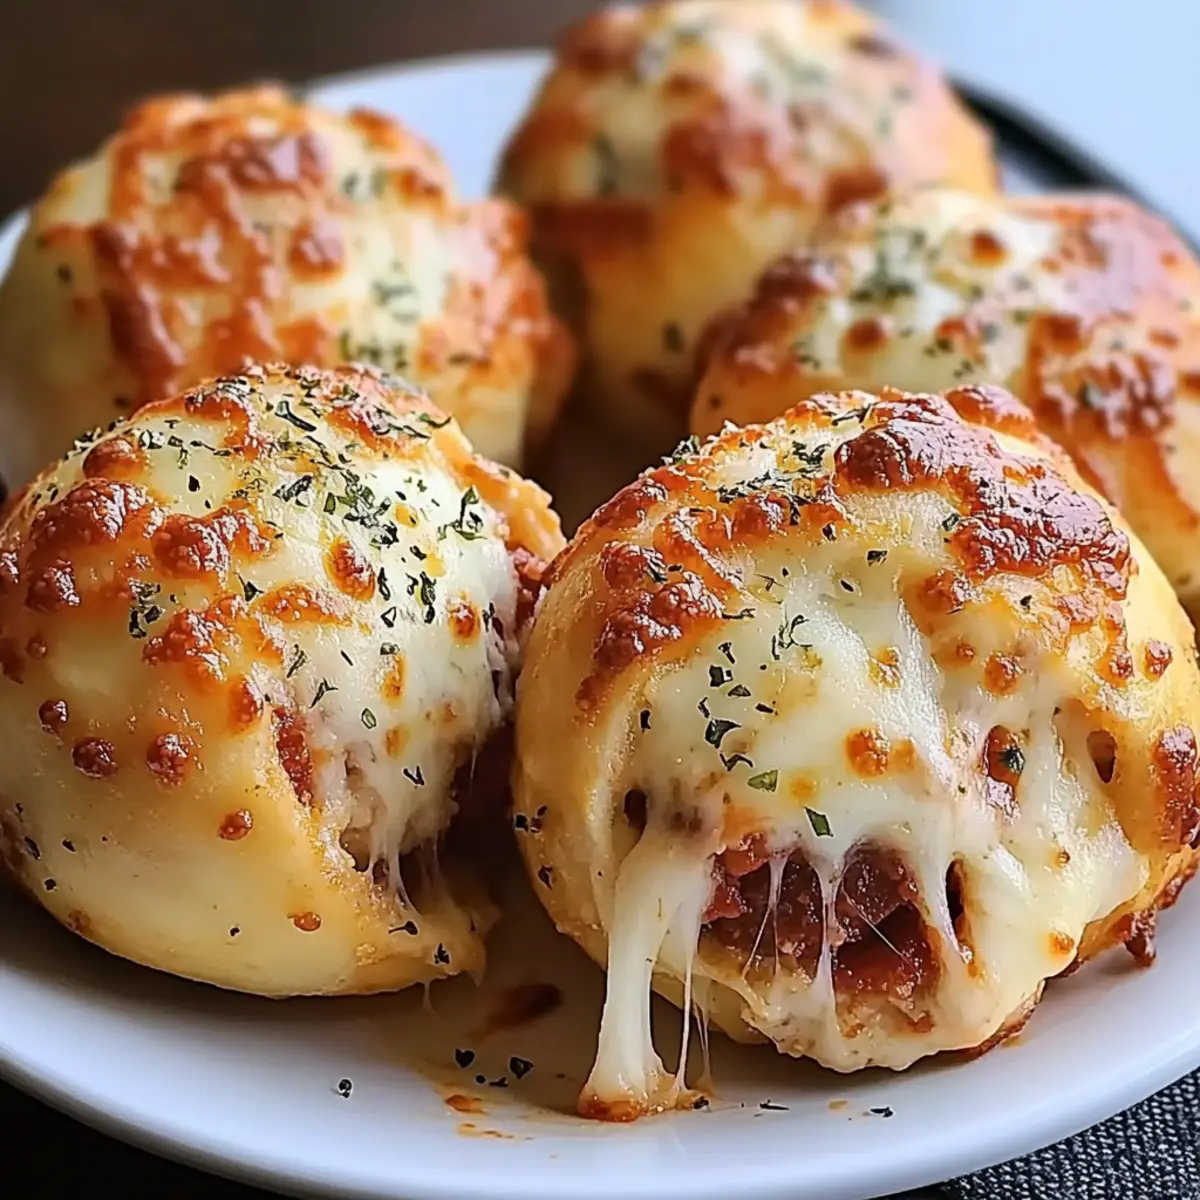
You won’t believe how quickly these cheesy Easy Pizza Bombs come together! With a crisp exterior and a gooey, savory interior, they’re not just a snack—they’re the ultimate party food that vanishes almost as fast as you can make them. Perfect for game days, laid-back family dinners, or simply indulging your cravings, this Pizza Bombs Recipe is truly a delight. Using refrigerated dough means you can whip them up in no time, making them your go-to treat for any occasion. Plus, they’re freezer-friendly, so you can always have a cheesy surprise waiting for you. Are you ready to make your kitchen the new MVP of snack time? Let’s dive into the delicious world of Pizza Bombs!

Why Are Pizza Bombs a Must-Try?
Irresistible Flavor: Each bite offers a burst of cheesy goodness, mixing gooey mozzarella with savory pepperoni and zesty pizza sauce for a party in your mouth!
Quick Preparation: They come together in a matter of minutes, making them the perfect option for those busy days when you crave something delicious without the hassle.
Advertisement
Freezer-Friendly: You can prep ahead! Freeze unbaked pizza bombs for impromptu snack sessions or game days—just bake them straight from the freezer for a last-minute treat.
Crowd-Pleasing Appeal: They’re a hit at parties and gatherings, always vanishing quickly off the platter. Pair them with homemade marinara for an extra layer of flavor.
Versatile Options: Feel free to customize your filling! Try beef or sautéed veggies to suit your taste preferences. If you love unique twists, check out my Mongolian Ground Meal for more exciting flavors!
Pizza Bombs Recipe Ingredients
For the Dough
• Refrigerated Biscuit Dough or Pizza Dough – Use 1 can (8-count) refrigerated biscuit dough or 1 lb pizza dough for an easy, flaky exterior.
For the Filling
• Mozzarella Cheese (12 pieces) – Provides melty texture; use 1-inch cubes or shredded for quick melting.
• Pepperoni (12 slices) – Adds savory flavor; can substitute with cooked sausage or mushrooms for variation.
• Pizza Sauce (1/3 cup + extra for dipping) – Moisture and flavor; use your favorite brand or homemade sauce.
For the Garlic Butter Mixture
• Melted Butter (2 tablespoons) – Enhances browning and flavor; optional to add herbs or spices to the butter for extra taste.
• Garlic Powder (1 teaspoon) – Infuses flavor; fresh garlic can be a substitute if desired.
• Dried Oregano (1/2 teaspoon) – Brings Italian flavor profile; Italian seasoning can be substituted if available.
• Salt (1/4 teaspoon) – Balances flavors; adjust to taste based on your dietary needs.
• Grated Parmesan Cheese (1/4 cup) – Adds a savory topping; can omit or replace with another hard cheese.
For the Garnish
• Fresh Parsley (for garnish, optional) – Adds color and freshness; don’t skip this for that beautiful final touch!
Step‑by‑Step Instructions for Pizza Bombs Recipe
Step 1: Preheat the Oven
Begin by preheating your oven to 375°F (190°C). This ensures a perfectly baked outer shell. While the oven heats, prepare a baking sheet by lining it with parchment paper or greasing a muffin tin to prevent sticking, making cleanup a breeze.
Step 2: Prepare the Dough
Take your refrigerated biscuit dough or pizza dough and flatten each piece into a small circle, roughly 3-4 inches in diameter. Use your hands or a rolling pin for even thickness. This will be the delightful exterior that encases your gooey filling, setting the stage for your Pizza Bombs.
Step 3: Assemble the Filling
In the center of each dough circle, add about 1 teaspoon of pizza sauce, followed by a cube or piece of mozzarella and a slice of pepperoni. Carefully fold the dough around the filling, pinching the edges together firmly. Make sure to seal each bomb tightly to prevent any delicious filling from escaping during baking.
Step 4: Brush with Garlic Butter
In a small bowl, mix together the melted butter, garlic powder, dried oregano, and salt. Using a brush, generously coat the tops of each pizza bomb with this flavorful garlic butter mixture. For an added touch, sprinkle grated Parmesan cheese over the top before they hit the oven, enhancing the savory appeal of your Pizza Bombs.
Step 5: Bake
Place the assembled Pizza Bombs on your prepared baking sheet or in the greased muffin tin, taking care to leave space between them for expansion. Bake in the preheated oven for about 15-18 minutes, or until they turn a beautiful golden brown and puff up slightly, signaling they are ready to be enjoyed.
Step 6: Cool and Serve
Once baked, remove the Pizza Bombs from the oven and allow them to cool for about 5 minutes. This brief cooling period helps the filling settle while keeping each bomb warm. Garnish with fresh parsley for a pop of color and serve them warm alongside extra pizza sauce for dipping.
What to Serve with Easy Pizza Bombs?
These cheesy bites are just the start of a delightful meal that will have everyone celebrating at the table.
-
Crispy Garden Salad: A refreshing mix of greens and veggies to balance the richness of the pizza bombs. The crunch and acidity from the dressing make it a perfect companion.
-
Garlic Breadsticks: For an extra dose of Italian flair, pair with warm garlic breadsticks. Their buttery flavor complements the savory filling like a match made in heaven.
-
Spicy Marinara Sauce: This classic dip enhances the overall flavor experience with its tangy kick. It’s great for dunking, making each bite even more irresistible.
-
Buffalo Chicken Dip: For the adventurous palates, this creamy dip matches well with the pizza bombs’ taste profile, adding a spicy zing that will excite your taste buds.
-
Roasted Veggies: The robustness of roasted veggies brings earthy flavors into the mix. Their caramelized sweetness contrasts beautifully with the melty cheese.
-
Craft Beer: A chilled craft beer can elevate the entire experience. Its effervescence cuts through the richness and pairs wonderfully with cheesy snacks.
-
Fresh Fruit Platter: For a sweet finish, offer a selection of sliced fruits. Their natural sweetness is a delightful way to cleanse the palate after indulging in savory pizza bombs.
-
Chocolate Chip Cookies: End on a sweet note with these classic treats. They balance out the savory flavors and round off your meal perfectly.
Make Ahead Options
These Easy Pizza Bombs are a fantastic choice for meal prep! You can assemble the pizza bombs up to 24 hours in advance. To do this, complete steps 1 through 3, then cover them tightly with plastic wrap and refrigerate. This keeps them from drying out and preserves their scrumptious filling. When you’re ready to enjoy, preheat your oven and simply brush them with the garlic butter mixture (step 4) and bake as directed in step 5. Not only will this save you valuable time on busy days, but it also allows you to serve fresh, warm pizza bombs that taste just as delicious as if they were freshly made!
Storage Tips for Pizza Bombs
Fridge: Store leftover pizza bombs in an airtight container for up to 3 days. Reheat in the oven at 350°F for about 5 minutes to regain that crispy texture.
Freezer: Pizza bombs can be frozen both before or after baking for up to 2 months. If unbaked, shape and freeze them on a baking sheet first before transferring to a freezer bag. Bake directly from frozen at 375°F for 20-25 minutes.
Sealing: Ensure pizza bombs are sealed tightly to prevent filling from leaking during storage. Wrap individually in plastic wrap or parchment to maintain freshness.
Reheating: For the best results, always reheat in the oven rather than the microwave; this keeps the exterior crispy while warming the cheesy filling inside.
Expert Tips for Pizza Bombs Recipe
-
Seal Tightly: Ensure the dough is well-sealed to keep the cheesy goodness inside during baking; loose edges can lead to leaks.
-
Chill the Dough: If the dough becomes sticky while handling, chill in the fridge for 10 minutes to make it easier to work with.
-
Customize Your Fillings: Experiment with different cheeses or proteins; feel free to swap pepperoni for cooked sausage or veggies to suit your palate.
-
Keep It Fresh: Assemble your pizza bombs ahead of time and store them in the fridge for up to 24 hours; just pop them in the oven when you’re ready!
-
Check Doneness: Look for a golden-brown color; if the tops are browning too fast, cover with foil to avoid burning while baking.
-
Dipping Delight: Serve with warm marinara or ranch dressing for a delicious dip that elevates the Pizza Bombs experience!
Pizza Bombs Recipe Variations & Substitutions
Feel free to get creative and make this delicious Pizza Bombs recipe your own with these fun variations!
- Meat Lovers: Substitute pepperoni for a mix of cooked sausage, ham, and bacon. Each bite becomes a hearty protein-packed delight.
- Vegetarian Delight: Use sautéed bell peppers, mushrooms, and olives in place of meat for a savory, plant-based option. This satisfying filling brings a burst of flavors with every mouthful.
- Cheesy Twist: Swap mozzarella for a blend of cheeses like cheddar and pepper jack for an extra cheesy experience with a spicy kick. Each bomb will ooze with gooey goodness!
- Spicy Kick: Add jalapeños or crushed red pepper flakes into the filling for a fiery twist. The heat elevates the flavors, catering to those who love a little spice in their snacks.
- Garlic Lovers: Mix fresh minced garlic into the melted butter for a more aromatic savory flavor. It amplifies the aroma and taste, turning the bombs into a garlic-infused treat!
- Herb-Infused: Blend fresh herbs like basil or thyme into the garlic butter for an aromatic touch. The infusion of these fresh tastes makes your pizza bombs feel even more special.
- Sweet & Savory: For a unique twist, incorporate a small dollop of barbecue sauce or sweet chili sauce alongside the traditional pizza sauce. This adds a sweet contrast to the savory elements.
- Dough Variations: Try whole wheat or gluten-free dough for a healthier twist, allowing everyone to enjoy these tasty bombs without missing out. You’ll still achieve that delightful flakiness!
As you explore these variations, don’t forget to reach for some dipping sauce! Homemade marinara pairs wonderfully, or try them alongside ranch dressing for an exciting contrast. If you’re looking for more flavorful ideas, check out my Breakfast Egg Muffins that can inspire more creative meals for your family.

Easy Pizza Bombs Recipe FAQs
What type of dough should I use?
Absolutely! You can use either refrigerated biscuit dough for a flaky texture or standard pizza dough for a more traditional base. If you’re feeling adventurous, homemade dough is also a great option!
How should I store leftover pizza bombs?
After enjoying your pizza bomb feast, store any leftovers in an airtight container in the fridge for up to 3 days. When reheating, pop them back in the oven at 350°F for around 5 minutes to restore their crispy shell. It’s like magic!
Can I freeze the pizza bombs?
Yes, you can! For best results, freeze unbaked pizza bombs. After assembling, place them on a baking sheet and freeze until solid before transferring to a freezer bag. They’ll stay good for up to 2 months. When you’re ready to bake, no need to thaw – just place them directly in a preheated oven at 375°F for about 20-25 minutes.
What if I have dietary restrictions or allergies?
Totally understand! For a gluten-free option, substitute with gluten-free dough. If you’re avoiding dairy, use non-dairy cheese alternatives or skip the cheese altogether and load them with your favorite veggies. Always double-check labels for any specific allergies!
How do I know if my pizza bombs are done?
You want to look for a beautiful golden-brown color on the outside, and they should puff up slightly. If they’re browning too quickly, don’t hesitate to cover them with foil for the last few minutes. Your taste buds will thank you!

Cheesy Pizza Bombs Recipe for Everyone's Snack Cravings
Ingredients
Equipment
Method
- Preheat your oven to 375°F (190°C) and prepare a baking sheet with parchment paper or grease a muffin tin.
- Flatten each piece of refrigerated biscuit dough or pizza dough into small circles, about 3-4 inches in diameter.
- In the center of each dough circle, add about 1 teaspoon of pizza sauce, a cube of mozzarella, and a slice of pepperoni, then fold and seal tightly.
- Mix melted butter, garlic powder, dried oregano, and salt in a bowl, then brush this mixture on each pizza bomb and sprinkle with Parmesan cheese.
- Bake in the preheated oven for 15-18 minutes until golden brown.
- Cool for 5 minutes before serving with extra pizza sauce for dipping.